EXSYS EX-1332V Manual
EXSYS
Ikke kategoriseret
EX-1332V

| Mærke: | EXSYS |
| Kategori: | Ikke kategoriseret |
| Model: | EX-1332V |
| Bredde: | 150 mm |
| Dybde: | 70 mm |
| Højde: | 30 mm |
| Vægt: | 360 g |
| Produktfarve: | Grå |
| Relativ luftfugtighed ved drift (H-H): | 5 - 95 % |
| Driftstemperatur (T-T): | 0 - 55 °C |
| Kabler inkluderet: | USB |
| Forbindelsesteknologi: | Ledningsført |
| Certificering: | CE, FC, ROHS |
| Kabellængde: | 2 m |
| Mac kompabilitet: | Ja |
| Kompatible operativsystemer: | Win 98SE, ME, 2000, Server 2003, XP, Vista\nLinux\nMac OS |
| Værtsgrænseflade: | PCI |
| Plug and play: | Ja |
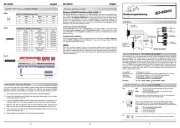
| I/O-porte: | 1x B-female\n2x 9-pin D-SUB serial male |
| Understøttede protokoller: | TxD, RxD, RTS, CTS, DTR, DSR, DCD, GND |
| Antal serielle porte: | 2 |
| Dataoverførselshastighed: | 0.1 Mbit/s |
| Porte, antal: | 2 |
| Chipsæt: | FTDI |
Har du brug for hjælp?
Hvis du har brug for hjælp til EXSYS EX-1332V stil et spørgsmål nedenfor, og andre brugere vil svare dig
Ikke kategoriseret EXSYS Manualer
23 September 2025
23 September 2025
24 Juli 2025
24 Juli 2025
24 Juli 2025
24 Juli 2025
23 Juli 2025
23 Juli 2025
23 Juli 2025
23 Juli 2025
Ikke kategoriseret Manualer
- Etna
- Röhm
- DPM
- Avanti
- Columbus
- AVer
- ELAC
- Sram
- Ford
- Steelplay
- Noxon
- Life Finds
- Manfrotto
- Blizzard
- Feit Electric
Nyeste Ikke kategoriseret Manualer
5 November 2025
5 November 2025

5 November 2025

5 November 2025

5 November 2025

5 November 2025
5 November 2025
5 November 2025

5 November 2025

5 November 2025