EXSYS EX-16415 Manual
EXSYS
Ikke kategoriseret
EX-16415

| Mærke: | EXSYS |
| Kategori: | Ikke kategoriseret |
| Model: | EX-16415 |
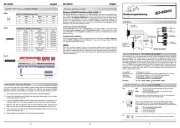
| Bredde: | 65 mm |
| Dybde: | 67 mm |
| Vægt: | 250 g |
| Relativ luftfugtighed ved drift (H-H): | 5 - 95 % |
| Driftstemperatur (T-T): | 0 - 55 °C |
| Forbindelsesteknologi: | Ledningsført |
| Certificering: | CE, FCC, RoHS |
| Platform: | PC |
| Kompatible operativsystemer: | Windows 98SE/ME/2000/XP/Vista |
| Værtsgrænseflade: | PCIe |
| I/O-porte: | 3x Ext. FireWire\n1x Int. FireWire |
| Dataoverførselshastighed: | 800 Mbit/s |
| FireWire-porte (IEEE 1394): | 4 |
Har du brug for hjælp?
Hvis du har brug for hjælp til EXSYS EX-16415 stil et spørgsmål nedenfor, og andre brugere vil svare dig
Ikke kategoriseret EXSYS Manualer
23 September 2025
23 September 2025
24 Juli 2025
24 Juli 2025
24 Juli 2025
24 Juli 2025
23 Juli 2025
23 Juli 2025
23 Juli 2025
23 Juli 2025
Ikke kategoriseret Manualer
- Carrera
- Shuttle
- Delamu
- Newline
- Comprehensive
- Aqua Marina
- Labpano
- Gill
- Valueline
- Singular Sound
- Graff
- Yealink
- Media-Tech
- Fiskars
- BENNING
Nyeste Ikke kategoriseret Manualer

2 November 2025

2 November 2025

2 November 2025

2 November 2025

2 November 2025

2 November 2025

2 November 2025

2 November 2025

2 November 2025

2 November 2025