Kramer VS-21DTP Manual

Kramer Skifte VS-21DTP

Læs gratis den danske manual til Kramer VS-21DTP (2 sider) i kategorien Skifte. Denne vejledning er vurderet som hjælpsom af 47 personer og har en gennemsnitlig bedømmelse på 4.5 stjerner ud af 24 anmeldelser. Har du et spørgsmål om Kramer VS-21DTP, eller vil du spørge andre brugere om produktet?

Side 1/2
VS-21DTP Quick Start
P/N:
2900- 300924QS
Rev:
2
Scan for full manual
This guide helps you install and use your VS-21DTP for the rst time.
Go to www.kramerav.com/downloads/VS-21DTP to download the latest user manual and check if firmware
upgrades are available.
Step 1: Check in the b what’s ox
VS-21DTP 2xHDMI to HDBT Standby
Switcher/POE
1 Bracket set
4 Rubber feet
1 Power adapter and cord
1 Quick start guide
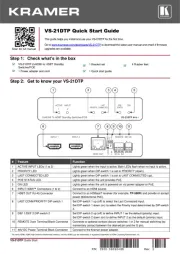
Step 2: Get to know your -21DTP VS
#
Feature
Function
1
ACTIVE INPUT LEDs (1 to 2)
Lights green when the input active. Both LEDs ash when no input is active. is
2
PRIORITY LED
Lights green when DIP-switch 1 is set to PRIORITY (down).
3
LAST CONNECTED LED
Lights green when DIP-switch 1 is set to LAST CONNECTED (up).
4
POE STATUS LED
Lights green when the unit provides PoE.
5
ON LED
Lights green when the unit is powered on via power adapter or PoE.
6
INPUT HDMI Connectors (1 to 2)
Connect to an HDMI source.
7
HDBT OUT RJ-45 Connector
Connect to an HDBaseT receiver (for example, ) and provide or accept TP-580R
power (bidirectional PoE).
8
LAST CONN/PRIORITY DIP-switch 1
Set DIP-switch 1 up (o) to select the Last Connected input.
Set DIP-switch 1 down (on) to select the Priority input determined by DIP-switch
2.
9
DEF 1/DEF 2 DIP-switch 2
Set DIP-switch 2 up (o) to dene INPUT 1 as the default (priority) input.
Set DIP-switch 2 down (on) to dene INPUT 2 as the default (priority) input.
10
REMOTE 3-pin Terminal Block Connector
Connects to optional contact closure switches 1 or 2 for manual switching (by
momentary contact between the desired pin and the G pin).
11
48V DC Power Terminal Block Connector
Connect to the Kramer power adapter.
The terms HDMI, HDMI High-Denition Multimedia Interface, and the HDMI Logo are trademarks or registered trademarks of HDMI Licensing Administrator, Inc.
Step 3: Mount -21DTP VS
Install using one of the following methods: VS-21DTP
Attach the rubber feet and place the unit on a at surface.
Fasten a bracket (included) on each side of the unit and attach it to a at surface
(see www.kramerav.com/downloads/VS-21DTP).
Mount the unit in a rack using the recommended rack adapter
(see www.kramerav.com/product/VS-21DTP).
Ensure that the environment (e.g., maximum ambient temperature &
air ow) is compatible for the device.
Avoid uneven mechanical loading.
Appropriate consideration of equipment nameplate ratings should be
used for avoiding overloading of the circuits.
Reliable earthing of rack-mounted equipment should be maintained.
Step 4: Connect inputs and outputs
Always switch OFF the power on each device before connecting it to your . VS-21DTP
DIP-switches Setup:
A switch that is down is on; a switch that is up is o. By default, both switches are up (o).
Video Switching Selection:
DIP-switch 1
DIP-switch 2
Video Input Selection
PRIORITY (down)
DEF 1 (up)
INPUT 1 is the default priority setup and is automatically switched to the output.
DEF 2 (down)
INPUT 2 is the default priority setup and is automatically switched to the output.
LAST CONNECTED (up)
N/A
The last connected source is switched to the output (a reactivated or
reconnected source becomes the new “Last Connected” source).
Contact Closure Switches (Manual Override):
Controlling via the remote contact closure pushbuttons overrides all DIP-switch settings and automatic switching until the
manually selected source disconnects, becomes inactive or the is powered o.VS-21DTP
Select INPUT 1
Momentarily connect REMOTE IN 1 to PIN G (ground).
Select INPUT 2
Momentarily connect REMOTE IN 2 to PIN G (ground).
To achieve specied extension distances, use the recommended Kramer cables available at www.kramerav.com/product/VS-21DTP.
Using third-party cables may cause damage!
Step 5: Connect power
Connect the power cord to and plug it into the mains electricity. VS-21DTP
Safety Instructions (See for updated safety information)www.kramerav.com
Caution:
For products with relay terminals and GPI\O ports, please refer to the permitted rating for an external connection, located next to the terminal or in the User Manual.
There are no operator serviceable parts inside the unit.
Warning:
Use only the power cord that is supplied with the unit.
Disconnect the power and unplug the unit from the wall before installing.
Do not open the unit. High voltages can cause electrical shock! Servicing by qualied personnel only.
To ensure continuous risk protection, replace fuses only according to the rating specied on the product label which located on the bottom of the unit.


Produkt Specifikationer

Mærke: Kramer
Kategori: Skifte
Model: VS-21DTP

Har du brug for hjælp?

Hvis du har brug for hjælp til Kramer VS-21DTP stil et spørgsmål nedenfor, og andre brugere vil svare dig


Skifte Kramer Manualer

Kramer

Kramer AFM-20DSP Manual

1 Februar 2025
Kramer

Kramer VS-48UHD Manual

11 Januar 2025
Kramer

Kramer VS-21DTP Manual

19 December 2024
Kramer

Kramer VP-427UHD Manual

19 December 2024
Kramer

Kramer WP-211X Manual

19 December 2024
Kramer

Kramer KIT-500 Manual

19 December 2024
Kramer

Kramer VP-461 Manual

19 December 2024
Kramer

Kramer VP-774A Manual

18 December 2024
Kramer

Kramer VS-8UFX Manual

24 August 2024
Kramer

Kramer VS-44H2A Manual

19 August 2024

Skifte Manualer

Nyeste Skifte Manualer