Muse M-610 SH Manual

Muse Hi-Fi system M-610 SH

Læs gratis den danske manual til Muse M-610 SH (2 sider) i kategorien Hi-Fi system. Denne vejledning er vurderet som hjælpsom af 2 personer og har en gennemsnitlig bedømmelse på 3.7 stjerner ud af 1.5 anmeldelser. Har du et spørgsmål om Muse M-610 SH, eller vil du spørge andre brugere om produktet?

Side 1/2
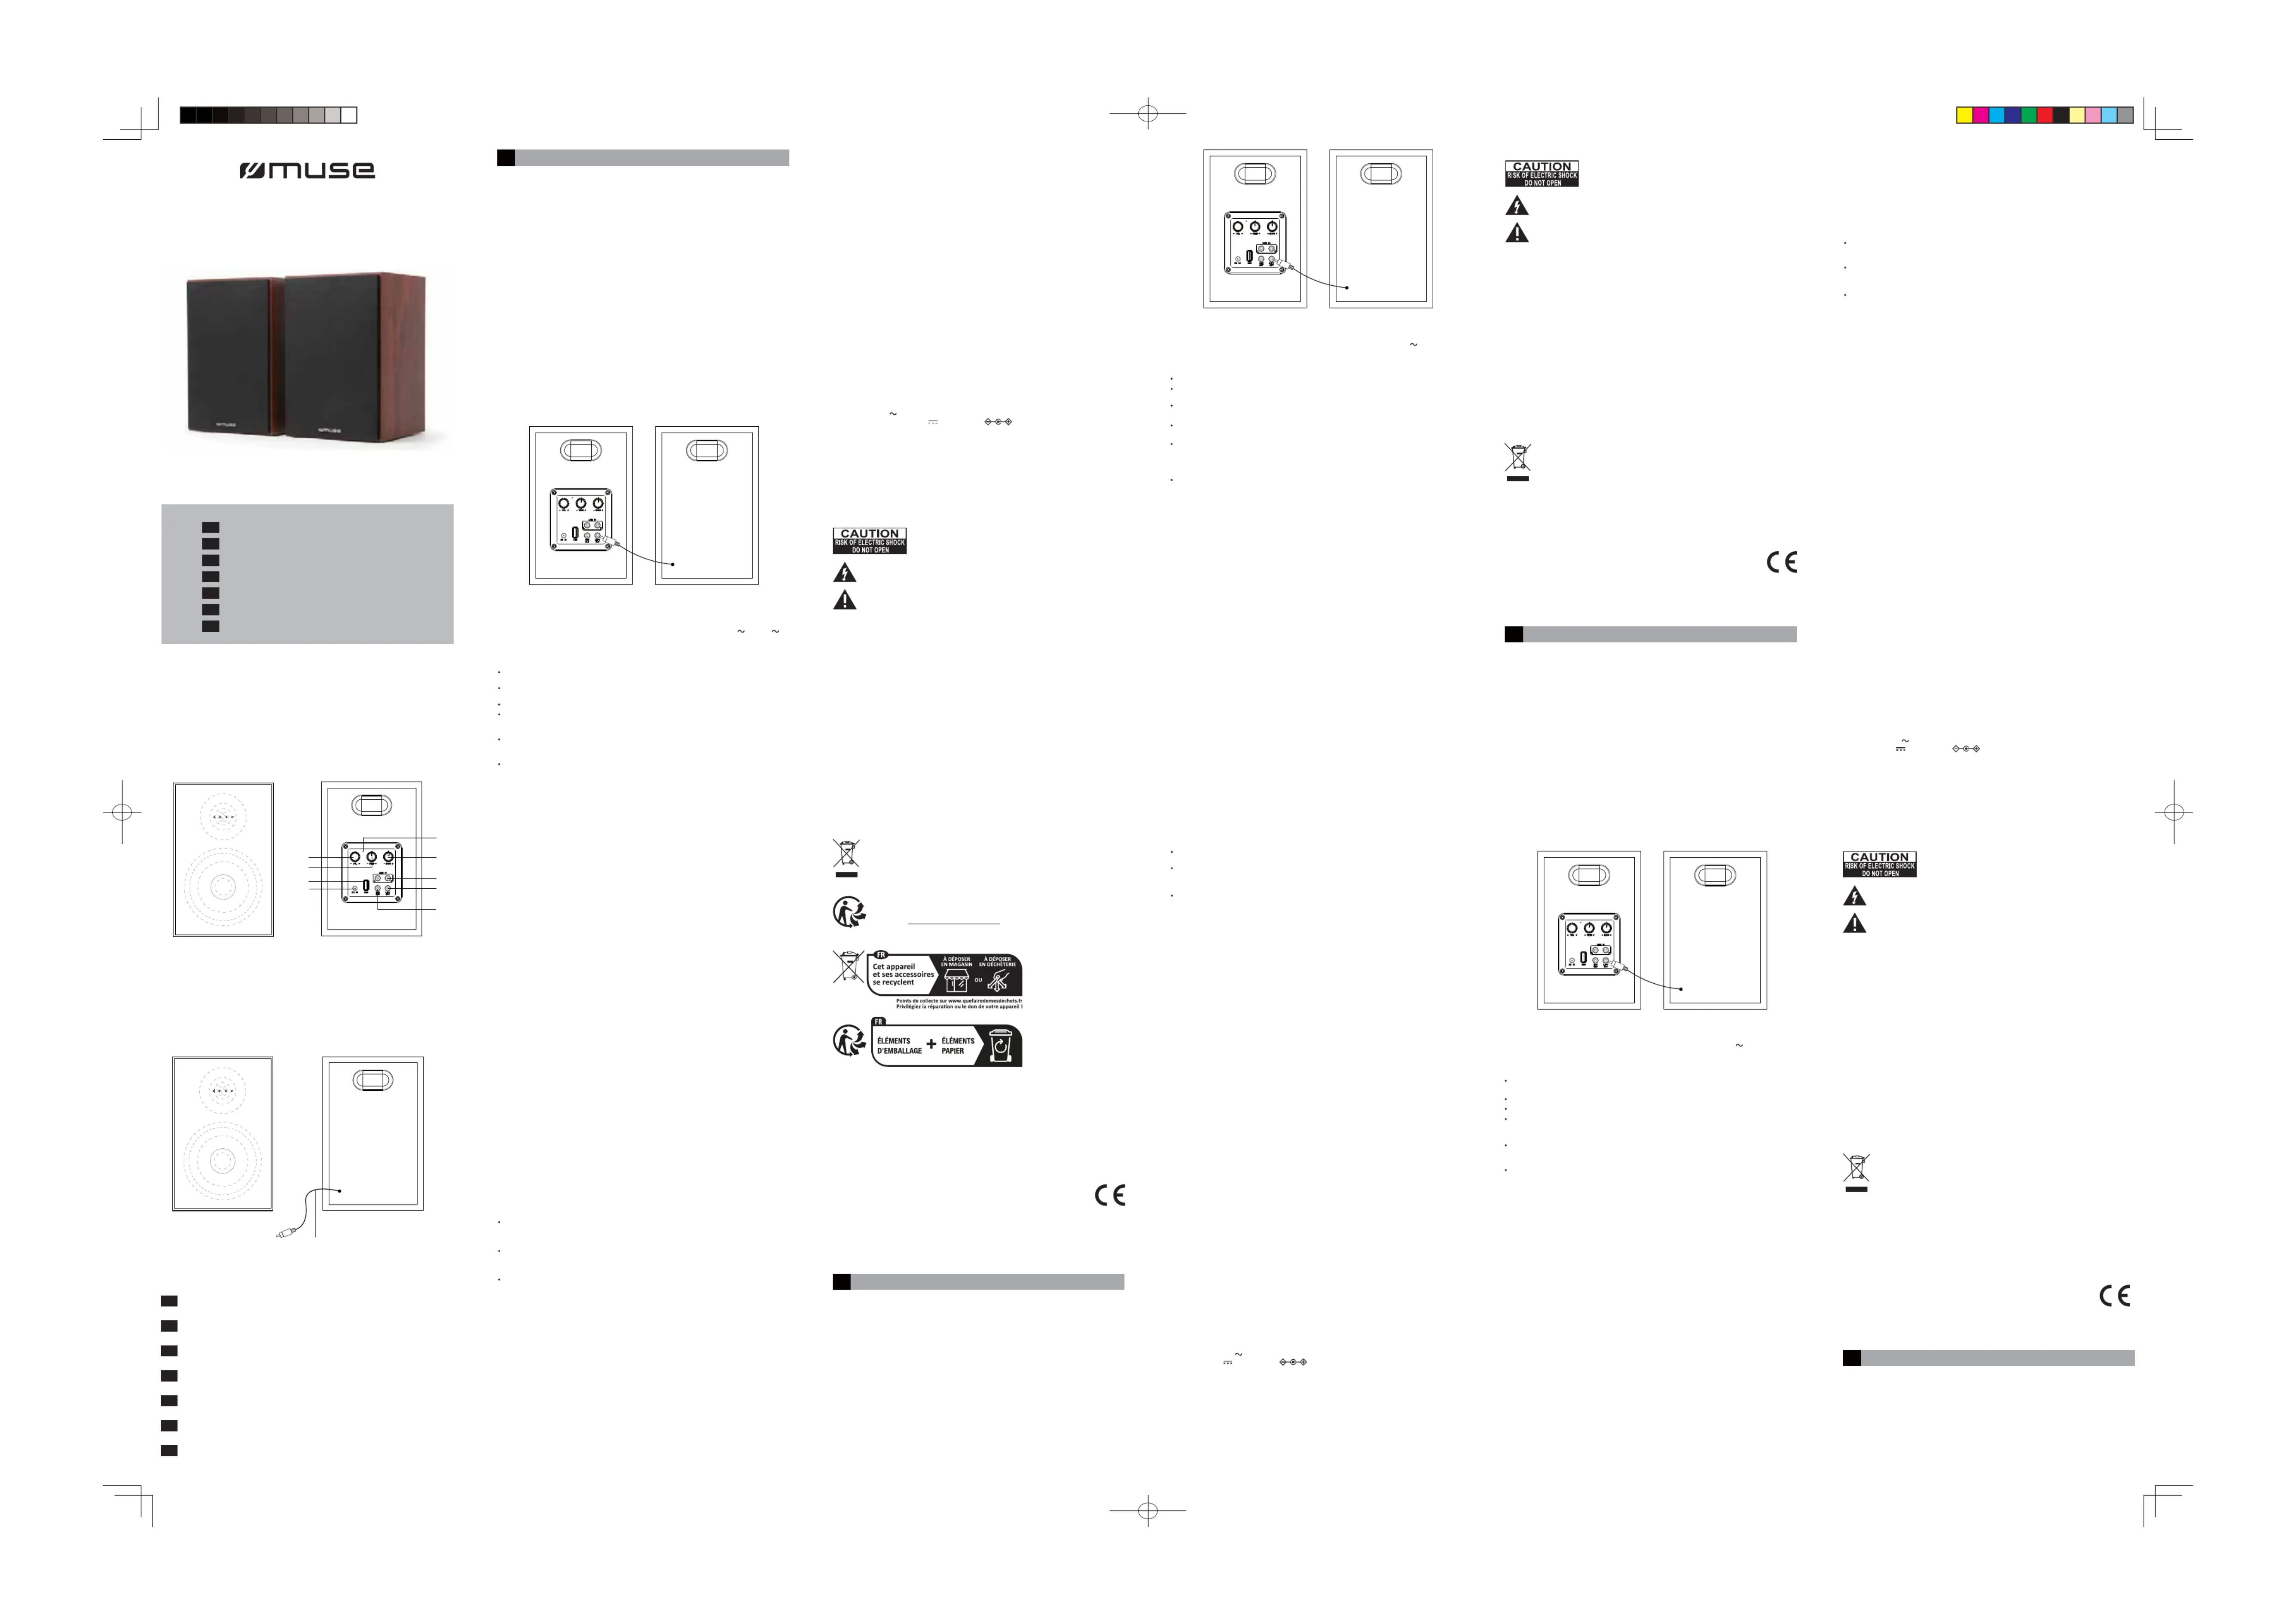
DESCRIPTION DE L’APPAREIL
ACCESSOIRES
ENCEINTES BIBLIOTHEQUE AVEC BLUETOOTHFR
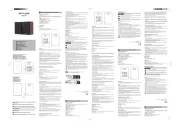
1. Indicateur de fonction LED
2. VOL+/-: Tournez le bouton pour régler le volume ; appuyez brièvement pour sélectionner le
mode de votre choix : Bluetooth, Aux ou USB ; Appuyez longuement pour allumer/éteindre
l'appareil.
3. TREB+/-: pour régler le niveau des aigus.
5. Prises RCA LINE IN L/R
6. Prise LEFT OUT (sortie audio du haut-parleur gauche)
7. Prise SUB OUT (sortie caisson de basses)
8. Port pour la lecture MP3USB
9. Prise dalimentation CC (DC IN)
10. Câble de connexion du haut-parleur
Adaptateur Secteur x1
Câble RCA x1
CONNEXION DES HAUT-PARLEURS
Connectez le câble du haut-parleur à la prise de l'unité principale.LEFT OUT
ALIMENTATION
L'adaptateur secteur fonctionne sur une alimentation AC comprise entre 100 V et 240 V .
Ladaptateur secteur fourni ne peut en aucun cas être utilisé sur un autre type dalimentation.
MISE EN MARCHE ET ARRET DE L’APPAREIL
Appuyez longuement sur pour allumer/éteindre l'appareil.VOL
FONCTION BLUETOOTH
Le mot Bluetooth® ainsi que les marques et logo sont des marques commerciales déposées
détenues par Bluetooth SIG, Inc. et l'utilisation de ces marques par New One S.A.S se fait dans
le cadre d'une autorisation. Les autres marques et noms commerciaux sont les propriétés de
leurs titulaires respectifs.
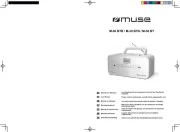
CONNEXION AVEC UN APPAREIL EXTERNE
Vers la sortie caisson de basses
Utilisez un câble audio (non fourni) pour connecter l'unité à la prise d'entrée audio de
votre caisson de basses.
Coupler un appareil Bluetooth
Utiliser un appareil Bluetooth
1. Lorsque l'appareil est ALLUMÉ, appuyez plusieurs fois sur la touche jusqu'à ce que le VOL
voyant LED de fonction devienne bleu.
2. Le voyant LED de fonction clignotera rapidement indiquant que lappareil est en mode de
couplage.
3. Sur l'appareil Bluetooth, activez le Bluetooth et sélectionnez « MUSE M-610 SH» dans la liste
des appareils. (consultez le manuel d'instruction de l'appareil pour les détails de connexion).
Si l'appareil Bluetooth vous demande un mot de passe, utilisez '0000'. Certains appareils
Bluetooth vous demanderont d'accepter la connexion. Vous entendrez un signal sonore une
fois le couplage effectué Le voyant LED de fonction clignotera lentement.
Astuces : Si vous souhaitez connecter votre haut-parleur Bluetooth à un autre périphérique
audio Bluetooth, déconnectez manuellement la connexion Bluetooth sur le périphérique, puis
suivez les étapes ci-dessus pour établir une nouvelle connexion.
1. Avec une unité couplée, (voir la section précédente), faites fonctionner votre appareil
Bluetooth et il diffusera du son par le biais de l'enceinte M-610 SH.
2. Sélectionnez la piste de votre choix sur l'appareil sur lequel vous êtes couplé.
3. Réglez le volume à l'aide de la commande
VOL. Vous pouvez également régler le volume sur
l'appareil avec lequel vous êtes couplé.
Remarque : le voyant LED de fonction restera allumé pendant la lecture.
Par la présente, NEW ONE S.A.S déclare que l'appareil "MUSE M-610 SH" est conforme aux
exigences essentielles et autres dispositions pertinentes de la directive 2014/53/EU. La
déclaration de conformité peut être consultée sur le site www.muse-europe.com
CHOIX DE LA FONCTION
Lorsque l'appareil est allumé, appuyez plusieurs fois sur la touche pour sélectionner le VOL
mode de votre choix : Bluetooth, Aux ou USB.
Rouge : Veille
Signification de la couleur du voyant LED de fonction pour les différents modes :
Dans un souci d'économie d'énergie, à la fin de la lecture ou bien encore si le volume d'écoute
est réglé à un niveau très bas et quaucune opération n'est effectuée sur l'appareil pendant une
période de 15 minutes celui ci se mettra automatiquement en mode veille.
Avertissements
Ladaptateur secteur fourni est exclusivement destiné à être utilisé avec cet appareil.
Ne lutilisez donc pas avec dautres appareils.
Afin déviter dabîmer lappareil, éteignez-le avant de débrancher ladaptateur secteur de
lappareil.
En cas de non-utilisation prolongée, débranchez ladaptateur secteur de la prise murale.
Veillez à ce que la prise secteur se trouve à proximité et soit facilement accessible. En
cas de disfonctionnement, débranchez immédiatement la fiche dalimentation de la prise
secteur.
Ladaptateur secteur permet de débrancher lappareil. Il doit rester facilement
accessible durant lutilisation. Pour couper complètement lalimentation de lappareil,
débranchez ladaptateur de la prise secteur.
Nutilisez pas ladaptateur secteur sil est abîmé. Placez les câbles de manière sûre
et veillez à ce quils ne soient ni coincés, ni pincés. Si le câble dalimentation est abîmé,
contactez un technicien qualié.
Sur certains appareils, comme les ordinateurs, une fois couplé, vous devrez sélectionner
l'unité dans le menu Bluetooth et choisir « utiliser comme un dispositif audio (Stéréo) » ou une
phrase similaire.
Le couplage reste intact lorsque lunité et/ou lappareil Bluetooth sont amenés hors de la
portée de liaison. Une connexion active sera rétablie lorsque votre appareil Bluetooth
reviendra dans la portée.
Lorsque vous rallumez l'unité, elle essayera automatiquement de se reconnecter avec le
dernier appareil Bluetooth connecté.
Bleu : Bluetooth
Jaune : AUX (entrée Line in)
- Une fois le périphérique USB inséré dans le port USB de l'appareil, il passera
automatiquement en mode USB.
Remarques:
- Le mode USB peut être sélectionné à l'aide de la touche
VOL uniquement
lorsquun appareil USB est connecté à l'appareil.
Violet : USB
M-610 SH
UNITÉ PRINCIPALE (HAUT-PARLEUR ACTIF)
MAIN UNIT (ACTIVE SPEAKER)
UNIDADE PRINCIPAL (COLUNA ATIVA)
HAUPTGERÄT (AKTIVER LAUTSPRECHER)
UNIDAD PRINCIPAL (ALTAVOZ ACTIVO)
UNITÀ PRINCIPALE (ALTOPARLANTE ATTIVO)
HOOFDEENHEID (ACTIEVE LUIDSPREKER)
HAUT-PARLEUR PASSIF
PASSIVE SPEAKER
COLUNA PASSIVA
PASSIVER LAUTSPRECHER
ALTAVOZ PASIVO
ALTOPARLANTE PASSIVO
PASSIEVE LUIDSPREKER
FR
Manuel de l’utilisateur
GB
User Manual
PT
Manual do Utilizador
Benutzerhandbuch
DE
ES
Manual de instrucciones
Manuale
IT
NL
Handleiding
FR
Lire attentivement les instructions avant de faire fonctionner
l’appareil.
Read the instructions carefully before operating the unit.
Leia este manual com atenção antes de qualquer utilização.
Bitte lesen sie dieses handbuch vor dem gebrauch des gerätes
sorgfältig durch.
Antes de utilizar este aparato, lea atentamente las siguientes
instrucciones
Leggete attentamente il manuale prima dell’uso.
Lees deze handleiding aandachtig voor u het toestel gebruikt.
GB
PT
DE
ES
IT
NL
1
4
5
6
7
10
8
9
2
3
Puissance de sortie : CC 21.0V
Version Bluetooth: V5.3
Bluetooth:2.402-2.480GHz
1.5A 31.5W
BLUETOOTH
Vers les prises LINE IN RCA
LECTURE USB
FICHE TECHNIQUE
ALIMENTATION
1. Connectez votre appareil auxiliaire (ex : lecteur DVD) sur les prises à l'arrière de LINE IN L/R
l'unité avec un câble audio RCA .
2. Lorsque l'appareil est allumé, appuyez plusieurs fois sur
VOL jusqu'à ce que le voyant LED de
fonction devienne jaune. L'appareil passe en mode AUX.
3. Commencez la lecture de votre source auxiliaire.
4. Réglez le volume au niveau souhaité.
5. Pour arrêter la lecture, déconnectez votre source auxiliaire des prises
LINE IN L/R.
Connectez un appareil USB sur le port USB de l'unité. L'appareil passe en mode USB et la
lecture commence automatiquement. Le voyant LED de fonction deviendra violet.
Adaptateur secteur
Entrée : 100-240V 50/60Hz
Remarques :
- Le mode USB peut être sélectionné à l'aide de la touche
VOL uniquement lorsquun appareil
USB est connecté à l'appareil.
- Le nombre total de fichiers MP3 sur l'appareil USB ne doit pas dépasser 999.
- L'appareil USB ne peut pas contenir plus de 99 répertoires.
- La durée de lecture prend quelques secondes ou plus en fonction de la quantité de fichiers
MP3 et de dossiers USB sur l'appareil.
- Ninsérez rien dautre quun périphérique USB dans le port prévu à cet effet. Vous risqueriez
dabîmer lappareil.
- Le port USB ne doit pas être directement connecté à un ordinateur : cela pourrait endommager
lappareil.
- Il existe sur le marché de nombreux modèles de clefs USB. Nous ne pouvons garantir une
compatibilité avec tous les formats. Merci dutiliser un autre périphérique USB si le vôtre ne
fonctionne pas.
Distance de fonctionnement : Jusqu'à 10 mètres mesurés en espace ouvert (les murs et les
structures peuvent affecter la portée de l'appareil)
Les caractéristiques et les spécifications sont sujettes à modification sans préavis.
CONSIGNES DE SÉCURITÉ
ATTENTION: pour réduire le risque de choc électrique,ne démontez
pas lappareil. Lappareil ne contient aucune pièce réparable par
lutilisateur. Confiez tout entretien à un technicien qualifié.
Le symbole de l'éclair terminé par une flèche à l'intérieur d'un triangle avertit l'utilisateur
de la présence dune « tension dangereuse » dans l'appareil.
Le point dexclamation à lintérieur dun triangle avertit lutilisateur de la présence
dimportantes instructions dans le manuel accompagnant lappareil.
Si vous souhaitez vous débarrasser de cet appareil, pensez à le recycler dans une
décharge pour appareils ménagers électriques. Renseignez-vous pour connaître votre
centre de recyclage le plus proche. Informez-vous auprès des autorités locales ou de
votre revendeur pour de plus amples détails. (Directive sur les Déchets des
équipements électriques et électroniques)
AVERTISSEMENT : POUR PRÉVENIR TOUT RISQUE DINCENDIE OU DE CHOC
ÉLECTRIQUE, N’EXPOSEZ PAS CET APPAREIL À LA PLUIE OU À LHUMIDI.
La plaque de précaution est située à larrière de lappareil.
IMPORTANT
- Utilisez cet appareil sous un climat tempéré.
- La plaque signalétique se trouve à larrière de cet appareil.
- Veiller à avoir une distance minimale de 5 cm autour de l'appareil pour une aération suffisante
et que la ventilation ne soit pas gênée en recouvrant les orifices d'aération de l'appareil avec
des objets tels que journaux, nappes, rideaux..
- Ne placez pas de sources de flammes nues, telles que des bougies allumées sur l'appareil.
- Ne pas exposer l'appareil à des gouttes d'eau ou éclaboussures.
- Ne placez pas d'objets remplis de liquides, tels que verre, vase ou objets similaires sur
l'appareil.
- Ladaptateur secteur permet de débrancher lappareil. Il doit rester facilement accessible
durant lutilisation. Pour couper complètement lalimentation de lappareil, débranchez
ladaptateur de la prise secteur.
- Sous l'influence du phénomène transitoire rapide et / ou phénomène électrostatique électrique,
le produit pourrait présenter des dysfonctionnements et l'utilisateur devra faire une
réinitialisation de l'appareil.
- Le fonctionnement normal du produit peut être perturbé par de fortes interférences
électromagnétiques. Si tel est le cas, il suffit de réinitialiser le produit pour qu'il reprenne son
fonctionnement normal en suivant le manuel d'instructions. Si le fonctionnement ne revient
toujours pas à la normale, veuillez déplacer et utiliser le produit dans un endroit offrant une
meilleure réception.
Nos emballages peuvent faire lobjet dune consigne de tri, pour en
savoir plus: www.quefairedemesdechets.fr
10, Rue de la Mission, 25480 Ecole Valentin, France
NEW ONE S.A.S
contact@muse-europe.com
SHELF SPEAKER WITH BLUETOOTHGB
1. Function LED indicator
2. VOL+/-: Rotate to adjust volume; short press to select desired function mode: Bluetooth, Aux
or USB; Long press to turn on/o the unit.
3. TREB+/-: To adjust the treble level.
4. BASS+/-:To adjust the bass level.
5. LINE IN L/R jacks
6. LEFT OUT jack (left speaker audio output)
7. SUB OUT jack (subwoofer output)
8. USB port allowing MP3 playback
9. DC IN jack
10. Speaker connection cable
ACCESSORIES
AC adaptor x1
SPEAKER CONNECTION
LOCATION OF CONTROLS
Connect the speaker cable to the jack on main unit.LEFT OUT
RCA cable x1
Puissance de sortie des RF (fréquences radios): 4.75 dBm
SAFETY INSTRUCTIONS
CAUTION: To reduce the risk of electric shock, do not remove the cover
(or back). There are no user serviceable parts inside the unit. Refer all
servicing to qualify personnel.
The lightening flash with arrowhead symbol within the triangle is a warning sign alerting
the user of dangerous voltage inside the unit.
The exclamation point within the triangle is a warning sign alerting the user of important
instructions accompanying the product.
WARNING: TO PREVENT FIRE OR SHOCK HAZARD, DO NOT EXPOSE THIS APPLIANCE TO RAIN OR
MOISTURE.
The Caution mark is located at the back of the device.
- The USB socket must not be connected to the computer directly, for that may damage the unit.
- There are many USB devices in the market. We cannot guarantee to support all different
models. Please try another USB device if your device is not supported.
Output DC 21.0V
1.5A 31.5W
Working Distance: Up to 10 meters measured in open space (wall and structures may affect
range of device)
Specifications are subject to change without notice.
Bluetooth Version: V5.3
Bluetooth:2.402-2.480GHz
RF Output Power: 4.75dBm
BLUETOOTH
TECHNICAL SPECIFICATION
POWER SUPPLY:
AC ADAPTOR:
Input: AC : 100-240V 50/60Hz
POWER SUPPLY
The supplied AC adaptor is suitable for use on AC mains supplies of 100-240V 50/60Hz and
should only be connected to a mains supply within these parameters.
TURNING UNIT ON/OFF
Long press VOL to turn on/o the unit.
SELECTING FUNCTION
When the unit is on, press button repeatedly to select desired mode: Bluetooth, Aux or VOL
USB.
Never use an AC adaptor that is damaged, route power lead in a safe manner and make sure it
is not subjected to trapping or pinching. If the power lead is damaged refer to a qualified service
agent.
In a concern of saving energy, when playback has reached to the end or listening volume is set
at a very low level and no control is operated on the device for a period of 15 minutes, the unit
will automatically switch to Standby mode.
Cautions:
The AC adaptor included with this unit is for its use only. Do not use it with other equipment.
Turn o the unit before unplugging the AC adaptor from the unit so as to avoid the unit being
damaged.
When the unit is not going to be used for long time, disconnect the AC adaptor from the AC
outlet.
Be sure to use it near the wall outlet and easily accessible. If a malfunction occurs, disconnect
the plug from the wall outlet at once.
AC adaptor is used as the disconnect device. It shall remain readily operable and should not be
obstructed during intended use. To be completely disconnected the apparatus from supply
mains, the AC adaptor of the apparatus shall be disconnected from the mains socket outlet
completely.
BLUETOOTH FUNCTION
The Bluetooth® word mark and logos are registered trademarks owned by Bluetooth SIG, Inc.
and any use of such marks by New One S.A.S is under license. Other trademarks and trade
names are those of their respective owners.
CONNECTING WITH EXTERNAL DEVICES
To subwoofer out jack
To LINE IN RCA jacks
USB PLAYBACK
Pairing a Bluetooth Device
Using a Bluetooth Device
1. When the unit is ON, press VOL button repeatedly until the function LED indicator becomes
blue. The function LED indicator will blink fast indicating its in pairing mode.
2. On the Bluetooth device, enable Bluetooth and select MUSE M-610 SH from the Device List.
(Refer to the user manual of the device to be connected for detailed operations.) If the
Bluetooth device prompts for a pass code, use 0000. Some Bluetooth devices will ask you to
accept the connection. You will hear an indication sound when pairing is successful. The
function LED indicator will blink slowly.
Tips: If you want to connect your Bluetooth speaker to another Bluetooth audio device, you need
to disconnect current device first and follow the steps above to make a new connection.
1. With a unit paired (see previous section), operate your Bluetooth device and its sound will be
heard through the M-610 SHs speakers.
2. Select your desired track on the device which you are paired.
3. Adjust the volume by the
VOL control. You can also adjust the volume on the device to which
you are paired.
Note: The function LED indicator will stay lit during playback.
In a concern of saving energy, when playback has reached to the end or listening volume is set
at a very low level and no control is operated on the device for a period of 15 minutes, the unit
will automatically switch to Standby mode.
Hereby, NEW ONE S.A.S, declares that this MUSE M-610 SH is in compliance with the
essential requirements and other relevant provisions of Directive 2014/53/EU. The declaration
of conformity may be consulted at www.muse-europe.com
1. Connect your auxiliary source (e.g. DVD player) to the
LINE IN L/R jacks on back of unit with
RCA audio cable.
2. When the unit is on, press
VOL repeatedly until the function LED indicator becomes yellow.
The unit is switched to AUX mode.
3. Start playback from your auxiliary source.
4. Adjust the volume to desired level.
5. To stop playback, disconnect your auxiliary source from the
LINE IN L/R jacks.
Use the audio cable (not included) to connect the unit to the audio input jack on your subwoofer.
Connect an USB device to the USB port on unit. It will switch to USB mode and start playback
automatically. The function LED indicator will become purple.
Notes:
- USB mode can be selected by
VOL button only when the USB device is connected to the unit.
- The total number of MP3 files on the USB device should not exceed 999.
- The device may not contain more than 99 directories.
- The reading time takes about a few seconds or more depending on the amount of MP3 files
and folders on USB device.
- Do not put anything other than a USB device to the port of this unit. Other objects may
damage the USB mechanism.
On some devices such as computers, once paired you must select the unit from the Bluetooth
menu and choose Use as Audio Device (stereo) or similar.
Pairing remains intact when the unit and/or your Bluetooth device is taken out of
communication range. An active connection will be re-established when your Bluetooth device
returns within range.
When the unit is turned on again, it will automatically try to reconnect with the most recently
paired Bluetooth device.
- Once insert the USB device to the USB port of unit, it will switch to USB mode automatically.
Notes:
- USB mode can be selected by
VOL button only when the USB device is connected to the unit.
Observe the color of function LED indicator for dierent mode:
Blue: Bluetooth
Yellow: Aux Line in
Purple: USB
Red : Standby
COLUNAS DE PRATELEIRA COM BLUETOOTHPT
If at any time in the future you should need to dispose of this product please note that
Waste electrical products should not be disposed of with household waste. Please
recycle where facilities exist. Check withyour Local Authority or retailer for recycling
advice. (Waste Electrical and Electronic Equipment Directive)
IMPORTANT!
- The use of apparatus in moderate climates.
- The Marking plate is located at the back of the device.
- Make sure to have a minimum distance of 5 cm around the unit for sufficient ventilation.
- Ensure that the ventilation openings is not covered with items such as newspapers, tablecloths,
curtains, etc.
- Do not place naked flame sources, such as lighted candles on the apparatus.
- Do not expose this appliance to dripping or splashing water.
- Do not place objects filled with liquids, such as glass, vase on the device.
- AC adaptor is used as the disconnect device. It shall remain readily operable and should not be
obstructed during intended use. To be completely disconnected the apparatus from supply
mains, the AC adaptor of the apparatus shall be disconnected from the mains socket outlet
completely.
- Under the inuence of fast transient and / or electrostatic electric phenomenon, the product
may malfunction and the user must perform a power reset of the device.
- The normal function of the product may be disturbed by strong Electro-Magnetic Interference.
If so, simply reset the product to resume normal operation by following the instruction manual.
In case the function could not resume, please use the product in other location.
10, Rue de la Mission, 25480 Ecole Valentin, France
NEW ONE S.A.S
contact@muse-europe.com
1. Indicador de Função LED
2. VOL+/-: Gire para ajustar o volume; pressione brevemente para selecionar o modo de função
desejado: Bluetooth, Aux ou USB; pressione longamente para ligar/desligar o aparelho.
3. TREB+/-: para ajustar os níveis dos agudos
4. BASS+/-: para ajustar os níveis dos graves
5. Fichas de Entrada de linha E/D (LINE IN L/R)
6. Entrada LEFT OUT (saída de áudio do alto-falante esquerdo)
7. Entrada SUB OUT (saída para subwoofer)
8. Conexão para reprodução de MP3 USB
9. Entrada de alimentação (DC IN)
10. Cabo de conexão do alto-falante
ACESSÓRIOS
DESCRIÇÃO DO APARELHO
Adaptador de corrente x1
LIGAÇÃO DA COLUNA
Conecte o cabo de coluna à entrada LEFT OUT na unidade principal.
Cabo RCA x1
ALIMENTAÇÃO
A fonte fornecida é adequada para ser utilizada em tomadas de 100 a 240V 50/60Hz e deverá
ser apenas ligada a tomadas dentro dessas especificações.
Atenção:
O adaptador de corrente fornecido destina-se apenas a ser utilizado com este aparelho. Não o
utilize, pois, com outros aparelhos.
Desligue o aparelho antes de desligar o adaptador de corrente para evitar danificar o leitor.
LIGANDO/DESLIGANDO O APARELHO
Pressione e segure o botão para ligar/desligar a unidade.VOL
SELECIONANDO A FUNÇÃO
Quando a unidade estiver ligada, pressione o botão repetidamente para selecionar o modo VOL
desejado: Bluetooth, Aux ou USB.
No interesse de economizar energia, quando uma reprodução terminar ou o nível de volume for
definidocomo muito baixo e nenhuma operação for realizada por um período de 15 minutos, o
aparelho entrará automaticamente no modo de Espera.
No caso de não utilização prolongada, desligue o adaptador de corrente da tomada.
Coloque o aparelho na proximidade da tomada de parede e certifiquese de que esta se
mantém facilmente acessível. Em caso de avaria, desligue imediatamente o aparelho da
tomada de parede.
O adaptador de corrente permite desligar o aparelho. Deve ser mantido facilmente acessível
durante a utilização. Para cortar completamente a alimentação do aparelho, desligue
efectivamente o adaptador da tomada de corrente.
Nunca utilize um adaptador de corrente danificado. Coloque o cabo de alimentação de forma
segura e de modo a não ficar preso nem esmagado. Se o cabo estiver danificado, contacte um
serviço de reparação.
FUNÇÃO DE BLUETOOTH
O nome Bluetooth® e logotipos são marcas registradas de propriedade da Bluetooth SIG, Inc. e
quaisquer usos destas marcas pela New One S.A.S estão licenciados. Outras marcas e nomes
registrados pertencem aos seus respectivos proprietários.
Pareando um dispositivo com Bluetooth
Utilizando um dispositivo com Bluetooth
1. Quando a unidade estiver LIGADA, pressione o botão repetidamente até que o indicador VOL
LED da função fique azul. O indicador LED de função irá piscar rapidamente, indicando que
está em modo de emparelhamento.
2. No dispositivo com Bluetooth, ative o Bluetooth e selecione "MUSE M-610 SH" na Lista de
Dispositivos. (Consulte o manual de instruções do dispositivo que estiver sendo conectado para
mais detalhes). Caso o dispositivo com bluetooth solicite uma senha, utilize "0000". Alguns
dispositivos com Bluetooth solicitarão que você aceite a conexão. Se a unidade estiver
emparelhada corretamente, pode ser ouvida uma voz e o indicador Bluetooth irá acender. O
indicador LED de função irá piscar lentamente.
Dica: Se quiser conectar a sua coluna Bluetooth a outro dispositivo de áudio Bluetooth,
precisará primeiro desconectar o dispositivo atual e seguir os passos acima para fazer uma
nova conexão.
1. Com o aparelho pareado (veja seção anterior), utilize o seu dispositivo com Bluetooth e o seu
som poderá ser escutado através das caixas de som do M-610 SH.
2. Selecione a faixa desejada no dispositivo com o qual está emparelhado.
3. Ajuste o volume através do controlo
VOL. Você tamb ém poderá ajustar o volume através do
dispositivo com o qual você estiver pareado.
Em alguns dispositivos, como computadores, uma vez pareado, você precisará selecionar o
aparelho em um Menu Bluetooth e escolher "Utilizar como Dispositivo de Áudio (estéreo)" ou
semelhante.
O pareamento permanecerá intacto quando o aparelho ou o seu dispositivo com Bluetooth for
retirado da área de comunicação. Uma conexão ativa será restabelecida quando o dispositivo
com Bluetooth voltar à área de alcance.
Quando o aparelho for ligado novamente, ele tentará automaticamente se reconectar ao
dispositivo de Bluetooth com o qual ele tenha sido mais recentemente pareado.
- Depois de inserir o dispositivo USB na porta USB da unidade, este irá mudar para o modo USB
automaticamente.
Observação:
- O modo USB pode ser selecionado pelo botão
VOL apenas quando o dispositivo USB estiver
conectado à unidade.
Verifique a cor do indicador LED de função para cada modo diferente:
Vermelho: Modo de espera
Azul: Bluetooth
Amarelo: AUX (entrada de linha)
Roxo: USB
REGALLAUTSPRECHER MIT BLUETOOTH DE
- Não coloque objectos que contenham líquido, como uma jarra, sobre ou na proximidade do
aparelho.
- O adaptador de corrente permite desligar o aparelho. Deve ser mantido facilmente acessível
durante a utilização. Para cortar completamente a alimentação do aparelho, desligue
efectivamente o adaptador da tomada de corrente.
-Sob o efeito de fenómenos electrostáticos e/ou eléctricos transitórios, o produto pode
apresentar anomalias e pode acabar por ser necessário proceder-se a uma reinicialização.
- A função normal do produto pode ser interrompida por fortes interferências eletromagnéticas.
Nesse caso, basta reiniciar o produto para retomar a operação normal seguindo o manual de
instruções. Caso a função não possa ser retomada, utilize o produto noutro local.
Caso pretenda descartar-se deste aparelho, proceda à sua reciclagem num centro de
recolha para electrodomésticos. Procure obter informações sobre o centro de
reciclagem mais próximo. Informe-se junto das autoridades locais ou do seu
revendedor local para a obtenção de pormenores adicionais (Directiva sobre os
Resíduos dos Equipamentos Eléctricos e Electrónicos).
10, Rue de la Mission, 25480 Ecole Valentin, France
NEW ONE S.A.S
contact@muse-europe.com
1. LED-Funktionsanzeige
2. VOL+/-: Drehen Sie den Regler, um die Lautstärke anzupassen. Drücken Sie ihn kurz, um
den Funktionsmodus (Bluetooth, AUX oder USB) auszuwählen. Halten Sie ihn lange gedrückt,
um das Gerät ein- oder auszuschalten.
3. TREB+/-: Zum Einstellen der Hochtöne.
4. BASS+/-: Zum Einstellen der Tieftöne.
5. LINE IN L/R RCA-Eingänge
6. LEFT OUT-Buchse (Audioausgang für den linken Lautsprecher)
7. SUB OUT-Buchse (Ausgang für den Subwoofer)
8. USB-Port für MP3-Wiedergabe
BESCHREIBUNG DES GERÄTS
ATENÇÃO
- Utilize este aparelho num clima temperado.
- A placa de características situa-se na parte de trás deste aparelho.
- Certifique-se de que respeita uma distância mínima de 5 cm à volta do aparelho de modo a
permitir uma ventilação suficiente.
- Certifique-se de que garante uma ventilação correcta do aparelho e que não tapa os orifícios
de ventilação com objectos como jornais, toalhas, cortinas, etc.
- Não coloque qualquer fonte de calor, como uma vela acesa, sobre ou na proximidade do
aparelho.
- Não exponha o aparelho a salpicos ou a humidade.
INSTRUÇÕES DE SEGURANÇA
ATENÇÃO: Para reduzir o risco de choque eléctrico, não desmonte o
aparelho. O aparelho não contém qualquer peça passível de ser
reparada pelo utilizador. Confie todas as operações de manutenção a
um técnico qualificado.
O símbolo do relâmpago com uma seta e situado no interior de um triângulo destina-se
a alertar o utilizador para a presença de uma tensão perigosa no aparelho.
O ponto de exclamação no interior de um triângulo destina-se a alertar o utilizador para
a presença de instruções importantes no manual que acompanha o aparelho.
ADVERTÊNCIA: PARA PREVENIR O RISCO DE INCÊNDIO OU DE CHOQUE ELÉCTRICO,
NÃO EXPONHA ESTE APARELHO A CHUVA OU HUMIDADE.
O símbolo de Cuidado é encontrado na parte de trás do dispositivo.
Saída: DC 21.0V
1.5A 31.5W
Distância de Funcionamento: Até 10 metros, medido em espaço aberto (paredes e estruturas
poderão afetar a distância de funcionamento do dispositivo).
O desenho e as especificaçõesestão sujeitas a mudanças sem aviso prévio.
Versão do Bluetooth: V5.3
Bluetooth:2.402-2.480GHz
Potência de saíde de RF (Rádio Frequência): 4.75dBm
BLUETOOTH
ESPECIFICAÇÕES
ALIMENTAÇÃO:
Adaptador de corrente:
Entrada: 100-240V 50/60Hz
CONECTANDO UM DISPOSITIVO EXTERNO
Para a saída do subwoofer
Na conexão de RCA LINE IN
REPRODUÇÃO DE USB
Nota: o indicador LED de função ficará aceso durante a reprodução.
A NEW ONE S.A.S aqui declara que este produto « MUSE M-610 SH» cumpre os requisitos
essenciais e outras disposições relevantes da Norma 2014/53/EU. A declaração de
conformidade pode ser consultada em www.muse-europe.com
1. Conecte a sua origem auxiliar (ex. Aparelho de DVD) na conexão de
LINE IN L/R localizada
na parte de trás do aparelho através de um cabo de áudio RCA.
2. Quando a unidade estiver ligada, pressione
VOL repetidamente até o indicador LED da
função ficar amarelo. A unidade será alterada para o modo AUX.
3. Arranque a reprodução na sua fonte auxiliar.
4. Ajuste o volume sonoro para o nível pretendido.
5. Para interromper a reprodução, desconecte a sua origem auxiliar da conexão
LINE IN L/R.
Use o cabo de áudio (não incluído) para conectar a unidade à entrada de áudio do seu
subwoofer.
Conecte um dispositivo USB na conexão USB do aparelho. Irá mudar para o modo USB e
iniciar a reprodução automaticamente. O indicador LED de função irá ficar roxo.
Observação:
- O modo USB pode ser selecionado pelo botão
VOL apenas quando o dispositivo USB estiver
conectado à unidade.
- O número total de arquivos de MP3 no dispositivo USB não deverá ser maior que 999.
- O dispositivo USB não poderá ter mais que 99 diretórios.
- O tempo de leitura poderá ser de alguns segundos ou mais, dependendo da quantidade de
arquivos de MP3 e pastas no dispositivo USB.
- Não insira mais nada a não ser um periférico USB na porta prevista para este efeito. Corre o
risco de danificar o aparelho.
- A porta USB não deve ser directamente ligada a um computador: tal pode danificar o aparelho.
- Existem no mercado inúmeros modelos de chaves USB e de leitores de MP3. Não podemos
garantir uma compatibilidade com todos os formatos. Utilize um outro periférico USB se o seu
não funcionar.
BOEKENPLANKLUIDSPREKERS MET BLUETOOTHNL
10, Rue de la Mission, 25480 Ecole Valentin, France
NEW ONE S.A.S
contact@muse-europe.com
AVVERTENZE DI SICUREZZA
ATTENZIONE: per ridurre il rischio di scossa elettrica, non smontate
lapparecchio. Questo apparecchio non contiene pezzi riparabili
dallutente. Per ogni riparazione rivolgetevi esclusivamente a tecnici
qualificati.
Il simbolo del fulmine con una freccia allestremità allinterno di un triangolo equilatero
avverte lutente della presenza di una tensione pericolosa nellapparecchio
Il punto esclamativo inscritto nel triangolo equilatero indica all'utente che nel manuale
di istruzioni si trovano importanti avvertenze per l'uso e la manutenzione dell'apparecchio.
Se in futuro volete sbarazzarvi di questo apparecchio, ricordate che le
apparecchiature elettroniche non devono essere gettate insieme ai rifiuti domestici.
Informatevi per sapere dove si trova il centro di riciclaggio più vicino. Per ulteriori
dettagli, rivolgetevi alle autorità locali o al vostro rivenditore. (Direttiva sui rifiuti delle
apparecchiature elettriche ed elettroniche)
AVVERTENZA: PER EVITARE IL RISCHIO DI INCENDIO O SCOSSA ELETTRICA,
NON ESPONETE LAPPARECCHIO ALLA PIOGGIA O ALLUMIDITÀ.
Il simbolo di allerta è posto sul retro del dispositivo.
ATTENZIONE
- Utilizzare lapparecchio in ambienti temperati.
- La targhetta segnaletica si trova nella parte posteriore dell'apparecchio.
- Lasciare uno spazio minimo di 5 cm intorno allapparecchio per permettere una ventilazione
suciente.
- Garantire sempre una ventilazione corretta dellapparecchio e non ostruire i fori di ventilazione
con oggetti come giornali, tovaglie, tende, ecc.
- Non collocare nessuna fonte di calore, come una candela accesa, sopra o nei pressi
dellapparecchio.
- Non esporre lapparecchio all'acqua o allumidità.
- Non collocare nessun recipiente contenente liquidi, come ad esempio un vaso, nelle vicinanze
dellapparecchio.
- Ladattatore di rete permette di scollegare lapparecchio. Deve pertanto restare facilmente
accessibile durante luso. Per mettere del tutto lapparecchio fuori tensione, scollegate il cavo
di alimentazione.
- Per effetto di fenomeni transitori elettrostatici e/o elettrici, è possibile che il prodotto non
funzioni correttamente. In tal caso è opportuno reinizializzare lapparecchio.
-Il normale funzionamento del prodotto può essere compromesso da forti interferenze
elettromagnetiche. In tal caso, segui le istruzioni nel manuale per reimpostare il prodotto per
riprendere il normale funzionamento. Nel caso in cui il funzionamento non venga ripristinato,
utilizzare il prodotto in altro luogo.
BESCHRIJVING VAN HET TOESTEL
1. Functie-indicator
2. VOL+/-: Draai met deze knop om het volume aan te passen; druk op de knop om de gewenste
functiemodus te selecteren: Bluetooth, Aux of USB. Houd de knop langere tijd ingedrukt om het
toestel Aan of Uit te zetten.
3. TREB+/-: Om het hoge-tonen niveau in te stellen.
4. BASS+/-: Om het lage-tonen niveau in te stellen.
5. LINE IN L/R RCA-aansluitingen
6. LEFT OUT aansluiting (audio-uitgang linker luidspreker)
7. SUB OUT aansluiting (uitgang subwoofer)
8. USB-poort voor afspelen MP3s
9. Ingang voor DC (voeding)
10. Aansluitkabel voor luidspreker
ACCESSOIRES
Netadapter x1
AANSLUITING LUIDSPREKER
Sluit de luidspekerkabel aan op de aansluiting op het hoofdtoestel.LEFT OUT
RCA-kabel x1
VOEDING
De netstroomadapter gebruikt een netstroom van AC 100V - 240V 50/60Hz. De meegeleverde
netstroomadapter mag nooit gebruikt worden op een ander type voeding.
Opmerkingen:
De AC adapter inbegrepen in dit toestel mag alleen met dit toestel gebruikt worden. Nooit
gebruiken voor een ander toestel.
Schakel het toestel uit voor de AC adapter los te maken om schade aan het toestel te
voorkomen.
ALTOPARLANTI DA MENSOLA CON BLUETOOTHIT
Si desea deshacerse de este aparato, recuerde que ha de depositarlo en un lugar
destinado al reciclado de electrodomésticos. Infórmese acerca del centro de reciclaje
más cercano. Consulte a las autoridades locales o a su proveedor para obtener más
información al respecto. (Directiva de Residuos de Aparatos Eléctricos y Electrónicos)
10, Rue de la Mission, 25480 Ecole Valentin, France
NEW ONE S.A.S
contact@muse-europe.com
INSTRUCCIONES DE SEGURIDAD
ATENCIÓN: Para reducir el riesgo de descarga eléctrica, no desmonte
el aparato. En el interior de este aparato no existe ninguna pieza que
pueda ser reparada por el usuario. Para cualquier operación de
mantenimiento y reparación, póngase en contacto con personal técnico
cualificado.
El símbolo del rayo con una flecha dentro de un triángulo equilátero advierte al usuario
de la presencia de voltaje peligroso en el interior del aparato.
El signo de exclamación dentro de un triángulo equilátero advierte al usuario de la
presencia de importantes instrucciones de funcionamiento y mantenimiento en el
manual que acompaña al producto.
ADVERTENCIA: PARA PREVENIR EL RIESGO DE INCENDIO O DE DESCARGA
ELÉCTRICA, NO EXPONGA ESTE APARATO A LA LLUVIA O A LA HUMEDAD.
La marca de precaución se encuentra en la parte posterior del dispositivo.
ATENCIÓN
- Utilice este aparato en lugares con climas templados.
- La placa de datos técnicos está situada en la parte posterior del dispositivo.
- Deje libre alrededor del aparato una distancia mínima de 5 cm para garantizar una correcta
ventilación del mismo.
- Para asegurar una ventilación correcta del aparato, no cubra los orificios de ventilación con
objetos tales como periódicos, manteles, cortinas, etc.
- No coloque ninguna fuente de calor, como por ejemplo una vela encendida, sobre el aparato o
cerca de él.
- No exponga el aparato a salpicaduras o a la humedad.
- No coloque objetos que contengan líquido, como un jarrón, encima del aparato.
- El adaptador de red permite enchufar y desenchufar el aparato. El acceso al mismo debe
permanecer despejado en todo momento. Para cortar por completo la alimentación del aparato,
ha de desenchufar el adaptador de red de la toma de corriente.
- Como resultado de fenómenos electroestáticos y/o eléctricos transitorios, pueden producirse
fallos en el funcionamiento del producto. En estos casos, el usuario deberá reiniciar el aparato
desenchufándolo y volviéndolo a enchufar.
- El funcionamiento normal del producto podría verse alterado por fuertes interferencias
electromagnéticas. En caso de ocurrir, simplemente reinicie el producto y continúe utilizándolo
con normalidad siguiendo las indicaciones del manual de instrucciones. En el caso de que no
volviera a funcionar, utilícelo en una ubicación diferente.
1. Spia LED di funzione
2. VOL+/-: Ruota per regolare il volume; premi brevemente per selezionare la funzione
desiderata tra Bluetooth, Aux o USB; tieni premuto per attivare/spegnere l'apparecchio.
3. TREB+/-: Per regolare il livello dei suoni alti.
4. BASS+/-: Per regolare il livello dei suoni bassi.
5. Prese (sinistro/destro) LINE IN L/R
6. Presa LEFT OUT (canale audio sinistro del diffusore)
7. Presa (uscita subwoofer)SUB OUT
8. Porta USB per la riproduzione di file MP3
9. Ingresso alimentazione (DC IN )
10. Cavo di connessione del diffusore
ACCESSORI
Adattatore di rete x1
COLLEGAMENTO ALTOPARLANTE
Collega il cavo del diffusore alla presa posta sullunità principale.LEFT OUT
Cavo RCA x1
ALIMENTAZIONE
Ladattatore di rete funziona tramite unalimentazione AC compresa tra 100V e 240V .
Ladattatore di rete fornito in dotazione non può in alcun caso essere utilizzato con un altro tipo
di alimentazione.
ACCENSIONE/SPEGNIMENTO DELL’APPARECCHIO
Tieni premuto per attivare/spegnere l'apparecchio.VOL
SELEZIONE DELL'ORIGINE
Con lapparecchio in funzione, premi più volte il tasto per selezionare la funzione VOL
desiderata tra Bluetooth, Aux o USB.
Per risparmiare energia, al termine della riproduzione oppure quando il volume è impostato al
minimo e nell'arco di 15 minuti non viene eseguita nessuna operazione, l'apparecchio passa in
automatico alla modalità di Standby.
Attenzione:
Ladattatore di rete fornito in dotazione è destinato ad essere utilizzato esclusivamente con
questo apparecchio. Non utilizzatelo dunque con altri apparecchi.
Per evitare di rovinare lapparecchio, spegnetelo prima di scollegare ladattatore di rete
dallapparecchio.
In caso di un prolungato periodo di non utilizzo, scollegate ladattatore di rete dalla presa a
muro.
Fate in modo che la presa di rete sia vicina e che resti facilmente accessibile. In caso di
malfunzionamento, scollegate immediatamente la spina di alimentazione dalla presa di rete.
Ladattatore di rete permette di scollegare lapparecchio. Deve pertanto restare facilmente
accessibile durante luso. Per mettere del tutto lapparecchio fuori tensione, scollegate il cavo
di alimentazione.
Non utilizzate ladattatore di rete se è danneggiato. Posizionate i cavi in modo sicuro facendo
attenzione che non vengano incastrati o schiacciati. Se il cavo di alimentazione è danneggiato,
rivolgetevi a un tecnico qualificato.
- Plaats geen voorwerpen met vloeistof, zoals een vaas, op of in de buurt van het toestel.
- De netstroomadapter maakt het mogelijk om de stroomvoorziening naar het toestel te
onderbeken. Zorg ervoor dat deze altijd makkelijk bereikbaar blijft tijdens het gebruik. Om de
voeding van het toestel volledig te onderbreken, dient u de stekker van de netstroomadapter uit
het stopcontact te trekken.
- Onder invloed van tijdelijke elektrostatische en/of elektrische verschijnselen kan het product
storingen ondervinden en kan een heropstart nodig blijken.
- De normale functie van het product kan worden verstoord door sterke elektromagnetische
storing. Als dit het geval is, reset het product dan gewoon door de handleiding te volgen. Als
het normale gebruik daarna niet kan worden hervat, probeer het product dan op een andere
locatie te gebruiken.
Indien u dit toestel in de toekomst wilt weggooien, denk er dan aan om het te
recycleren via een inzamelpunt voor elektrische huishoudapparaten. Informeer naar
het dichtstbijzijnde recyclagecentrum. Voor meer informatie wendt u zich tot de lokale
overheden of uw verdeler (richtlijn met betrekking tot Afval afkomstig van elektrische
en elektronische apparaten).
10, Rue de la Mission, 25480 Ecole Valentin, France
NEW ONE S.A.S
contact@muse-europe.com
Uscita: CC 21.0V 1.5A 31.5W
Raggio dazione: fino a 10 metri in spazi aperti (pareti e altre strutture possono influire sul raggio
dazione del dispositivo).
Il modello e le caratteristiche tecniche possono subire variazioni senza preavviso.
Versione del Bluetooth: V5.3
Bluetooth:2.402-2.480GHz
Potenza RF (radiofrequenza) irradiata : 4.75 dBm
BLUETOOTH
SPECIFICHE
ALIMENTAZIONE
Adattatore di rete:
Ingresso: 100-240V 50/60Hz
COLLEGAMENTO CON DISPOSITIVI ESTERNI
Presa di uscita del subwoofer
RIPRODUZIONE MEDIANTE PORTA USB
Associazione di un dispositivo Bluetooth
Utilizzo di un dispositivo Bluetooth
1. Con lapparecchio in funzione, premi più volte il tasto finché lindicatore di funzione LED VOL
non diventi blu. Lindicatore LED di funzione lampeggerà velocemente a confermare che la
modalità di abbinamento è attiva.
2. Attivare la funzione Bluetooth sul proprio dispositivo Bluetooth e selezionare
MUSE M-610 SH dallelenco dei dispositivi rilevati (consultare il manuale di istruzioni del
dispositivo per informazioni dettagliate su come connettere il dispositivo). Se il dispositivo
Bluetooth richiede la digitazione di una password, inserire 0000. Alcuni dispositivi Bluetooth
richiedono di accettare la connessione. Una volta riuscita l'associazione, l'unità emette un
segnale acustico. Lindicatore LED di funzione lampeggerà lentamente.
Suggerimento: prima di connettere il tuo altoparlante Bluetooth a un diverso dispositivo audio
Bluetooth è necessario scollegare il dispositivo corrente, e quindi seguire i passaggi sopra
elencati per stabilire una nuova connessione.
1. Una volta associata lunità a un dispositivo (vedi sezione precedente) laudio del dispositivo
Bluetooth viene riprodotto mediante laltoparlante.
2. Seleziona il brano desiderato sul dispositivo correntemente abbinato.
3. Regola il volume con il controllo
VOL. È possibile regolare il volume anche dal dispositivo a
cui lunità è associata.
Nota: lindicatore LED di funzione resterà acceso durante la riproduzione.
Con la presente, NEW ONE S.A.S dichiara che « MUSE M-610 SH » è conforme ai requisiti
essenziali e alle altre disposizioni fondamentali della direttiva 2014/53/EU. La dichiarazione di
conformità è consultabile alla pagina www.muse-europe.com
Alle prese LINE IN RCA
1. Collegare la sorgente ausiliaria (ad es. lettore DVD) ai jack sul retro LINE IN L/R
dell'apparecchio utilizzando un cavo audio RCA.
2. Con lapparecchio in funzione, premi più volte il tasto
VOL finché lindicatore di funzione LED
non diventi giallo. Lapparecchio sarà quindi in modalità AUX.
3. Avviare la riproduzione dalla sorgente ausiliaria.
Usa un cavo audio (non incluso) per connettere lapparecchio alla presa di ingresso audio
posta sul subwoofer.
Collegare un dispositivo USB alla porta USB sull'unità. Passa alla modalità USB e la
riproduzione si avvierà automaticamente. L'indicatore LED della funzione diventerà viola.
Nota bene:
- La funzione USB può essere selezionata premendo il tasto
VOL solo se un dispositivo USB è
collegato allapparecchio.
- Il numero totale di file MP3 contenuti nel dispositivo USB non deve essere superiore a 999.
- Il numero di directory contenute nel dispositivo USB non deve essere superiore a 99.
- Il tempo di lettura può variare a seconda del numero di file MP3 o di cartelle contenuti nel
dispositivo USB.
- Inserire esclusivamente periferiche USB nello slot corrispondente. L'inserimento di oggetti
potrebbe danneggiare lapparecchio.
- La porta USB non deve essere direttamente collegata ad un PC, in quanto ciò potrebbe
danneggiare lapparecchio.
- Sul mercato esistono numerosi modelli di periferiche USB e di lettori MP3. Non è possibile
garantire la compatibilità con tutti i formati. Qualora un modello di periferica USB non sia
compatibile, provare con unaltro.
Su alcuni dispositivi, come ad esempio computer, una volta associato il dispositivo è
necessario selezionare lunità dal menu Bluetooth, quindi selezionare lopzione Utilizza come
dispositivo audio (stereo) o similare.
Lassociazione rimane attiva quando lunità e/o il dispositivo Bluetooth escono dal raggio
dazione del Bluetooth. Una connessione attiva viene ristabilita quando il dispositivo rientra nel
raggio dazione del Bluetooth.
Una volta riaccesa, lunità tenta in automatico di riconnettersi allultimo dispositivo Bluetooth
associato.
FUNZIONALITÀ BLUETOOTH
Il marchio denominativo Bluetooth® e i relativi loghi sono marchi registrati di Bluetooth SIG, Inc.,
utilizzati da New One S.A.S su licenza. Altri marchi e nomi commerciali sono di proprietà dei
rispettivi titolari.
- Una volta collegato il dispositivo USB alla porta USB dell'unità, la modalità USB si attiverà
automaticamente.
Nota:
- La funzione USB può essere selezionata premendo il tasto
VOL solo se un dispositivo USB è
collegato allapparecchio.
Osserva il colore dellindicatore LED per le rispettive funzioni:
Rosso: Standby
Blu: Bluetooth
Giallo: AUX (Line in)
Viola: USB
Salida: CC 21.0V
1.5A 31.5W
Distancia de rendimiento :Hasta 10 m medidos en espacio abierto (la pared y las estructuras
pueden afectar el rango del dispositivo)
Las especificaciones están sujetas a cambios sin previo aviso.
Versión Bluetooth: V5.3
Bluetooth:2.402-2.480GHz
Salida de corriente RF (radiofrecuencia) : 4.75 dBm
BLUETOOTH
FICHA TÉCNICA
ALIMENTACION:
Entrada: 100-240V 50/60Hz
FUNCIÓN BLUETOOTH
Los logos y nombres Bluetooth® son marcas registradas que pertenecen a Bluetooth SIG, Inc.
y cualquier uso de dichas marcas por parte de New One S.A.S tiene sus respectivas licencias.
Otras marcas comerciales y registradas son propiedad de sus respectivos propietarios.
CONEXIÓN DE DISPOSITIVOS EXTERNOS
A la toma de salida del subwoofer
A las tomas LINE IN RCA
REPRODUCIÓN DE UN DISPOSITIVO USB
Emparejar un dispositivo Bluetooth
Utilizar un dispositivo Bluetooth
1. Cuando la unidad esté encendida, presione repetidamente el botón hasta que el VOL
indicador LED de función se vuelva de color azul. El indicador LED de función parpadeará
rápidamente indicando que está en modo de emparejamiento.
2. En el dispositivo Bluetooth, habilite Bluetooth y seleccione MUSE M-610 SH de la lista de
dispositivos. (Para obtener el detalle de operaciones para conectarse, consulte el manual de
usuario del dispositivo). Si el dispositivo Bluetooth le solicita una contraseña de acceso,
utilice 0000. Algunos dispositivos Bluetooth le indicarán que acepte la conexión. Si la unidad
resultara emparejada correctamente, se oirá un sonido de voz. El indicador LED de función
parpadeará lentamente..
Consejos: Si desea conectar su altavoz Bluetooth a otro dispositivo de audio Bluetooth, primero
debe desconectar el dispositivo actual y seguir los pasos anteriores para realizar una nueva
conexión.
1. Con alguna unidad emparejada (ver la sección anterior),haga funcionar su dispositivo
Bluetooth. El sonido se escuchará a través de los altavoces M-610 SH.
2. Seleccione la pista deseada en el dispositivo con el que está vinculado.
3. Ajuste el volumen con el control
VOL. Ajuste el volumen con los botones de Volumen.
También puede ajustar el volumen en el dispositivo con el cual está emparejado.
Nota: El indicador LED de función permanecerá encendido durante la reproducción.
Por la presente, NEW ONE S.A.S declara que el « MUSE M-610 SH » cumple con los
requerimientos esenciales y otras provisiones aplicables de la Directiva 2014/53/EU. La
declaración de conformidad podrá consultarse en www.muse-europe.com.
1. Conecte su fuente auxiliar (un reproductor de DVD, por ejemplo) a las tomas
LINE IN L/R
de la parte posterior de la unidad con un cable de audio RCA.
2. Cuando la unidad esté encendida, presione repetidamente
VOL hasta que el indicador LED
de función se vuelva de color amarillo. La unidad cambiará al modo auxiliar.
3. Empiece el playback desde la fuente AUX.
4. Ajuste el volumen hasta el nivel deseado.
5. Para detener la reproducción, desconecte su fuente de audio auxiliar de las tomas
LINE IN L/R.
Use el cable de audio (no incluido) para conectar la unidad a la toma de entrada de audio del
subwoofer.
Conecte un dispositivo USB al puerto USB de la unidad. Cambiará al modo USB e iniciará la
reproducción automáticamente. El indicador LED se volverá morado.
Notas:
- El modo USB puede seleccionarse con el botón
VOL solo cuando el dispositivo USB esté
conectado a la unidad.
- El número total de archivps MP3 en el dispositivo USB no deberá exceder los 999.
- El dispositivo USB no podrá contener más de 99 directorios.
- El tiempo de lectura llevará unos segundos o más, dependiendo de la cantidad de archivos
MP3 y carpetas en el dispositivo USB.
- Introduzca sólo dispositivos USB en el puerto USB. En caso contrario, podría dañar el aparato.
- No conecte el puerto USB directamente a un ordenador: podría dañar el aparato.
- En el mercado pueden encontrarse numerosos modelos de dispositivos USB. No podemos
garantizarle que este aparato sea compatible con todos los formatos. En caso de que su
dispositivo USB no funcione, utilice otro.
En algunos dispositivos como computadoras, una vez realizado el emparejamiento, debe
seleccionar la unidad del menú Bluetooth y elegir " Use as Audio Device (stereo) or similar
" (utilizar como dispositivo de audio (estéreo) o similar).
El emparejamiento permanece intacto cuando la unidad y/o su dispositivo Bluetooth sale del
rango de comunicación. Se restablecerá una conexión activa cuando su dispositivo Bluetooth
vuelva dentro del rango.
Cuando vuelva a encender la unidad, se intentará la reconexión automática con el dispositivo
Bluetooth al que se haya emparejado más recientemente.
- Una vez que inserte el dispositivo USB en el puerto USB de la unidad, esta cambiará
automáticamente al modo USB.
Notas:
- El modo USB puede seleccionarse con el botón
VOL solo cuando el dispositivo USB esté
conectado a la unidad.
Amarillo: AUX (entrada de línea)
Púrpura: USB
Rojo: En espera
Azul: Bluetooth
Este adaptador funciona con una alimentación CA de entre 100 V- 240 V 50/60Hz.
El adaptador de red que se suministra con el aparato no se puede utilizar en ningún caso con
otro tipo de alimentación.
ENCENDIDO/APAGADO DE LA UNIDAD
Mantenga presionado para encender o apagar la unidad.VOL
SELECCIÓN DE FUNCIÓN
Cuando la unidad esté encendida, presione repetidamente el botón para seleccionar el VOL
modo deseado: Bluetooth, Auxiliar o USB.
No utilice el adaptador de red si está estropeado. Coloque los cables de forma segura y
compruebe que no quedan aplastados, doblados ni tensados. Si el cable de alimentación está
estropeado, acuda a un técnico cualificado.
Con el objetivo de ahorrar energía, cuando la reproducción haya alcanzado el finalo el volumen
se encuentre a un nivel muy bajo y no se use ningún control en el dispositivo por un periodo de
15 minutos, la unidad pasará al modo de espera automáticamente.
Atención:
ALIMENTACIÓN
El adaptador de red que se suministra ha sido diseñado para utilizarse exclusivamente con
este aparato. No lo utilice con ningún otro aparato.
Apague el aparato antes de desenchufar el adaptador de red. De lo contrario, el aparato podría
estropearse.
Cuando no vaya a utilizar el aparato durante un período de tiempo prolongado, desenchufe el
adaptador de red de la toma de corriente.
Asegúrese de que la toma de corriente está cerca y de que es fácil acceder a ella. En caso de
fallo en el funcionamiento del aparato, desenchufe inmediatamente el adaptador de red de la
toma de corriente.
El adaptador de red permite enchufar y desenchufar el aparato. El acceso al mismo debe
permanecer despejado en todo momento. Para cortar por completo la alimentación del aparato,
ha de desenchufar el adaptador de red de la toma de corriente.
Observe el color del indicador LED de función para diferentes modos:
OPGELET
- Gebruik dit toestel bij een gematigd klimaat.
- Het kenmerkenplaatje bevindt zich aan de achterkant van het toestel.
- Zorg voor een afstand van minimum 5 cm rondom uw toestel voor voldoende ventilatie.
- Zorg voor een juiste ventilatie van het toestel en bedek de ventilatie-openingen niet met
voorwerpen zoals dagbladen, tafellakens, gordijnen, enz.
- Plaats geen warmtebron, zoals een brandende kaars, op of in de buurt van het toestel.
- Stel het toestel niet bloot aan waterspatten of vochtigheid.
VEILIGHEIDSINSTRUCTIES
OPGEPAST: Om het risico op elektrische schokken te vermijden, mag u
het toestel niet demonteren. Het toestel bevat geen enkel onderdeel
dat door de gebruiker zelf kan gerepareerd worden. Contacteer altijd
een gekwalificeerde technieker indien een reparatie nodig is.
Het symbool van een zwarte driehoek met daarin een witte bliksemschicht eindigend in
een driehoek, waarschuwt de gebruiker dat er een gevaarlijke spanning aanwezig is in
het toestel
Het bovenstaande symbool (zwarte driehoek met daarin een wit uitroepingsteken)
waarschuwt de gebruiker dat er belangrijke gebruiksaanwijzingen in verband met het
gebruik en het onderhoud ter beschikking zijn in de bijgeleverde handleiding.
WAARSCHUWING Stel het toestel niet bloot aan vocht of regen om het risico op brand of
elektrische schokken te vermijden.
De waarschuwingsmarketing zit op de achterkant van het apparaat.
Uitgang: DC 21.0V
1.5A 31.5W
Werkafstand: Tot 10 meter gemeten in een open ruimte (muren en bouwwerken kunnen invloed
hebben op het bereik van de luidspreker)
Ontwerp en specificaties zijn onderhevig aan verandering zonder kennisgeving.
Bluetooth-versie: V5.3
Bluetooth:2.402-2.480GHz
RF-vermogen (radiofrequentievermogen): 4.75dBm
BLUETOOTH
TECHNISCHE KENMERKEN
NETSTROOM
Netadapter :
Ingang: AC100-240V 50/60Hz
HET APPARAAT IN-/UITSCHAKELEN
Houd de VOL knop langere tijd ingedrukt om het toestel Aan/Uit te zetten.
FUNCTIE SELECTEREN
Druk terwijl het toestel AAN staat herhaalde malen op de knop om de gewenste modus VOL
te selecteren: Bluetooth, Aux of USB.
Om energie te besparen zal het apparaat automatisch naar de standbymodus schakelen
wanneer het afspelen het eindpunt heeft bereikt of het volume is ingesteld op een zeer laag
niveau en het apparaat niet wordt gebruikt voor een periode van 15 minuten.
Als het toestel lange tijd niet gebruikt wordt, verwijdert u de AC adapter uit het stopcontact.
Gebruik het in de buurt van een makkelijk bereikbaar stopcontact. Doet zich een storing voor,
verwijder het contact dan onmiddellijk uit het stopcontact.
Het moet makkelijk te bedienen blijven en mag tijdens het gebruik niet verstoord worden. Om
volledig losgekoppeld te zijn van stroomtoevoer, moet het toestel via de AC adapter volledig uit
het stopcontact worden verwijderd.
Gebruik nooit een beschadigde AC adapter, leg de kabels op een veilige manier vrij van druk of
knijpen. Wend u tot een erkende dienstverlener als de kabel beschadigd is.
BLUETOOTH-FUNCTIE
De Bluetooth® markering en de logos zijn geregistreerde handelsmerken die eigendom zijn van
Bluetooth SIG, Inc. en het gebruik van deze markeringen door New One S.A.S is onder licentie.
Andere handelsmerken en handelsnemen zijn van hun respectieve eigenaars.
AANSLUITEN OP EXTERNE APPARATEN
Naar de SUB OUT aansluiting
Voor het tot stand brengen van RCA-aansluitingen
WEERGAVE VAN EEN USB-APPARAAT
Een Bluetooth-apparaat koppelen
Een Bluetooth-apparaat gebruiken
1. Druk terwijl het toestel AAN staat herhaalde malen op de VOL knop totdat het functie
LED-lampje blauw wordt.
2. Het Functie LED-lampje zal snel beginnen te knipperen om aan te duiden dat de paarmodus
is ingeschakeld.
3. Schakel Bluetooth in op het Bluetooth-apparaat en selecteer MUSE M-610 SH uit de lijst
met apparaten. (Kijk in de handleiding van het apparaat waarmee u verbinding wilt maken voor
gedetailleerde instructies.) Als het Bluetooth-apparaat vraagt om een wachtwoord, voer dan
0000 in. Sommige Bluetooth-apparaten zullen u vragen de verbinding te accepteren. U hoort
een indicatietoon als het koppelen is gelukt. Het Functie LED-lampje zal langzaam knipperen.
Tips: Als u uw Bluetooth-luidspreker met een ander Bluetooth-audioapparaat wilt verbinden,
moet u eerst de verbinding met het huidige apparaat verbreken en bovenstaande stappen
volgen om een nieuwe verbinding tot stand te brengen.
1. Als u verbinding heeft gemaakt met een apparaat (zie voorgaande paragraaf), gebruik dan de
bediening op uw Bluetooth-apparaat en wanneer het afspelen wordt gestart, dan zal het geluid
uit de luidsprekers van de M-610 SH klinken.
2. Selecteer het gewenste nummer op het apparaat waarmee uw toestel verbonden is.
3. VOLRegel het volume met behulp van de knop. U kunt het volume ook instellen op het
apparaat dat is verbonden met de luidspreker.
Let op: Het Functie LED-lampje zal tijdens het afspelen blijven branden.
Hierbij verklaart NEW ONE S.A.S dat deze MUSE M-610 SH voldoet aan de essentiële eisen
en andere relevante bepalingen uit richtlijn 2014/53/EU. De verklaring van conformiteit kan
worden geraadpleegd op www.muse-europe.com
1. Sluit uw hulpapparaat (bijv. DVD-speler) met een RCA-audiokabel aan op de
LINE IN L/R-aansluitingen op de achterkant van de luidspreker.
2. Druk terwijl het toestel AAN staat herhaalde malen op de
VOL knop totdat het functie
LED-lampje geel wordt. Het toestel is nu overgeschakeld naar de AUX modus.
3. Start het afspelen van uw hulpbron.
4. Stel het geluidsvolume in op het gewenste niveau.
5. Als u het afspelen wilt stoppen, koppel uw hulpapparaat dan los van de
LINE IN L/R
-aansluitingen.
Gebruik de audiokabel (niet meegeleverd) om uw toestel aan te sluiten op de audio-ingang van
uw subwoofer.
Sluit een USB-apparaat aan op de USB -poort van de luidspreker. Het apparaat schakelt over
naar de USB-modus en start het afspelen automatisch. Het Functie LED-lampje zal paars
worden.
Opmerkingen:
- De USB modus selecteren met behulp van de
VOL knop is alleen maar mogelijk wanneer het
USB-apparaat op de eenheid is aangesloten.
- Het totaal aantal MP3-bestanden op het USB-apparaat mag niet groter zijn dan 999.
- Het USB-apparaat mag niet meer dan 99 mappen bevatten.
- Het inlezen van de bestanden duurt een paar seconden of langer, afhankelijk van het aantal
MP3-bestanden en mappen op het USB-apparaat.
- Steek niets anders dan USB-randapparatuur in de hiertoe voorziene poort. U riskeert het
toestel te beschadigen.
- De USB-poort mag niet rechtstreeks aangesloten worden op een computer: dit kan het toestel
beschadigen.
- Er bestaan verschillende USB-sleutels en MP3-spelers op de markt. Wij kunnen niet
garanderen dat het toestel compatibel is met alle formaten. Gebruik daarom een andere
USB-drager indien uw USB-drager niet werkt.
Op bepaalde apparaten, zoals computers, moet u, zodra er is gekoppeld, het apparaat
selecteren in het Bluetooth-menu en de optie Gebruik als audioapparaat (stereo) (of een
soortgelijke optie) gebruiken.
De verbinding blijft intact wanneer de luidspreker en/of uw Bluetooth-apparaat buiten het
communicatiebereik wordt verplaatst. Er wordt opnieuw een actieve verbinding gemaakt
wanneer uw Bluetooth-apparaat terugkeert binnen het bereik.
Als het apparaat weer wordt ingeschakeld, dan zal het automatisch proberen opnieuw
verbinding te maken met het Bluetooth-apparaat waarmee het laatst werd gekoppeld.
- Zodra u het USB-apparaat in de USB-poort van het apparaat hebt geplaatst, schakelt het
automatisch over naar de USB-modus.
Opmerking:
- De USB modus selecteren met behulp van de
VOL knop is alleen maar mogelijk wanneer het
USB-apparaat op de eenheid is aangesloten.
Kijk naar de kleur van het Functie LED-lampje om te zien welke modus is ingeschakeld:
Rood: Standby
Blauw: Bluetooth
Geel: AUX (Lijn in)
Paars: USB
- Der ordnungsgemäße Betrieb des Geräts kann durch starke elektromagnetische Störungen
beeinträchtigt werden. Setzen Sie das Gerät in solch einem Fall gemäß den Angaben in der
Bedienungsanleitung zurück, um den normalen Betrieb wieder herzustellen. Falls der
ordnungsgemäße Betrieb nicht fortgesetzt werden kann, versuchen Sie das Gerät an einem
anderen Ort zu verwenden.
Wenn Sie dieses Gerät entsorgen möchten, denken Sie daran, es bei einer
Sammelstelle für elektrische Haushaltsgeräte zu entsorgen. Erkundigen Sie sich nach
Ihrer nächstgelegenen Wertstoffsammelstelle. Für detaillierte Informationen wenden
Sie sich an die örtlichen Behörden oder an Ihren Händler. (Richtlinie über elektrische
und elektronische Abfallgeräte).
10, Rue de la Mission, 25480 Ecole Valentin, France
NEW ONE S.A.S
contact@muse-europe.com
ALTAVOCES DE ESTANTERÍA CON BLUETOOTHES
DESCRIPCIÓN DEL APARATO
DESCRIZIONE DEL PRODOTTO
1. Indicador de función LED
2. VOL+/-: Gire para ajustar el volumen. Presione brevemente para seleccionar el modo de
función deseado: Bluetooth, Auxiliar o USB. Mantenga presionado para encender o apagar la
unidad.
3. TREB+/-: Para ajustar el nivel de agudos.
4. BASS+/-: Para ajustar el nivel de los graves.
5. Tomas LINE IN L/R RCA
6. Toma LEFT OUT (salida de audio del altavoz izquierdo)
7. Toma SUB OUT (salida del subwoofer)
8. Puerto USB para la reproducción MP3
9. Entrada de alimentación (DC IN )
10. Cable de conexión del altavoz
ACCESORIOS:
Adaptador de red x1
CONEXIÓN DE LOS ALTAVOCES
Conecte el cable del altavoz a la toma de la unidad principal.LEFT OUT
Cable RCA x1
-Unter der Einwirkung von elektrostatischen und/oder elektrischen Phänomen kann das Produkt
Fehlfunktionen aufweisen. Ein Zurücksetzen auf die Werkseinstellungen kann sich als
notwendig erweisen.
Vorsicht:
GERÄT EIN-/AUSSCHALTEN
Verwenden Sie den mitgelieferten Netzstromadapter ausschließlich für diesen Player.
Verwenden Sie ihn nicht mit anderen Geräten.
Schalten Sie den Player aus, bevor Sie den Netzstromadapter aus der Steckdose oder dem
Player herausziehen; anderenfalls könnte der Player beschädigt werden.
Falls der Player über längere Zeit hinweg nicht benutzt werden soll, ziehen Sie den
Netzstromadapter aus der Netzsteckdose heraus.
Vergewissern Sie sich, dass sichdie Netzsteckdose in der Nähe befindet und leicht erreichbar
ist. Falls eine Fehlfunktion auftritt, ziehen Sie sofort den Netzstromadapter aus der
Netzsteckdose heraus.
Über den Netzstromadapter kann das Gerät von der Netzspannung getrennt werden. Er sollte
schnell eingeschaltet werden können und während der vorgesehnen Verwendung nicht
blockiert sein. Um das Gerät vollständig vom Netzstrom zu trennen, muss der
Netzstromadapter von der Netzsteckdose vollständig getrennt werden.
Verwenden Sie niemals einen beschädigten Netzstromadapter, verlegen Sie das
Netzanschlusskabel so, dass es sicher ist und nirgendwo eingeklemmt oder gequetscht werden
kann. Falls das Netzkabel beschädigt ist, wenden sie sich an einen qualifizierten Fachbetrieb.
Aus Energiespargründen aktiviert das Gerät automatisch den Standby-Modus, wenn das Ende
der Wiedergabe erreicht oder eine sehr geringe Lautstärke eingestellt ist und 15 Minuten lang
keine Eingabe am Gerät erfolgt.
Halten Sie die VOL-Taste gedrückt, um das Gerät ein- oder auszuschalten.
ACHTUNG
- Verwenden Sie dieses Gerät in klimatisch gemäßigter Umgebung.
- Das Typenschild befindet sich auf der Rückseite des Geräts.
- Achten Sie auf einen Mindestabstand von 5 cm zu Ihrem Gerät, um eine ausreichende
Belüftung zu gewährleisten.
- Stellen Sie eine ausreichende Belüftung des Geräts sicher und behindern Sie die
Belüftungsönungen nicht mit Gegenständen wie z. B. Zeitungen, Tischdecken, Vorhängen,
usw.
- Stellen Sie keine Wärmequelle wie eine angezündete Kerze auf oder in der Nähe des Geräts
ab.
- Setzen Sie das Gerät niemals Wasserspritzern oder Feuchtigkeit aus.
- Stellen Sie kein mit Wasser gefülltes Gefäß, wie z. B. Vasen, in der Nähe des Geräts ab.
- Verwenden Sie auf keinen Fall einen beschädigten Netzstromadapter. Verlegen Sie das
Netzkabel so, dass es weder eingeklemmt noch gequetscht wird. Ein beschädigtes Netzkabel
muss bei einer Reparaturstelle repariert werden.
SICHERHEITSANWEISUNGEN
ACHTUNG: Um Elektroschockgefahr zu vermeiden, dürfen Sie dieses
Gerät nicht demontieren. Das Gerät enthält keine Teile, die der
Benutzer selbst reparieren kann. Vertrauen Sie die Instandhaltung des
Geräts einem Fachmann an.
Das in einem Pfeil endende Blitzsymbol innerhalb eines Dreiecks weist den Benutzer
auf die Gegenwart einer gefährlichen Spannung im Gerät hin.
Das Ausrufezeichen im Inneren eines Dreiecks weist den Benutzer auf wichtige
Anweisungen hin, die sich in dem das Gerät begleitenden Handbuch befinden.
WARNUNG: UM BRAND- UND ELEKTROSCHOCKGEFAHR VORZUBEUGEN, DÜRFEN
SIE DIESES GET WEDER REGEN NOCH FEUCHTIGKEIT AUSSETZEN.
Der Sicherheitshinweis befindet sich an der Rückseite des Geräts.
Ausgang: DC 21.0V 1.5A 31.5W
Betriebsreichweite: bis zu 10 Meter in offenen Räumen (Wände und Hindernisse können die
Reichweite des Geräts beeinträchtigen)
Gestaltung und Ausführung bleiben Änderungen vorbehalten.
Bluetooth-Version: V5.3
Bluetooth:2.402-2.480GHz
RF-Ausgangsleistung (Radiofrequenz-Augangsleistung): 4.75 dBm
BLUETOOTH
TECHNISCHE EIGENSCHAFTEN
ALLGEMEIN
Netzstromadapter
Eingang : 100-240V 50/60Hz
FUNKTION AUSWÄHLEN
Ist das Gerät eingeschaltet, drücken Sie die VOL-Taste wiederholt, um den gewünschten Modus
auszuwählen: Bluetooth, AUX oder USB.
BEDIENUNG
Der Bluetooth®-Markenname und damit verbundene Logos sind Eigentum der Firma Bluetooth
SIG, Inc. Jegliche Benutzung dieser Marken durch die Firma New One S.A.S stehen unter
Lizenz. Alle anderen Produkt- und Markennamen sind Eigentum_der jeweiligen Besitzer.
ANSCHLUSS AN EXTERNE GERÄTE
Zur Subwoofer- Ausgangsbüchse
Anschluss an LINE IN RCA-Eingänge
USB-WIEDERGABE
Verbindungsaufbau mit einem Bluetooth-Gerät
Verwenden eines Bluetooth-Geräts
1. Wenn das Gerät eingeschaltet ist, drücken Sie wiederholt die VOL-Taste, bis die
Funktions-LED blau leuchtet. Die LED-Funktionsanzeige blinkt zügig blau und weist somit
darauf hin, dass der Kopplungsmodus aktiviert ist.
2. Aktivieren Sie die Bluetooth-Funktion auf Ihrem Bluetooth-Gerät, und wählen Sie
"MUSE M-610 SH" in der Geräteliste. (Lesen Sie bitte die Bedienungsanleitung des jeweiligen
Geräts für detaillierte Bedienungsschritte zum Verbindungsaufbau.) Wenn das
Bluetooth-Gerät Sie zur Eingabe eines Schlüssels auffordert, geben Sie bitte "0000" ein.
Manche Bluetooth-Geräte erfordern es zudem, dass die Verbindung bestätigt wird. Nach der
erfolgreichen Kopplung ertönt ein Signalton. Die Bluetooth-Anzeige hört auf zu blinken und
leuchtet stetig. Die LED-Funktionsanzeige blinkt langsam.
Tipps: Wenn Sie Ihren Bluetooth-Lautsprecher mit einem anderen Bluetooth-Audiogerät
verbinden möchten, trennen Sie zuerst die bestehende Verbindung. Führen Sie anschließend
die oben genannten Schritte aus, um eine neue Verbindung herzustellen.
1. Bei bestehender Verbindung (siehe voriger Abschnitt), können Sie das
Bluetooth-Gerät bedienen und den Ton über das M-610 SH wiedergeben.
2. Wählen Sie den gewünschten Titel auf dem gekoppelten Gerät aus.
3. Passen Sie die Lautstärke mit dem
VOL-Regler an. Sie können die Lautstärke auch direkt
auf dem Gerät, mit dem die Verbindung hergestellt wurde, einstellen.
Hinweis: Während der Wiedergabe leuchtet die LED-Funktionsanzeige stetig.
NEW ONE S.A.S erklärt hiermit, dass dieser MUSE M-610 SH den wesentlichen
Anforderungen und anderen geltenden Vorgaben der Richtlinie 2014/53/EU entspricht. Die
Konformitätserklärung lässt sich unter www.muse-europe.com herunterladen.
1. Schließen Sie ein externes Gerät (z.B. DVD-Player) unter Verwendung eines
RCA-Audiokabels an die
LINE IN L/R Eingänge an der Rückseite des Geräts
an.
2. Wenn das Gerät eingeschaltet ist, drücken Sie wiederholt die
VOL-Taste, bis die
Funktions-LED gelb leuchtet. Das Gerät wechselt in den AUX-Modus.
3. Beginnen Sie mit dem Playback Ihrer Zusatzquelle.
4. Stellen Sie die Lautstärke auf den gewünschten Pegel ein.
5. Um die Wiedergabe zu beenden, trennen Sie das externe Gerät von den
LINE IN L/R
Eingängen.
Verwenden Sie ein geeignetes Audiokabel (nicht im Lieferumfang enthalten), um das Gerät mit
der Audioeingangsbuchse Ihres Subwoofers zu verbinden.
Schließen Sie ein USB-Gerät an den USB -Port dieses Geräts an. Das Gerät schaltet
automatisch in den USB-Modus und startet die Wiedergabe. Die LED-Funktionsanzeige leuchtet
dann lila.
- Auf dem USB-Gerät dürfen nicht mehr als 999 MP3-Dateien gespeichert sein.
- Das USB-Gerät darf nicht mehr als 99 Verzeichnisse enthalten.
- Je nach Anzahl der MP3-Dateien und Ordner auf dem USB-Gerät benötigt der Lautsprecher
einige Sekunden oder länger zum Lesen der Dateien.
- Stecken Sie nur ein USB-Gerät in den dazu vorgesehenen USB-Port. Sie könnten das Gerät
ansonsten beschädigen.
- Der USB-Port darf nicht direkt an einen PC angeschlossen werden: Dadurch könnte das Gerät
beschädigt werden.
- Auf dem Markt sind zahlreiche USB-Sticks und MP3-Player erhältlich. Die Kompatibilität mit
allen Formaten kann daher nicht gewährleistet werden. Benutzen Sie bitte einen anderen
USB-Stick, falls der Ihre nicht funktionieren sollte.
Anmerkungen:
- Der USB-Modus kann nur mit der Taste
VOL ausgewählt werden, wenn ein USB-Gerät
angeschlossen ist.
Auf einigen Geräten wie z. B. Computern müssen Sie bei bestehender Verbindung das Gerät
aus dem Bluetooth-Menü wählen und als Audiogerät aktivieren.
Die Verbindung bleibt bestehen, wenn das Bluetooth-Gerät außer Reichweite bzw.
ausgeschaltet ist. Eine aktive Verbindung wird dann wieder hergestellt, wenn das
Bluetooth-Gerät sich wieder in Reichweite bendet.
Wird das Gerät erneut eingeschaltet, versucht es automatisch, sich mit dem zuletzt
gekoppelten Bluetooth-Gerät zu verbinden.
- Nach der Verbindung des externen USB-Geräts mit der USB-Buchse Ihres Geräts wird
automatisch der USB-Modus aktiviert.
Hinweise:
- Der USB-Modus kann nur mit der Taste
VOL ausgewählt werden, wenn ein USB-Gerät
angeschlossen ist.
Je nach Modus leuchtet die LED-Anzeige in einer anderen Farbe:
Rot: Standby
Blau: Bluetooth
Gelb: AUX (Line-In)
Lila: USB
Adaptador de red:
M-610 SH/IB/V0
9. Stromversorgungseingang Gleichstrom (DC IN )
10. Lautsprecheranschlusskabel
ZUBEHÖR:
Netzstromadapter x1
ANSCHLUSS DER LAUTSPRECHER
Schließen Sie das Lautsprecherkabel an die Buchse am Hauptgerät an.LEFT OUT
RCA-Kabel x1
STROMVERSORGUNG
Der Netzstromadapter funktioniert mit Wechselstrom zwischen 100 und 240 V Wechselstrom.
Der mitgelieferte Netzstromadapter darf auf keinen Fall mit einer Stromquelle mit anderen
Kenndaten als den genannten verwendet werden.
4. Regolare il volume al livello desiderato.
5. Per arrestare la riproduzione scollegare la sorgente ausiliaria dalla presa
LINE IN L/R.


Produkt Specifikationer

Mærke: Muse
Kategori: Hi-Fi system
Model: M-610 SH

Har du brug for hjælp?

Hvis du har brug for hjælp til Muse M-610 SH stil et spørgsmål nedenfor, og andre brugere vil svare dig


Hi-Fi system Muse Manualer

Muse

Muse M-610 SH Manual

31 Juli 2025
Muse

Muse M-880 FBC Manual

7 Juli 2025
Muse

Muse M-30 BT Manual

31 December 2025
Muse

Muse M-630 DWT Manual

2 September 2024
Muse

Muse M-380 GBS Manual

25 August 2024
Muse

Muse M-380 GB Manual

25 August 2024
Muse

Muse M-880 BTC Manual

14 August 2024
Muse

Muse M-38 BT Manual

5 August 2024
Muse

Muse MD-203 KB Manual

5 August 2024
Muse

Muse M-182 DB Manual

3 August 2024

Hi-Fi system Manualer

Nyeste Hi-Fi system Manualer