Operating Instructions
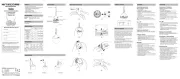
Battery Installation / Removal
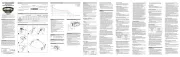
1. Remove the Shade.
2. Hold the Bubble in your hand.
3. Rotate the Top Cover counterclockwise to the end.
4. Separate the Top Cover and the Lamp Body.
5. As illustrated, insert / remove the batteries according to the
polarity labels.
6. Place the Top Cover over the Lamp Body according to the
position of △.
7. Rotate the Top Cover clockwise to the LIGHTING Position to
access Lighting Mode.
8. Install the Shade to complete the installation.
Note: The batteries should be replaced when the output
appears to be dim or the Bubble becomes unresponsive due to
low power.
On / Off
• In Lockout Mode, rotate the Top Cover clockwise to the
LIGHTING Position to access LOW.
• In Lighting Mode, touch and hold the Power Switch for 1
second to turn on / o the Bubble.
• When the light is on, rotate the Top Cover counterclockwise
to the LOCKOUT Position to turn o the Bubble and access
Lockout Mode.
Brightness Adjustment
When the light is on, touch the Power Switch to cycle through
the following sequences: LOW – MID – HIGH – Candle Mode.
Lockout / Unlock
• Lockout: In Lighting Mode, press and rotate the Top Cover
counterclockwise to the LOCKOUT Position to turn o the
Bubble and access Lockout Mode. Lighting Mode is not
available when the Bubble is locked.
• Unlock: In Lockout Mode, press and rotate the Top Cover
clockwise to the LIGHTING Position to unlock the Bubble and
access LOW.
Warnings
1. CAUTION! Possible dangerous radiation! Don't look into the
light! May be dangerous for your eyes.
2. Remove all batteries when the product is left unused for a
prolonged time.
3. When the product is kept in the backpack, please activate
the Lockout Mode to prevent accidental activation.
4. DO NOT disassemble or modify the product as doing so
will cause damage to it and render the product warranty
invalid. Please refer to the warranty section in the manual for
complete warranty information.
5. DO NOT immerse the product in water.
6. DO NOT install the batteries with wet hands.
7. DO NOT place the product close to the re to avoid accidents
and damage to the product.
8. Dispose of the device/batteries in accordance with applicable
local laws and regulations.
Features
Warranty Service
Operating Instructions Product View
Specifications
Accessories
Battery Options
Technical Data
Usage Options
SYSMAX Innovations Co., Ltd.
TEL: +86-20-83862000
FAX: +86-20-83882723
E-mail: info@nitecore.com
Web: www.nitecore.com
Address: Unit 6355, 5/F, No. 1021 Gaopu Road, Tianhe District,
Guangzhou, 510653, Guangdong, China
Please nd us on facebook : NITECORE Flashlight
Made in China
Bubble160523
• All-purpose portable camping lantern
• Equipped with 4 high CRI LEDs (CRI>90, Color Temperature:
2,700K) to produce a max output of 100 lumens
• 3 brightness levels and Candle Mode available
• Touch switch design
• Portable magnetic loop design
• Made from durable PC material
• Silicone shade is able to soften the light
• Waterproof and dustproof rating in accordance with IPX4
All NITECORE
®
products are warranted for quality. Any DOA /
defective product can be exchanged for a replacement through
a local distributor/dealer within 15 days of purchase. After
that, all defective / malfunctioning NITECORE
®
products can
be repaired free of charge within 60 months from the date
of purchase. Beyond 60 months, a limited warranty applies,
covering the cost of labor and maintenance, but not the cost of
accessories or replacement parts.
The warranty will be nullied if
1. the product(s) is/are broken down, reconstructed and/or
modied by unauthorized parties;
2. the product(s) is/are damaged due to improper use.
For the latest information on NITECORE
®
products and services,
please contact a local NITECORE
®
distributor or send an email
to service@nitecore.com.
※ All images, texts and statements specied herein this
user manual are for reference purposes only. Should any
discrepancy occur between this manual and information
specied on www.nitecore.com, Sysmax Innovations Co.,
Ltd. reserves the rights to interpret and amend the content
of this document at any time without prior notice.
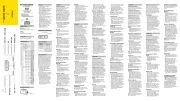
Dimensions: ø72mm x 132mm (ø2.83" x 5.20")
Weight: 106g (3.74 oz) (Batteries Included)
71g (2.50 oz)
3 x AAA Batteries
Type
Nominal
Voltage
Compatibility
NITECORE HLB1300
Rechargeable Li-ion
Battery Pack
— 3.7V
Y
(Recommended)
Primary Alkaline
Battery
AAA 1.5V
Y
(Recommended)
Rechargeable Ni-MH
Battery
AAA 1.2V
Y
(Recommended)
Rechargeable LFP
Battery
10400 3.2V N (Incompatible)
Rechargeable Li-ion
Battery
10400 3.7V N (Incompatible)
(English)Lockout / Unlock
All-purpose Portable Camping Lantern
(Francais)
Bubble
Brightness Levels
/ Mode
HIGH MID LOW
Candle
Mode
Brightness
100
Lumens
40
Lumens
6
Lumens
100 – 120
Lumens
Runtime 5h 10h 42h 5h
Note: The stated data is measured using 3 x 1.5V AAA alkaline
batteries under laboratory conditions. The data may vary in
real world use due to dierent battery usage or environmental
conditions.
Worldwide Warranty Service
Model number
————————————————————————
Date of purchase
————————————————————————
Serial number
————————————————————————
Store Stamp
————————————————————————
This is the certicate of authenticity if this item and we
conrm that it has been subjected to the most exacting
quality controls by SYSMAX Innovations Co., Ltd.
NOTE:
Please ensure this warranty card is fully completed by the
distributor or retailer after purchasing the product. Should
the product fail to operate correctly during the warranty
period, it may be returned with the completed warranty
card and original sales receipt to the retailer or local
distributor for replacement or repair.
Customer Service Email: service@nitecore.com
Shade
Loop
Top Cover
Power Switch
Lamp Body
LIGHTING Position
LOCKOUT Position
Magnetic Ball
Metal Surface
⑦
⑧
①
②
③
④
⑤
⑥
LOCKOUTLIGHTING
Rotate
Instructions d'utilisation
Installation et retrait de la batterie
1. Retirer l'abat-jour.
2. Tenez la Bubble dans votre main.
3. Tournez le couvercle supérieur dans le sens inverse des
aiguilles d'une montre jusqu'au bout.
4. Séparez le couvercle supérieur et le corps de la lampe.
5. Comme illustré, insérez / retirez les piles en respectant les
étiquettes de polarité.
6. Placez le couvercle supérieur sur le corps de la lampe en
respectant la position △.
7. Tournez le couvercle supérieur dans le sens des aiguilles
d'une montre jusqu'à la position LIGHTING pour accéder au
mode d'éclairage.
8. Installer l'abat-jour pour terminer l'installation.
On / Off
• En mode verrouillage, tournez le couvercle supérieur dans le
sens des aiguilles d'une montre jusqu'à la position LIGHTING
pour accéder au mode BAS.
• En mode éclairage, touchez et maintenez l'interrupteur
d'alimentation pendant 1 seconde pour allumer/éteindre la
Bubble.
• Lorsque la lumière est allumée, tournez le couvercle
supérieur dans le sens inverse des aiguilles d'une montre
jusqu'à la position LOCKOUT pour éteindre la Bubble et
accéder au mode verrouillage.
Réglage de la luminosité
Lorsque la lumière est allumée, appuyez sur l'interrupteur
d'alimentation pour faire déler les séquences suivantes : BAS -
MOYEN - HAUT - Mode Bougie.
Verrouillage / Déverrouillage
• Verrouillage : En mode éclairage, appuyez sur le couvercle
supérieur et tournez-le dans le sens inverse des aiguilles
d'une montre jusqu'à la position LOCKOUT pour éteindre la
Bubble et accéder au mode verrouillage. Le mode éclairage
n'est pas disponible lorsque la Bubble est verrouillée.
• Déverrouillage : En mode verrouillage, appuyez sur
le couvercle supérieur et tournez-le dans le sens des
aiguilles d'une montre jusqu'à la position ÉCLAIRAGE pour
déverrouiller la Bubble et accéder au mode BAS.
Avertissements
1. ATTENTION ! Risque de radiation dangereuse ! Ne regardez
pas la lumière ! Peut être dangereux pour les yeux.
2. Retirez toutes les piles lorsque le produit n'est pas utilisé
pendant une période prolongée.
3. Lorsque le produit est rangé dans le sac à dos, activez le
mode verrouillage pour éviter toute activation accidentelle.
4. NE PAS démonter ou modier le produit, car cela
l'endommagerait et rendrait la garantie du produit invalide.
Veuillez vous référer à la section garantie du manuel pour
des informations complètes sur la garantie.
5. NE PAS immerger le produit dans l'eau.
6. NE PAS installer les piles avec des mains mouillées.
7. NE PAS placer le produit à proximité du feu an d'éviter les
accidents et les dommages au produit.
8. Jetez l'appareil/les piles conformément aux lois et
réglementations locales en vigueur.
• Candle Mode Available
• Touch Switch Design
• 3 Brightness Levels