HC70
SYSMAX Innovations Co., Ltd.
TEL: +86-20-83862000
FAX: +86-20-83882723
E-mail: info@nitecore.com
Web: www.nitecore.com
Address: Rm2601-06,CentralTower,No.5XiancunRoad,
TianheDistrict,Guangzhou,510623,Guangdong,China
Thanks for purchasing NITECORE!
Please find us on facebook : NITECORE Flashlight
HC05037018
Warranty Service
All NITECORE® products are warranted
for quality. DOA/defective products can
be exchanged for replacement through a
local distributor/dealer within the 15 days
of purchase. After 15 days, all defective /
malfunctioning NITECORE® products will be
repaired free of charge for a period of 60
months from the date of purchase. After 60
months, a limited warranty applies, covering the
cost of labor and maintenance, but not the cost
of accessories or replacement parts.
The warranty is nullied in all of the following
situations:
1. The product(s) is/are broken down,
reconstructed and/or modied by
unauthorized parties.
2. The product(s) is/are damaged through
improper use.
3. The product(s) is/are damaged by leakage
of batteries.
※ For the latest information on NITECORE®
products and services, please contact your
national NITECORE® distributor or send an
email to service@nitecore.com. The Nitecore
ocial website shall prevail in case of any
product data changes.
· English · Español
· Deutsch · Francais
· Русский · 日本語
· 한국어 · Română
· 简体中文
(English) HC70 User Manual (Español) HC70
Manual de usuario
(Deutsch) HC70
Benutzerhandbuch
(Francais) HC70 Mode d’emploi
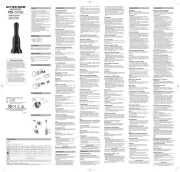
Features
• A headlamp with a separate battery case specially designed for caving
• The die-cast unibody headlamp is lightweight and durable
• Utilizes a CREE XM-L2 U2 LED
• Max output up to 1000 lumens
• Peak intensity up to 8300cd and a beam distance up to 182 meters
• Single switch controls 5 brightness levels and 3 special modes
• Integrated “Precision Digital Optics Technology” provides extreme reflector
performance
• High-eciency regulation circuit provides runtime up to 220 hours
• Flood lighting system produces a wide 90° beam angle
• Advanced temperature regulation (ATR) technology
• The battery case can serve as a power bank to charge 2 devices simultaneously
• Comfortable headband constructed from quality elastic nylon
• Optics lens with anti-reective coating
• Constructed from rugged aero-grade aluminum alloy
• Rugged HAIII military grade hard-anodized aluminum alloy
• IP67 waterproof
• Impact resistant to 1 meter
Specications
HC70 Headlamp: Battery Case:
Size: 64mm×36mm×56mm Size: 110.2mm×48.5mm×28mm
(2.52"×1.42"×2.20") (4.34"×1.91"×1.10")
Head diameter: 32mm (1.26") Weight: 176.7g (6.23oz)
Weight: 97.9g (3.45oz)
Accessories
Headband, 2×cable buckles
Battery options
HC70 battery case
Size Nominal voltage Compatible
18650 Rechargeable Li-ion battery 18650 3.7V Y (Recommended)
Primary Lithium battery CR123 3V N
Rechargeable Li-ion battery RCR123 3.7V N
NOTE: HC70 can also be powered by 5V power source, but Turbo and High modes
CANNOT be accessed.
Brightness & Runtime
FL1 STANDARD
Turbo High Mid Low
Ultralow
Caution Light
SOS Beacon
1000
lumens
550
lumens
240
lumens
65
lumens
1
lumen
1000
lumens
1000
lumens
1000
lumens
*2h15min
*4h 10h 30h 220h ─ ─ ─
182m 140m 89m 44m 7m ─ ─ ─
8300cd 4900cd 2000cd 485cd 12cd ─ ─ ─
1m (Impact resistance)
IP67 (Waterproof AND Submersible)
NOTICE: The above data has been measured in accordance with the international
ashlight testing standards ANSI/NEMA FL1 using two 3.7V 3400mAh 18650 batteries
under laboratory conditions. The data may vary slightly during real-world use due to
battery type, individual usage habits and environmental factors.
* The runtime for Turbo and High mode are the testing result before starting
temperature regulation.
About the Battery Case
Parameters
Input: DC 5V 1000mA
2.5W MIN(compatible with computer USB port)
Output Voltage: Headlamp Connection Port 8.4V MAX / 5V±5%
General USB port 5V±5%
Output Current: 2.1A MAX
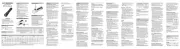
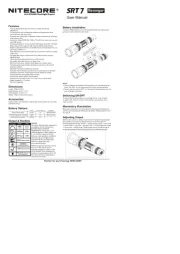
Battery Installation
Install two 18650 Li-ion batteries as illustrated in the diagram. After installation,
put the battery cap in place, use the key attached on the battery cap to screw it
clockwise.(as shown in diagram)
NOTE: Ensure batteries are inserted properly by
observing the positive and negative marks indicated
in the diagram. The HC70 will not operate with
incorrectly inserted batteries. Installing one 18650
Li-ion battery can not activate the battery case.
Operating Instruction
The battery case has three USB ports:
1) Headlamp Connection Port
2) General USB Output Port
3) Battery Case Charging Port
To use the headlamp, connect the headlamp cable to the Headlamp Connection Port.
Do not connect the cable to the General USB Output Port(5V) or the headlamp will
not function properly.
To charge the battery case, connect a USB- MICRO USB cable between the Battery
Case Charging Port and a USB power supply.
While the HC70 headlamp unit is turned o, the battery case can be used as a power
bank for other devices via the General USB output port. If the HC70 headlamp cable
is disconnected, the battery case can be used to charge two devices simultaneously
through the General USB Output Port and the Headlamp Connection Port.
Charging
After installing the batteries, plug one end of the USB cable into the Battery Case
Charging Port of the battery case, plug the other end into a USB adapter or socket
outlet (or USB power supply) to charge the batteries. During charging, the power
indicator on the battery case will blink; Upon charging completion, the power
indicator will become steady. It takes 11 hours to charge two 18650 Li-ion batteries
(3.7V 3400mAh ).
NOTE: When the power supply is adequate, the battery case will charge at the
rate of 1000mA; if the power supply cannot provide enough power input, it will
automatically lower the charging speed.
ON/OFF
Turn on: When the battery case is o, tap the power switch once to turn it on. The
power indicator will start blinking slowly.
Turn o: When the battery case is on, tap the power switch once to turn it o.
Note: Please turn o the battery case when it is not in use. If it is not used as a
power supply for 12 hours, the battery case will automatically turn o. When it is
stored in packsack or other places for long time storage, please take out the batteries
to avoid accidental activation or battery leakage.
Power Tips
There are 3 power indicators on the battery case. Once the battery case is turned on,
the power indicator will blink slowly to notify user.
(1) 3 indicator LEDs blink slowly to indicate the remaining power is full
(2) 2 Indicator LEDs blink slowly to indicate the remaining power is about 70%
(3) 1 indicator LED blinks slowly to indicate the remaining power is about 35%
About the headlamp
Operating Instructions
Power on: Connect the headlamp to the
Headlamp-purposed USB port (Turbo and High
modes CAN NOT be accessed If the headlamp
is connected to the general USB port)
WARNING: Avoid direct eye exposure.
ON/OFF
Check and make sure the battery case has been turned on before you operate the
headlamp.
Turn On: When it is connected to the battery case, the headlamp will automatically
enter the previously used mode.
Press and hold down the headlamp switch until the light activates, the headlamp will
enter the previously used mode.
Turn O: Press and hold down the headlamp switch to turn the light o; or tap the
power switch on the battery case to turn the light o.
Direct access to the ultralow mode: When the light is o, tap the headlamp
switch to enter ultralow mode.
Direct access to the turbo mode: When the light is o, long press the headlamp
switch for 1.5 seconds and then release.
NOTE: The battery case automatically turns on upon batteries installation. Nitecore
suggests to turn o the battery case before connecting the HC70 to avoid accidental
eye exposure.
Changing Brightness Levels
When the light is on, tap the headlamp switch repeatedly to cycle through “Ultralow-
Low-Mid-High-Turbo”. (The HC70 memorizes its previously used brightness level and
returns to it the next time it is turned on)
Accessing Special Modes (Caution Light/SOS/Beacon)
When the light is o, quickly tap the headlamp switch twice to turn on the caution
light. After the caution light is turned on, tap the switch repeatedly to cycle through
“SOS-Beacon-Caution Light”. Simply pressing and holding the switch to exit. (Special
modes cannot be memorized)
ATR (Advanced Temperature Regulation)
With Advanced Temperature Regulation module, the HC70 regulates its output and
adapts to the ambient environment, maintaining optimal performance.
Changing Batteries
Recharge the batteries when the output appears to be dim, or the Turbo and High
modes can no longer be accessed.
Maintenance
Every 6 months, wipe the threads of the battery case with a clean cloth followed by
applying a thin coating of silicon-based lubricant.
Warranty Service
All NITECORE® products are warranted for quality. DOA/defective products can be
exchanged for replacement through a local distributor/dealer within the 15 days of
purchase. After 15 days, all defective / malfunctioning NITECORE® products will be
repaired free of charge for a period of 60 months from the date of purchase. After 60
months, a limited warranty applies, covering the cost of labor and maintenance, but
not the cost of accessories or replacement parts.
The warranty is nullied in all of the following situations:
1. The product(s) is/are broken down, reconstructed and/or modied by unauthorized
parties.
2. The product(s) is/are damaged through improper use.
3. The product(s) is/are damaged by leakage of batteries.
※ For the latest information on NITECORE® products and services, please contact
your national NITECORE® distributor or send an email to service@nitecore.com.
The Nitecore ocial website shall prevail in case of any product data changes.
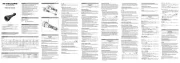
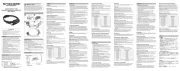
+ Battery 18650 -
- Battery 18650 +
Headlamp Connection Port
Battery Case Charging Port
Power Switch
Características
• Linterna frontal con porta baterías separado diseñada especialmente para espeleología
• El cuerpo monocasco fundido al vacío de la linterna frontal es ligero y durable
• Utiliza un LED CREE XM-L2 U2
• Potencia máxima de hasta 1000 lúmenes
• Intensidad máxima del haz de hasta 8300cd y distancia del haz de hasta 182 metros
• Botón único para control de los 5 niveles de intensidad y 3 modos especiales
• ”Tecnología Óptica de Precisión Digital” integrada, provee un rendimiento extremo del
reector
• Circuito de regulación de alta eciencia, proporciona una duración de batería de hasta
220 horas
• Amplio sistema de iluminación, produce un haz de luz con ángulo de 90°
• Tecnología avanzada de regulación de temperatura (ATR)
• El porta baterías puede funcionar como banco de poder para cargar 2 dispositivos
simultáneamente
• Confortable banda construida de nylon elástico de calidad
• Lente óptico con recubrimiento anti reejante
• Construida con fuerte aleación de aluminio de grado aeronáutico
• Robusto anodizado militar de grado HAIII
• IP67 resistente al agua
• Resistente a impactos desde 1 metros
Especicaciones
HC70 Linterna frontal: Porta baterías:
Tamaño: 64mm×36mm×56mm Tamaño: 110.2mm×48.5mm×28mm
(2.52"×1.42"×2.20") (4.34"×1.91"×1.10")
Diámetro de la cabeza: 32mm (1.26") Peso: 176.7g (6.23oz)
Peso: 97.9g (3.45oz)
Accesorios
Banda, 2×hebillas de cable
Opciones de baterías
HC70 porta baterías
Tamaño CompatibleVoltaje nominal
Batería 18650 Li-ion recargable 18650 3.7V S (Recomendado)
Batería primaria de litio CR123 3V N
Batería Li-ion recargable RCR123 3.7V N
NOTA: La HC70 puede ser alimentada también por una Fuente de 5V, pero los modos
Turbo y Alto NO pueden ser accesados.
Intensidad y duración
FL1
STANDARD
Turbo Alto Med Bajo Ultrabajo
Luz de
precaución
SOS Baliza
1000
lúmenes
550
lúmenes
240
lúmenes
65
lúmenes
1
lúmen
1000
lúmenes
1000
lúmenes
1000
lúmenes
*2h15min
*4h 10h 30h 220h ─ ─ ─
182m 140m 89m 44m 7m ─ ─ ─
8300cd 4900cd 2000cd 485cd 12cd ─ ─ ─
1m (Resistente a impactos)
IP67 (Resistente al agua Y sumergible)
ADVERTENCIA: Los datos aquí mencionados han sido medidos de acuerdo con los
estándares internacionales de pruebas de linternas ANSI/NEMA FL1, usando 2 baterías
18650 3.7V, 3400mAh bajo condiciones de laboratorio. Los datos pueden variar
ligeramente en el uso real debido al tipo de baterías, hábitos individuales de uso y
condiciones ambientales.
* El tiempo de duración en modo Turbo o Alto es el resultado de pruebas antes de iniciar
la regulación de temperatura.
Acerca del porta baterías
Parámetros
Entrada: DC 5V 1000mA
2.5W MIN (compatible con puerto USB de computadora)
Voltaje de salida: Puerto de conexión de la linterna 8.4V MAX / 5V±5%
Puerto general USB 5V±5%
Corriente de salida: 2.1A MAX
Instalación de las baterías
Instale 2 baterías Li-ion 18650 como se muestra en el diagrama. Después de la
instalación, coloque la tapa de las baterías en su lugar, utilice la llave jada en la tapa de
las baterías para atornillar en sentido de las manecillas
del reloj (como se muestra en el diagrama).
NOTA: Asegúrese que las baterías están insertadas
correctamente observando las marcas de polo positivo
y negativo indicadas en el diagrama. La HC70 no
operará con las baterías insertadas incorrectamente.
Instalar una batería Li-ion 18650 no activará el porta
baterías.
Instrucciones de operación
El porta baterías tiene tres puertos USB:
1) Puerto de conexión a la linterna
2) Puerto USB de salida general
3) Puerto de carga del porta baterías
Para utilizar la linterna, conecte el cable de la linterna al puerto de conexión de la
linterna. No conecte el cable al puerto USB de salida general (5V) o la linterna no
funcionará apropiadamente.
Para cargar el porta baterías, conecte un cable USB-MICRO USB entre el puerto de carga
USB del porta baterías y una fuente de alimentación USB.
Mientras la linterna HC70 está apagada, el porta baterías puede ser utilizado como banco
de energía para otros dispositivos mediante el puerto USB de salida general. Si el cable
de la linterna HC70 está desconectado, el porta baterías puede ser utilizado para cargar
2 dispositivos simultáneamente mediante el Puerto USB de salida general y el puerto de
conexión a la linterna.
Carga
Después de instalar las baterías, conecte un extremo del cable USB al puerto de carga del
porta baterías, conecte el otro extremo a un adaptador USB o, a un toma corriente USB
(o fuente de alimentación USB) para cargar las baterías. Durante la carga, el indicador
de encendido en el porta baterías parpadeará; Al completar la carga, el indicador de
encendido permanecerá iluminado. Toma 11 horas cargar 2 baterías Li-ion 18650 (3.7V
3400mAh).
NOTA: Cuando la fuente de alimentación es adecuada, el porta baterías cargará a una
velocidad de 1000mA; Si la fuente de alimentación no puede proporcionar suciente
potencia de entrada, automáticamente bajará la velocidad de carga.
ON/OFF
Encendido: Cuando el porta baterías está apagado, presione el botón de encendido una
vez para encenderlo. El indicador de encendido comenzará a parpadear lentamente.
Apagado: Cuando el porta baterías está encendido, presione el botón de encendido una
vez para apagarlo.
Nota: Por favor apague el porta baterías cuando no está en uso. Si no se usa como
fuente de alimentación por 12 horas, el porta baterías se apagará automáticamente.
Cuando se almacene en una mochila u otros lugares por periodos de tiempo prolongados,
por favor saque las baterías para evitar activación accidental o fugas de las baterías.
Consejos de carga
Hay 3 indicadores de encendido en el porta baterías. Una vez que el porta baterías está
encendido, el indicador de encendido parpadeará lentamente para noticar al usuario.
(1) 3 LEDs indicadores parpadean lentamente para indicar que la carga está complete
(2) 2 LEDs indicadores parpadean lentamente para indicar que la carga restante es de
aproximadamente el 70%
(3) 1 LED indicador parpadea lentamente para indicar que la carga restante es de
aproximadamente el 35%
Acerca de la linterna
Instrucciones de operación
Encendido: Conecte la linterna al puerto USB
específico para conexión a la linterna (modos
Turbo y Alto NO pueden ser accesados si la
linterna está conectada al puerto USB general)
ADVERTENCIA: Evite la exposición directa a los
ojos
ON/OFF
Compruebe y asegúrese que el porta baterías esté encendido antes de operar la linterna.
Encendido: Cuando está conectada al porta baterías, la linterna automáticamente
entrará en el modo utilizado anteriormente.
Presione y mantenga presionado el botón de encendido de la linterna hasta que la luz se
active, la linterna entrará en el modo previamente utilizado.
Apagado: Presione y mantenga presionado el botón de encendido de la linterna para
apagar la luz; o presione el botón de encendido en el porta baterías para apagar la luz.
Acceso directo al modo ultrabajo: Cuando la luz está apagada, toque el botón de
encendido de la linterna para entrar al modo ultra bajo.
Acceso directo al modo turbo: Cuando la luz está apagada, presione el botón de
encendido de la linterna durante 1.5 segundos y después suéltelo.
NOTA: El porta baterías automáticamente se enciende al instalar las baterías. Nitecore
sugiere apagar el porta baterías antes de conectar la HC70 para evitar exposición
accidental a los ojos.
Selección del nivel de intensidad
Cuando la luz está encendida, toque el botón de encendido de la linterna repetidamente
para cambiar entre “Ultrabajo-Bajo-Medio-Alto-Turbo”. (La HC70 memoriza el nivel de
intensidad utilizado previamente y regresará a el la siguiente vez que sea encendida).
Acceso a los modos especiales (Luz de precaución/SOS/
Baliza)
Cuando la luz está apagada, presione rápidamente 2 veces el botón de encendido de la
linterna para encender la luz de precaución. Después de encender la luz de precaución,
presione el botón repetidamente para cambiar entre “SOS-Baliza-Luz de precaución”.
Simplemente presione y manteniendo presionado el botón para salir. (Los modos
especiales no pueden ser memorizados).
ATR (Regulación de Temperatura Avanzado)
Con el modulo de Regulación de Temperatura Avanzado, la HC70 regula su salida y se
adapta al medio ambiente, manteniendo un rendimiento óptimo.
Cambio de baterías
Recargue las baterías cuando la intensidad luzca tenue, o los modos Turbo y Alto no
puedan ser accesados.
Mantenimiento
Cada 6 meses, limpie los sellos del porta baterías con un paño limpio, seguido a esto,
aplique una na capa de lubricante a base de silicón.
Servicio de garantía
Todos los productos NITECORE
®
tienen garantía de calidad. Todo producto DOA /
defectuoso puede ser remplazado por medio de un distribuidor local en los primeros
15 días después de la compra. Después de 15 días todos los productos NITECORE
®
defectuosos / con fallas pueden ser reparados libre de costo por un periodo de 60 meses
a partir de la fecha de adquisición. Después de 60 meses, aplicará una garantía limitada,
que cubre el costo de mano de obra y mantenimiento, más no el costo de accesorios o
recambio de piezas.
La garantía se cancelará en cualquiera de las siguientes situaciones:
1. El(los) producto(s) está(n) descompuesto(s), reconstruido(s) o modificado(s) por
partes no autorizadas.
2. El(los) producto(s) está(n) dañado(s) por uso inapropiado.
3. El(los) producto(s) está(n) dañado(s) por fugas de las baterías.
※Para la información más recientes sobre productos y servicios de NITECORE
®, favor
de ponerse en contacto con el distribuidor nacional de NITECORE
® o envíe un correo
electrónico a service@nitecore.com El sitio web ocial de Nitecore prevalecerá en caso
de cambios en los datos del producto.
+ Battery 18650 -
- Battery 18650 +
Headlamp Connection Port
Battery Case Charging Port
General USB output port (5V)
Power Switch
Caractéristiques
• Lampe frontale avec batterie séparée spécialement conçue pour la spéléologie
• Construction monobloc en aluminium hautement résistante et légère
• LED premium CREE XM-L2 (U2) pour un éclairage allant jusqu’à 1000 lumens
• Pic d’intensité de 8300 Candelas et portée de 182 mètres
• Interrupteur permettant d’alterner entore 5 niveaux de luminosité et 3 modes
spéciaux
• Réecteurs « Precision Digital Optics Technology » haute performance
• Circuit haute performance offrant jusqu’à 220 heures d’autonomie en niveau
d’éclairage bas
• Système basé “catoptrics” orant un faisceau extrêmement large de 90°
• Le système avancé de régulation de la température (ATR)
• Le boitier de batterie peut contenir un chargeur 2 batteries
• Bandeau confortable anti-irritation en nylon respirable
• Lentilles en verre minéral durci traitées antireets
• Construit en alliage d’aluminium de grade aéronautique
• Anodisation dure qualité militaire « HAIII »
• Etanche conformément à la norme IP67
• Résiste à des chutes jusqu’à 1 mètres de hauteur
Dimensions
Dimensions de la lampe : 64mm×36mm×56mm
Taille tête : 32mm
Poids : 97.9g
Dimensions du boitier de batteries : 110.2mm×48.5mm×28mm
Poids : 176.7g
Accessoires
Bandeau, 2×cables
Options Batterie
taille Voltage nominal Compatible
Batterie 18650 Rechargeable Li-ion 18650 3.7V Oui recommandé
Piles Lithium CR123 3V Non
Batterie Rechargeable Li-ion RCR123 3.7V Non
NOTE: HC70 peut aussi être alimenté par la source de 5v, mais le mode de Turbo et
de Haut ne sont pas accessibles
Luminosité & Autonomie
FL1
STANDARD
Turbo HIGH MID LOW
ULTRA-LOW Signal de
Police SOS Signal de
Localisation
1000
LUMENS
550
LUMENS
240
LUMENS
65
LUMENS
1
LUMEN
1000
LUMENS
1000
LUMENS
1000
LUMENS
*2h15min
*4h 10h 30h 220h ─ ─ ─
182m 140m 89m 44m 7m ─ ─ ─
8300cd 4900cd 2000cd 485cd 12cd ─ ─ ─
1m (resistant aux chocs)
IP67 (etanche et submersible)
NOTE : Les données ci-dessus ont été mesurées conformément à la norme ANSI/
NEMA FL1 concernant les produits d’éclairage portatifs, en utilisant 2 batteries 18650
Nitecore 3,7V 3400mAh dans des conditions de laboratoire. Les données peuvent
varier légèrement pour un usage réel en fonction du type de batteries/piles, des
habitudes individuelles d’utilisation et des facteurs environnementaux.
* Les données pour le mode “turbo” et “high” sont obtenus avant de commencer la
régulation de température.
Informations sur le boitier de batteries
Caractéristiques
Tension Entrée: DC 5V 1000mA
2.5W MIN(compatible avec port USB )
Tension sortie: port connexion de la lampe 8.4V MAX / 5V±5%
port général USB 5V±5%
Courant sortie: 2.1A MAX
Insertion des batteries/piles
Insérez 2 batteries comme sur le schéma ci-
dessous. Placer la plaque de protection et
verrouillez le couvercle dans le sens horaire avec la
clé attachée au boitier.
Note : Insérez les 2 batteries avec les pôles positif
(+) et négatif (-) orientés comme sur le schéma. La
lampe ne fonctionnera pas avec les batteries mal
insérées, ou avec une seule batterie.
Utilisation Générale
Le boitier de batterie possède 3 ports USB :
(1) port de connexion de la lampe frontale
(2) port USB général.
(3) port USB de chargement micro USB.
Connecter le câble de la lampe frontale au port de connexion de la lampe frontale et
à la lampe. Ne pas connecter ce câble au port général de sortie USB (5V).
Pour charger les batteries : connecter un câble micro usb / USB à un port USB
Lorsque la lampe HC70 est éteinte le boitier de batteries peut être utilisé pour
connecter d’autres appareils via le port USB général.
Si le port de connexion de la lampe frontale n’est pas utilisé, le boitier peut être
utilisé pour charger simultanément 2 appareils via le port de connexion de la lampe
et via le port général USB.
Chargement
Après installation des batteries, branchez une extrémité du câble USB dans le port
mini-USB du boîtier de batteries, branchez l'autre extrémité dans un adaptateur USB
ou une prise murale (ou une alimentation USB) pour charger les batteries. Dans des
conditions de charge normales, l’indicateur lumineux près du port de charge clignote.
Lorsque la charge est terminée, l’indicateur lumineux reste allumé. La charge
complète de 2 batteries li-ion 18650 (3.7V – 3400mAh) prend approximativement 11
heures.
Note : Lorsque l'alimentation électrique est adéquate, la charge se fait à une
puissance de 1000mA; Si l'alimentation électrique ne peut pas fournir susamment
d'alimentation, elle abaissera automatiquement la vitesse de charge.
ON/OFF
Alimentation: lorsque le boîtier de la batterie est éteint, appuyez une fois sur
l’interrupteur pour l'allumer. L'indicateur d'alimentation commence à clignoter
lentement.
Extinction: lorsque le boîtier de la batterie est allumé, appuyez une fois sur
l'interrupteur pour l'éteindre.
Remarque: Veuillez éteindre le boîtier de la batterie lorsqu'il n'est pas utilisé. S’il
n'est pas utilisé comme alimentation électrique pendant 12 heures, le boîtier s'éteindra
automatiquement. Lorsqu'il est stocké dans un sac ou pour un stockage prolongé,
retirez les batteries pour éviter une activation accidentelle ou une fuite de batterie.
Conseils
Il y a 3 indicateurs lumineux sur le boitier de batteries qui clignotent lentement
lorsqu’il fonctionne : 3 indicateurs signifie que la puissance est complète, 2
indicateurs signie que la puissance est d’environ 70% , 1’indicateur signie que la
puissance est aux environs de 35%.
Informations sur la lampe
Connecter le câble de la lampe frontale au port
de connexion de la lampe frontale. Les modes
Turbo et High ne peuvent PAS être accessibles
si la lampe est connectée au port USB général.
ATTENTION : Assurez-vous que le faisceau
n’est pas dirigé vers les yeux de personnes ou
d’animaux.
ON/OFF
Vérier que le boitier de batteries est allumé avant d’utiliser la lampe.
Alimentation : Lorsque la lampe est connectée au boitier de batteries elle s’allume
automatiquement au dernier mode utilisé.
Extinction : Maintenir enfoncé l’interrupteur pour éteindre la lampe ou appuyer sur
l’interrupteur du boitier de batteries pour éteindre la lampe.
Accès direct au mode « ultralow » : lorsque la lampe est éteinte, appuyer sur
l’interrupteur de la lampe pour accéder au mode « ultralow ».
Accès direct au mode « Turbo » : lorsque la lampe est éteinte, rester appuyer sur
l’interrupteur de la lampe pendant 1.5 seconde et relâchez.
Note : A l’installation des batteries dans le boitier, celui-ci s’allume automatiquement.
Nitecore suggère d’éteindre le boitier de batteries avant de connecter la lampe pour
éviter une exposition accidentelle au niveau des yeux.
Sélection de la Luminosité
Lorsque la lampe est allumée, appuyez plusieurs fois sur l’interrupteur de la lampe
pour alterner entre les modes d’éclairage suivants : très bas, bas, moyen, fort et
turbo. Le niveau de luminosité actif est mémorisé lorsque l’utilisateur éteint la lampe.
Modes spéciaux Signal de Police / SOS et Signal de
Localisation
Lorsque la lampe est allumée, pressez le bouton jusqu’à la butée deux fois de suite
pour activer le signal de Police. Pressez l’interrupteur jusqu’à mi-course plusieurs fois
pour alterner entre Signal de Localisation, SOS et Signal de Police. Appuyez jusqu’à
la butée pour sortir du mode spécial et éteindre la lampe. (les modes spéciaux ne
peuvent pas être mémorisés)
Système ATR
Le système avancé de régulation de la température (ATR) permet à la lampe d’ajuster
de façon dynamique son niveau d’éclairage en fonction de sa température interne.
Cela permet d’éviter toute surchaue de la lampe et d’augmenter sa durée de vie
Remplacement des batteries
Si la lampe devient faible ou ne répond plus aux réglages (accès Turbo et high
impossible), cela signie également que les batteries doivent être remplacées ou
rechargées.
Maintenance
Tous les six mois, les letages doit être essuyé avec un chion propre et recouvert d’un
lubriant à base de silicone.
Service de Garantie
Tous les produits NITECORE
® sont garantis pour leur qualité. Les produits défectueux
peuvent être échangés par l’intermédiaire du distributeur local dans les 15 jours
suivant l’achat. Après 15 jours, tous les produits NITECORE® défectueux peuvent
être réparés gratuitement pendant les 60 mois suivant l’achat. Après 60 mois, une
garantie limitée s’applique, couvrant les coûts de main d’œuvre et maintenance, mais
pas le coût des pièces détachées.
La garantie est annulée dans les situations suivantes :
1. Le(s) produit(s) est/sont démonté(s), reconstruit(s) et/ou modifié(s) par des
personnes non autorisées.
2. Le(s) produit(s) est/sont endommagés suite à un usage inapproprié.
3. Le(s) produit(s) est/sont endommagés suite à des fuites de batteries.
Pour les dernières informations sur les produits et services NITECORE®, contactez
votre distributeur national NITECORE® ou envoyez un mail à service@nitecore.com.
+ Battery 18650 -
- Battery 18650 +
Headlamp Connection Port
Battery Case Charging Port
General USB output port (5V)
Power Switch
Funktionen und Eigenschaften
• Kopampe mit separatem Batteriefach speziell entwickelt für Höhlenforschung
• Leichtes und robustes Druckgussgehäuse
• Verwendet eine CREE XM-L2 U2 LED
• Maximale Leistung von 1000 Lumen
• Spotintensität von 8300cd, Leuchtweite bis zu 182 Meter
• Ein Schalter für 5 Helligkeitsstufen und 3 Spezial-Modi
• Integrierte "Precision Digital Optics Technology" für hervorragende Reektorleistung
• Hochleistungsschaltkreis für bis zu 220 Stunden Laufzeit
• 90° breiter Strahlwinkel
• Erweiterte Temperaturregulierung (ATR) -Technologie
• Das Batteriefach kann als Power Bank zum gleichzeitigen Laden von zwei Geräten
dienen
• Bequemes Kopfband aus hochwertigem, elastischem Nylon
• Gehärtetes ultra-klares Mineralglas mit Antireexbeschichtung
• Hergestellt aus Luftfahrt-Aluminium-Legierung und hart eloxiert nach HAIII-Militär-
Standard
• Wasserdicht nach IP67
• Bruchfeste Fallhöhe bis 1 Meter
Technische Daten
HC70 Kopampe Batteriefach
Maße: 64 mm x 36 mm x 56 mm Maße: 110,2 mm x 48,5 mm x 28 mm
Lampenkopfdurchmesser: 32 mm Gewicht: 176,7 g
Gewicht: 97,9 g
Zubehör
Kopfband, 2 Kabelschnallen
Zugelassene Batterien und Akkus
HC70 Batteriegehäuse
Typ Art Spannung Kompatibilität
wiederauadbarer Li-Ionen Akku 18650 3,7 V Ja (empfohlen)
Standard Lithium Batterie CR123 3 V Nein
wiederauadbarer Li-Ionen Akku RCR123 3,7 V Nein
HINWEIS: Die HC70 kann auch mit einer 5V Stromquelle betrieben werden, hier stehen
dann aber weder Turbo noch High Mode zur Verfügung.
Helligkeit und Leuchtdauer
FL1
STANDARD
TURBO HIGH MID LOW
ULTRA-LOW
Warnlicht SOS Beacon
1000
LUMEN 550
LUMEN 240
LUMEN 65
LUMEN 1
LUMEN 1000
LUMEN 1000
LUMEN 1000
LUMEN
*2h15min *4h 10h 30h 220h ─ ─ ─
182m 140m 89m 44m 7m ─ ─ ─
8300cd 4900cd 2000cd 485cd 12cd ─ ─ ─
1 m (bruchfeste Fallhöhe)
IP67 (wasserdicht und Tauchtiefe)
HINWEIS :
Die angegebenen Werte wurden nach internationalem ANSI/NEMA FL1 Standard
unter Verwendung von 2 x 18650 Li-Ionen Akku (3.7V, 3400mAh) im Testlabor
ermittelt. Die Werte können im Alltag, je nach Batteriezustand, - typ, individuellen
Nutzungsgewohnheiten und Umwelteinüssen abweichen.
* Die Leuchtdauer im "HIGH- und TURBO-Mode" wurde ermittelt bevor sich das
Temperaturregulierungsmodul einschaltet.
Das Batteriegehäuse
Technische Daten
Eingangsspannung: DC 5V 1000mA
2,5W min (kompatibel mit Computer USB Port)
Ausgangsspannung: Anschluss für Kopampe: 8,4V max / 5V ± 5%
USB Ausgang: 5V ± 5%
Ausgangsstrom: 2,1V max
Einsetzen der Akkus
Legen Sie zwei 18650 Li-Ionen Akkus ein, wie in der Zeichnung dargestellt. Nach
dem Einlegen der Akkus befestigen sie den Batteriefachdeckel mit dem mitgelieferten
Schlüssel am Batteriefach, indem sie die Schraube im Uhrzeigersinn drehen.
HINWEIS:
Stellen Sie sicher, dass die Batterien richtig eingelegt
sind, indem Sie die in der Abbildung angegebenen
positiven und negativen Markierungen beachten. Mit
falsch eingesetzten Batterien wird die HC70 nicht
funktionieren. Es müssen immer zwei Akkus eingesetzt
sein.
Bedienungsanleitung
Das Batteriefach hat drei USB-Anschlüsse:
1) Kopampenanschluss
2) Allgemeiner USB-Ausgang
3) Ladeanschluss
Um die Kopflampe zu verwenden, schließen Sie das Verbindungskabel an den
Kopampenanschluss an. Benutzen Sie dafür nicht an den allgemeinen USB-Ausgang (5V)!
Mit diesem Anschluss wird die Kopampe nicht ordnungsgemäß funktionieren.
Um die Akkus im Batteriefach aufzuladen, verbinden Sie den MIRCO-USB-Ladeanschluss
mittels eines USB-Kabels mit einer USB-Stromquelle.
Wenn die HC70 Kopampe ausgeschaltet ist, kann das Batteriefach über den allgemeinen
USB-Ausgang als Power-Bank für andere Geräte dienen. Wenn das Kabel zur HC70
Kopampe abgeklemmt ist, kann das Batteriefach zum gleichzeitigen Laden von zwei
Geräten genutzt werden: Über den USB-Ausgang und den Kopampenanschluss.
Auaden
Nach dem Einlegen der Akkus stecken Sie das eine Ende des USB-Kabels in den
Ladeanschluss des Batteriefachs und das andere Ende in eine USB-Stromquelle, um
die Akkus aufzuladen. Während des Ladevorgangs blinkt die Betriebs anzeige am
Batteriefach. Nach dem Abschluss des Ladevorgangs leuchtet die Betriebsanzeige
konstant. Es dauert 11 Stunden, um zwei 18650 Li-Ionen-Akkus (3,7 V 3400mAh)
aufzuladen.
HINWEIS: Wenn die Stromversorgung ausreichend ist, wird das Batteriefach mit
1000mA aufgeladen; wenn die Stromversorgung nicht ausreichend ist, wird der
Ladestrom automatisch angepasst.
Ein-/Ausschalten
Einschalten: Wenn das Batteriefach ausgeschaltet ist, tippen Sie kurz auf den Ein-/
Ausschalter, um es einzuschalten. Die Betriebsanzeige beginnt langsam zu blinken.
Ausschalten: Wenn das Batteriefach eingeschaltet ist, tippen Sie kurz auf den
Netzschalter, um es auszuschalten.
HINWEIS: Bitte schalten Sie das Batteriefach aus, wenn es nicht benutzt wird. Wenn
es innerhalb von 12 Stunden nicht verwendet wird, schaltet sich das Batteriefach
automatisch aus. Wenn es für längere Zeit ohne Nutzung gelagert wird, entnehmen Sie
bitte die Akkus, um eine versehentliche Aktivierung oder das Auslaufen der Akkus zu
vermeiden.
Power-Tipps
Es gibt 3 LEDs am Batteriefach. Sobald das Batteriefach eingeschaltet ist, beginnen die
LEDs langsam zu blinken.
(1) 3 LED-Anzeigen blinken langsam, um anzuzeigen, dass der Akku voll geladen ist.
(2) 2 LEDs blinken langsam, um anzuzeigen, dass die Restleistung etwa 70% beträgt.
(3) 1 LED blinkt langsam, um anzuzeigen, dass die restliche Leistung bei etwa 35% ist.
Die Kopampe
Einschalten: Verbinden Sie die Kopampe mit
dem Kopflampenanschluss. (Auf Turbo- und
High-Mode kann NICHT
zugegrien werden, wenn die Kopampe an den
USB-Ausgang angeschlossen ist.)
WARNUNG: Blicken Sie nicht direkt in den
Lichtstrahl. Dies kann zu Augenschäden führen.
An-/Ausschalten
Überprüfen Sie und achten Sie darauf, dass das Batteriefach eingeschaltet ist, bevor Sie
den Scheinwerfer betätigen.
Anschalten: Wenn die Kopampe an das Batteriefach angeschlossen ist, wechselt sie
automatisch in den vorher verwendeten Modus. Halten Sie den Schalter der Kopampe
gedrückt, bis das Licht aktiviert ist - die Kopampe verwendet den vorher genutzten
Mode.
Ausschalten: Halten Sie den Schalter der Kopflampe gedrückt, bis das Licht
ausgeschaltet ist. Oder tippen Sie auf den Ein-/Ausschalter am Batteriefach, um das Licht
auszuschalten.
Direkter Zugri auf den Ultralow-Mode: Wenn das Licht ausgeschaltet ist, tippen
Sie auf den Kopampen-Schalter, um in den Ultralow-Mode zu schalten.
Direkter Zugri auf den Turbo-Modus: Wenn das Licht ausgeschaltet ist, drücken
Sie den Kopampen-Schalter für 1,5 Sekunden und lassen Sie ihn dann los.
HINWEIS: Das Batteriefach schaltet sich bei der Installation der Akkus automatisch ein.
Nitecore schlägt vor, das Batteriefach auszuschalten, bevor die HC70 angeschlossen wird,
um eine versehentliche Augenbelastung zu vermeiden.
Wechsel der Helligkeitsstufen
Wenn das Licht eingeschaltet ist, tippen Sie wiederholt auf den Scheinwerfer-Schalter, um
nacheinander wiederholt durch die Helligkeitsstufen "Ultralow" - "Low" - "Mid" - "High"
und "Turbo" zu schalten. (Die HC70 speichert die bisher verwendete Helligkeitsstufe und
startet mit dieser, wenn sie erneut eingeschaltet wird.)
Zugri auf Sondermodi (Warnlicht / SOS / Beacon)
Wenn das Licht ausgeschaltet ist, tippen Sie zweimal kurz nacheinander auf den
Kopflampen-Schalter, um das Warnlicht einzuschalten. Nachdem das Warnlicht
eingeschaltet ist, tippen Sie wiederholt auf den Schalter, um durch die Modi "SOS" -
"Beacon" und "Caution-Light" zu schalten. Zum Beenden drücken und halten Sie einfach
den Schalter. (Die Sondermodi können nicht gespeichert werden.)
ATR (erweiterte Temperaturregulierung)
Mit dem "Advanced Temperature Regulation"-Modul regelt die HC70 ihre Leistung und
passt sich der Umgebungstemperatur an, um so die optimale Leistung zu erhalten.
Wechsel der Akkus/Batterien
Die Akkus sollten aufgeladen oder die Batterien ersetzt werden, wenn der Lichtschein
dunkel erscheint oder die Taschenlampe nicht mehr reagiert.
Wartung
Alle 6 Monate sollte das Gewinde mit einem sauberen Tuch abgewischt und anschließend mit
einer dünnen Schicht Silikonfett geschmiert werden.
Garantiebedingungen
Alle NITECORE® Produkte genießen einen umfassenden Garantieschutz.
Bei einer Fehlfunktion der NITECORE ® der HC70 kann das Gerät über einen autorisierten
Vertriebshändler/Händler innerhalb von 15 Tagen nach Erwerb - nach Vorlage des Kaufbelegs durch
den Endverbraucher - getauscht werden. Nach 15 Tagen können alle defekten oder fehlerhaften
NITECORE ® Produkte für einen Zeitraum von 60 Monaten (5 Jahr) ab Kaufdatum kostenlos repariert
werden. Über 60 Monate (5 Jahr) hinaus deckt die Garantie die Arbeitskosten, jedoch nicht die Kosten
für Zubehör- oder Ersatzteile.
Der Garantieanspruch erlischt beim Eintritt folgender Umstände:
1. Der Artikel wurde durch konstruktive Veränderungen beschädigt oder modiziert.
2. Der Artikel wurde durch unsachgemäßen Gebrauch beschädigt.
3. Der Artikel wurde durch auslaufende Batterien/Akkus beschädigt.
Für weitere Details der NITECORE® Garantie-Bedingungen kontaktieren Sie bitte einen regionalen
Vertrieb/Händler oder senden Sie eine E-Mail an service@nitecore.com
Hinweis: Die offizielle Website von NITECORE ® gilt im Falle von geänderten Produktdaten als
maßgebend. Alle Bilder, Texte und Erklärungen in dieser Bedienungsanleitung dienen lediglich
Referenzzwecken. Sollte eine Diskrepanz zwischen dieser Bedienungs-anleitung und den veröentlichten
Informationen auf der NITECORE ® Website »www.nitecore.com« auftreten, gelten die Informationen
unserer oziellen Website. SYSMAX Innovations Co., Ltd. behält sich das Recht vor, den Inhalt dieses
Dokumentes jederzeit und ohne Vorankündigung zu ändern und zu interpretieren.
Allgemeine Hinweise
Altbatterien gehören nicht in den Hausmüll. Sie können gebrauchte Batterien unentgeltlich an
unserer Versandlager zurückgeben. Als Verbraucher sind Sie zur Rückgabe von Altbatterien gesetzlich
verpichtet.
+ Battery 18650 -
- Battery 18650 +
Headlamp Connection Port
Battery Case Charging Port