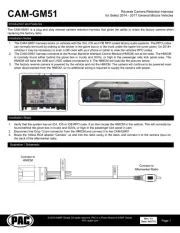
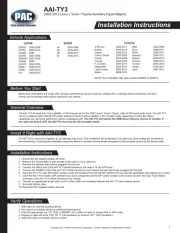
PAC AP4-TY13 Manual


Læs gratis den danske manual til PAC AP4-TY13 (6 sider) i kategorien Ikke kategoriseret. Denne vejledning er vurderet som hjælpsom af 15 personer og har en gennemsnitlig bedømmelse på 4.6 stjerner ud af 8 anmeldelser. Har du et spørgsmål om PAC AP4-TY13, eller vil du spørge andre brugere om produktet?

Side 1/6
© 2019 AAMP Global. All rights reserved. PAC is a Power Brand of AAMP Global.
PAC-audio.com
C
Page 1
Rev: V3
Date:062419
Advanced Amplier Interface
for Select Toyota Applications
AP4-TY13
The AP4-TY13 provides a 6-channel pre-amp output for use with aftermarket audio equipment. Using the full range,
xed level head unit output, in conjunction with data bus messages, the AP4-TY13 delivers a variable 5v RMS
pre-amp output with fading, balance, equalization, and level control capabilities. The module also retains audio from
other vehicle features such as factory navigation prompts, Bluetooth and Voice Activation. An accessory controlled
remote amplier turn on wire is also provided by the AP4-TY13. When used in conjunction with the APA-TOS1 (sold
separately), the module can provide a variable 2-channel ber optic digital audio output (TOSLINK).
Introduction and Features
Important Notes
1. Toyota Safety Connect (SOS) can easily be retained. See the Tech Brief "AP4-TY SOS Retention" at PAC-audio.com for
detailed instructions.
2. The factory radio's speed controlled volume, DSP, and surround sound mode are not supported by the AP4 outputs.
3. The factory amplier must remain connected, and in the vehicle after the AmpPRO has been installed.
4. Prior to testing, cycle the ignition off and back on again to properly initilize the AP4-TY13.
5. The radio's beep setting must be enabled on the factory radio in order to hear the audible tones when making selections
through the radio.
6. Initially, if the beep through the AP4-TY13 does not match the on / off selection through the radio, cycle the beep to the
opposite setting and back, then test again.
7. The radio's beep volume and minimum volume levels are set to 0 dB by default. If you are happy with this level in your
particular application, additional adjustment is not required. Please refer to the Setup and Conguration section on page 4
for more details.
8. The Radio's Nav / VR Voice, incoming E-mail tone, Ringtone, In-Call, Incoming SMS / MMS tone and Incoming SMS Voice
volumes can be adjusted through the radio's settings menu as they were prior to installation of the AP4-TY13.
9. The remote output is rated at 2A of current. If more current is needed, an external relay must be used.
10. Channels 5 and 6 are non-fading outputs. The output level of channels 5 and 6 can be controlled using the supplied level
control knob.
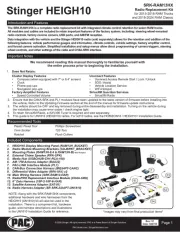
Wiring Connection Chart
To Aftermarket
Amplier
Non-FadingRearFront
1(L) 2(R) 4(R) 5(L) 6(R)3(L)
To Amp
Non-Fading
Level Control
Knob
To Amp
Harness
AP4-TY13-HAR
Remote Turn On Output (2A Max)
24-pin
30-pin
© 2019 AAMP Global. All rights reserved. PAC is a Power Brand of AAMP Global.
PAC-audio.com
C
Page 2
Rev: V3
Date:062419
Advanced Amplier Interface
for Select Toyota Applications
AP4-TY13
Installation
1. To gain access to the amplier, reposition the left front seat forward
and to the highest position.
2. Locate the factory amplier cover, remove the 3 push pins that
secure the cover into place, and remove the cover to gain access to
the amplier (Fig. 1).
3. Disconnect the 30-pin harness and the 24-pin harness from the
amplier. To unplug the 30-pin, you must press the inner release tab
and pull the connector's outer release tab at the same time (Fig. 2).
4. Connect the AmpPRO harnesses to the vehicle harnesses.
5. Connect the AmpPRO harnesses to the factory amplier.
6. Set any feature DIP switches that apply to your install.
a. DIP switch 1 is used for two channel mode. In this mode, both
the TOSLINK and front RCA outputs (1 and 2) become non-
fading outputs.
b. Set DIP switch 2 on (down) to lower the RCA output voltage to
4v. Leave DIP switch 2 off (up) to keep the RCA output voltage at
5v. See troubleshooting section on page 6 for more details.
c. Set DIP switch 3 on (down) only if the output of the AP4 is too
low. Doing this will give you a +8 dB boost on the INPUT of the
module.
d. DIP switch 4 is not used and should remain off (up).
6. If you are using the APA-TOS1 (sold separately) refer to the
instructions included with that product for its installation.
7. Connect the AmpPRO harness to the module.
8. Connect the level control knob to the module and install in an
accessible location.
9. Connect the signal cables and remote input from the aftermarket
amplier.
10. Initially, if the beep through the AP4-TY13 does not match the
on / off selection through the radio, cycle the beep to the opposite
setting and back, then test again.
11. See the Tech Brief "AP4-TY SOS Retention" at PAC-audio.com
for detailed instructions for retaining SOS. The Yellow / Black
connections are not necessary when using the AP4-TY13.
DIP
1 2 3 4
ON
Two Channel Mode 5v / 4v Preout Troubleshooting Not Used
1 2 3 4
Set DIP switches to the ON position to activate the corresponding features.
Set DIP switches to the OFF position for any features that are not desired.
Module Layout
LED 1
Interface Connector 1
Expansion Port
TOSLINK Output
(APA-TOS1 sold separately)
Programming Button
Feature Select
DIP switches
Front Output
Ch. 1(L) and 2(R)
Non-Fading Level Control
Knob Connection
USB Connection Rear Output
Ch. 3(L) and 4(R)
Non-Fading Output
Ch. 5(L) and 6(R)
LED 2
Fig. 1
Fig. 2
24 - Pin 30 - Pin
Press Inner Release Tab
Pull Outer Release Tab


Produkt Specifikationer

Mærke: PAC
Kategori: Ikke kategoriseret
Model: AP4-TY13

Har du brug for hjælp?

Hvis du har brug for hjælp til PAC AP4-TY13 stil et spørgsmål nedenfor, og andre brugere vil svare dig


Ikke kategoriseret PAC Manualer

PAC

PAC OnStar OS-311b Manual

17 Februar 2025
PAC

PAC BT-SWC-NI1 Manual

11 Februar 2025
PAC

PAC OnStar OS-311 Manual

11 Februar 2025
PAC

PAC LCCH21 Manual

11 Februar 2025
PAC

PAC APSUB-TY13 Manual

28 December 2024
PAC

PAC RP4-GM31 Manual

6 September 2024
PAC

PAC NU-CTS2 Manual

6 September 2024
PAC

PAC TR7 Manual

6 September 2024
PAC

PAC OS-5 Manual

6 September 2024
PAC

PAC NDK735MG Manual

29 August 2024

Ikke kategoriseret Manualer

Nyeste Ikke kategoriseret Manualer