PAC APSUB-GM61 Manual

PAC Ikke kategoriseret APSUB-GM61

Læs gratis den danske manual til PAC APSUB-GM61 (12 sider) i kategorien Ikke kategoriseret. Denne vejledning er vurderet som hjælpsom af 34 personer og har en gennemsnitlig bedømmelse på 4.4 stjerner ud af 17.5 anmeldelser. Har du et spørgsmål om PAC APSUB-GM61, eller vil du spørge andre brugere om produktet?

Side 1/12
© 2020 AAMP Global. All rights reserved. PAC is a Power Brand of AAMP Global.
PAC-Audio.com
C
Page 1
Rev: V1
Date: 091120
Advanced Subwoofer Amplier Interface
for Select General Motors Vehicles
APSUB-GM61
Remote Turn On Output
2A Max Output
AP4-GM61-HAR
To Tuner To Vehicle
Harness
Non-Fading
Level Control
Knob
To Aftermarket
Amplifier
Subwoofer Outputs
The APSUB-GM61 provides a 2-channel non-fading output for use with an aftermarket amplier and subwoofer. Using
the full range, xed level head unit output, in conjunction with MOST data, the APSUB-GM61 delivers a variable 5v RMS
pre-amp output with bass equalization and level control capabilities. The signal has a 350Hz / 24dB Linkwitz-Riley low
pass lter applied. A data controlled remote amplier turn on wire is also provided by the APSUB-GM61.
Introduction and Features
Important Notes
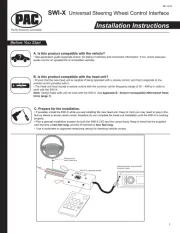
1. This interface is compatible in vehicles with or without Bose that are equipped with IO4, IO5 or IO6 model radios.
2. In some non-Bose radios, there may be absence of audio from the left channel when in AM, FM, and XM sources. The
APSUB-GM61 is capable of providing a work-around by passing the right channel audio through the left and right channels
when in the AM, FM and XM sources. All other sources will still offer left and right separation. See the troubleshooting
section on page 6 for additional details.
3. If originally equipped, the factory amplier must remain in the vehicle, and connected after the APSUB-GM61 has been installed.
4. The remote output is rated at 2A of current. If more current is needed, an external relay must be used.
5. When the bass level control knob is not connected to the APSUB-GM61, the output level will default to 100%.
6. The level control knob must be connected in order to manually adjust the minimum volume settings.
7. The minimum volume level is set to a default value. If you are happy with this level in your particular application, then
additional adjustment is not required. Please refer to the Setup and Conguration section on page 2 for more details.
8. The factory radio's speed controlled volume and surround sound mode are not supported by the APSUB-GM61 outputs.
9. No adjustments can be made manually using the programming button or the factory SWC when the module is connected to a PC.
10. If the vehicle is equipped with Active Noise Cancellation (ANC), the ANC can be disabled using the included ANC-GM03
harness. See page 3.
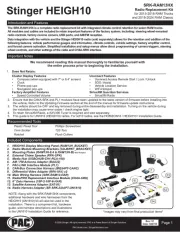
Wiring Connection Chart
To Factory
Amplier
To Amplier
Harness
ANC-GM03-HAR
The aftermarket amplier must have a very solid ground and the amplier power/ground connections
should be made before connecting the RCA's or Remote Turn On to the APSUB-GM61
© 2020 AAMP Global. All rights reserved. PAC is a Power Brand of AAMP Global.
PAC-Audio.com
C
Page 2
Rev: V1
Date: 091120
Advanced Subwoofer Amplier Interface
for Select General Motors Vehicles
APSUB-GM61
Setup and Conguration
1. Turn the ignition on. LED 1 on the interface will turn on and the +12v remote output will turn on.
2. Set the amp gain(s) to the desired level. We recommend using an oscilloscope and test tones to set the amp gain(s).
Please refer to the MECP Advanced study guide (p. 360) if you are unfamiliar with this process.
3. Check volume, balance, fade and EQ settings.
4. If you would like to adjust the minimum volume, do so using one of the methods outlined on the next page. If you are happy
with the default levels, no adjustments are necessary.
Installation
1. Access the factory tuner module (see location info to the right).
2. Disconnect the Gray 20-pin factory harness and the Gray
8-pin harness from the tuner module (Figure 1).
3. Connect the APSUB harness to vehicle harness.
4. Connect the APSUB harness to factory tuner module.
5. Set any feature DIP switches that apply to your install.
Set DIP switch 2 on (down) to lower the RCA output
voltage to 4v. Leave DIP switch 2 off (up) to keep the
RCA output voltage at 5v.
6. Connect the APSUB harness to the APSUB module.
7. Connect the level control knob to the module and install in
an accessible location.
8. After the aftermarket amplier power/ground connections
DIP
1 2 3 4
ON
No Function Troubleshooting No Function5v / 4v Preout
1 2 3 4
Set DIP switches to the ON position to activate the corresponding features.
Set DIP switches to the OFF position for any features that are not desired.
Module Layout
are made, connect the signal cables and remote input
from the aftermarket amplier to the APSUB.
9. Turn the vehicle off, shut the doors and lock the vehicle
with the factory key fob. Wait 5 minutes. After 5 minutes,
turn vehicle back on, and proceed with setup and
conguration.
V
V
V
Vehicle
ehicle
ehicle
ehicle
Vehicle T
T
T
Tuner Module Location
uner Module Location
Tuner Module Location
Cadillac CT6 Back Passenger Sidewall of Trunk
Cadillac (others) Above Passenger Kick Panel
Chevrolet Corvette Passenger Footwell on Firewall
Chevrolet Impala
Chevrolet Camaro Above Passenger Kick Panel
Full/Mid Size Trucks Behind Radio Display
Full Size SUV Behind Radio Display, Lower Dash
Chevrolet Equinox
Chevrolet Traverse
GMC Acadia
GMC Terrain
Behind Glove Box-
By Passenger Kick Panel
Interface Connector 1
Expansion Port
Programming Button
Feature Select
DIP switches
Non-Fading Level Control
Knob Connection
USB Connection
LED 1
Subwoofer Output
LED 2
FIG 1
Factory Radio Tuner Module


Produkt Specifikationer

Mærke: PAC
Kategori: Ikke kategoriseret
Model: APSUB-GM61

Har du brug for hjælp?

Hvis du har brug for hjælp til PAC APSUB-GM61 stil et spørgsmål nedenfor, og andre brugere vil svare dig


Ikke kategoriseret PAC Manualer

PAC

PAC CAM-GM51 Manual

11 Juli 2025
PAC

PAC TY1A-RS Manual

11 Juli 2025
PAC

PAC SR-F15009HX Manual

10 Juli 2025
PAC

PAC SRK-RAM13HX Manual

10 Juli 2025
PAC

PAC AAI-TY3 Manual

30 Juni 2025
PAC

PAC SRK-GM14HX Manual

10 Marts 2025
PAC

PAC C2A-CHY Manual

19 Februar 2025
PAC

PAC MCI-FD22 Manual

19 Februar 2025
PAC

PAC GM6A-RST Manual

19 Februar 2025
PAC

PAC SWI-X Manual

19 Februar 2025

Ikke kategoriseret Manualer

Nyeste Ikke kategoriseret Manualer