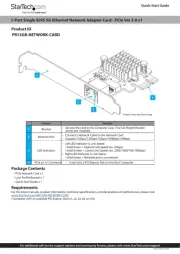
StarTech.com PEX40GQSFPI Manual
Læs gratis den danske manual til StarTech.com PEX40GQSFPI (2 sider) i kategorien Netværkskort/adapter. Denne vejledning er vurderet som hjælpsom af 23 personer og har en gennemsnitlig bedømmelse på 5.0 stjerner ud af 12 anmeldelser.
Har du et spørgsmål om StarTech.com PEX40GQSFPI, eller vil du spørge andre brugere om produktet?

Produkt Specifikationer
| Mærke: | StarTech.com |
| Kategori: | Netværkskort/adapter |
| Model: | PEX40GQSFPI |
| Bredde: | 121 mm |
| Dybde: | 181 mm |
| Højde: | 20 mm |
| Vægt: | 112 g |
| Produktfarve: | Sort |
| Pakkevægt: | 242 g |
| Pakkedybde: | 207 mm |
| Pakkebredde: | 114 mm |
| Pakkehøjde: | 38 mm |
| Opbevaringstemperatur (T-T): | -20 - 85 °C |
| Relativ luftfugtighed ved drift (H-H): | 5 - 95 % |
| Driftstemperatur (T-T): | 0 - 57 °C |
| Hurtig start guide: | Ja |
| Forbindelsesteknologi: | Ledningsført |
| Netværksstandarder: | IEEE 802.1Q, IEEE 802.3ad, IEEE 802.3ba, IEEE 802.3x |
| LED-indikatorer: | Ja |
| Harmoniseret systemkode (HS): | 85176990 |
| Bæredygtighedscertifikater: | CE, RoHS |
| Hovedkassen højde (udvendigt): | 320 mm |
| Hovedkassens længde (udvendigt): | 440 mm |
| Hovedkassens bredde (udvendigt): | 420 mm |
| Værtsgrænseflade: | PCI Express |
| Grænseflade: | Fiber |
| Intern: | Ja |
| Maksimal dataoverførselshastighed: | 40000 Mbit/s |
| Fiber optisk strømstik: | QSFP+ |
| Produkter pr. hovedkasse (udvendigt): | 40 stk |
| Understøttede operativsystemer til servere: | Windows Server 2008 R2, Windows Server 2012, Windows Server 2012 R2, Windows Server 2016 |
| Flowkontrol support: | Ja |
| Jumbo Frames support: | Ja |
| Jumbo rammer: | 9000 |
| Fiberkanal porte: | 1 |
| VLAN mærkning: | Ja |
| Simpelt beslag: | Ja |
| Chipsæt: | Intel® XL710-BM1 |
Har du brug for hjælp?
Hvis du har brug for hjælp til StarTech.com PEX40GQSFPI stil et spørgsmål nedenfor, og andre brugere vil svare dig
Netværkskort/adapter StarTech.com Manualer

Netværkskort/adapter Manualer
- Paradigm
- Simplecom
- Elecom
- 7inova
- J5 Create
- Gigaset
- Star Micronics
- Nedis
- Icy Box
- SIIG
- TERRIS
- Planet
- NGS
- Thrustmaster
- Allied Telesis
Nyeste Netværkskort/adapter Manualer