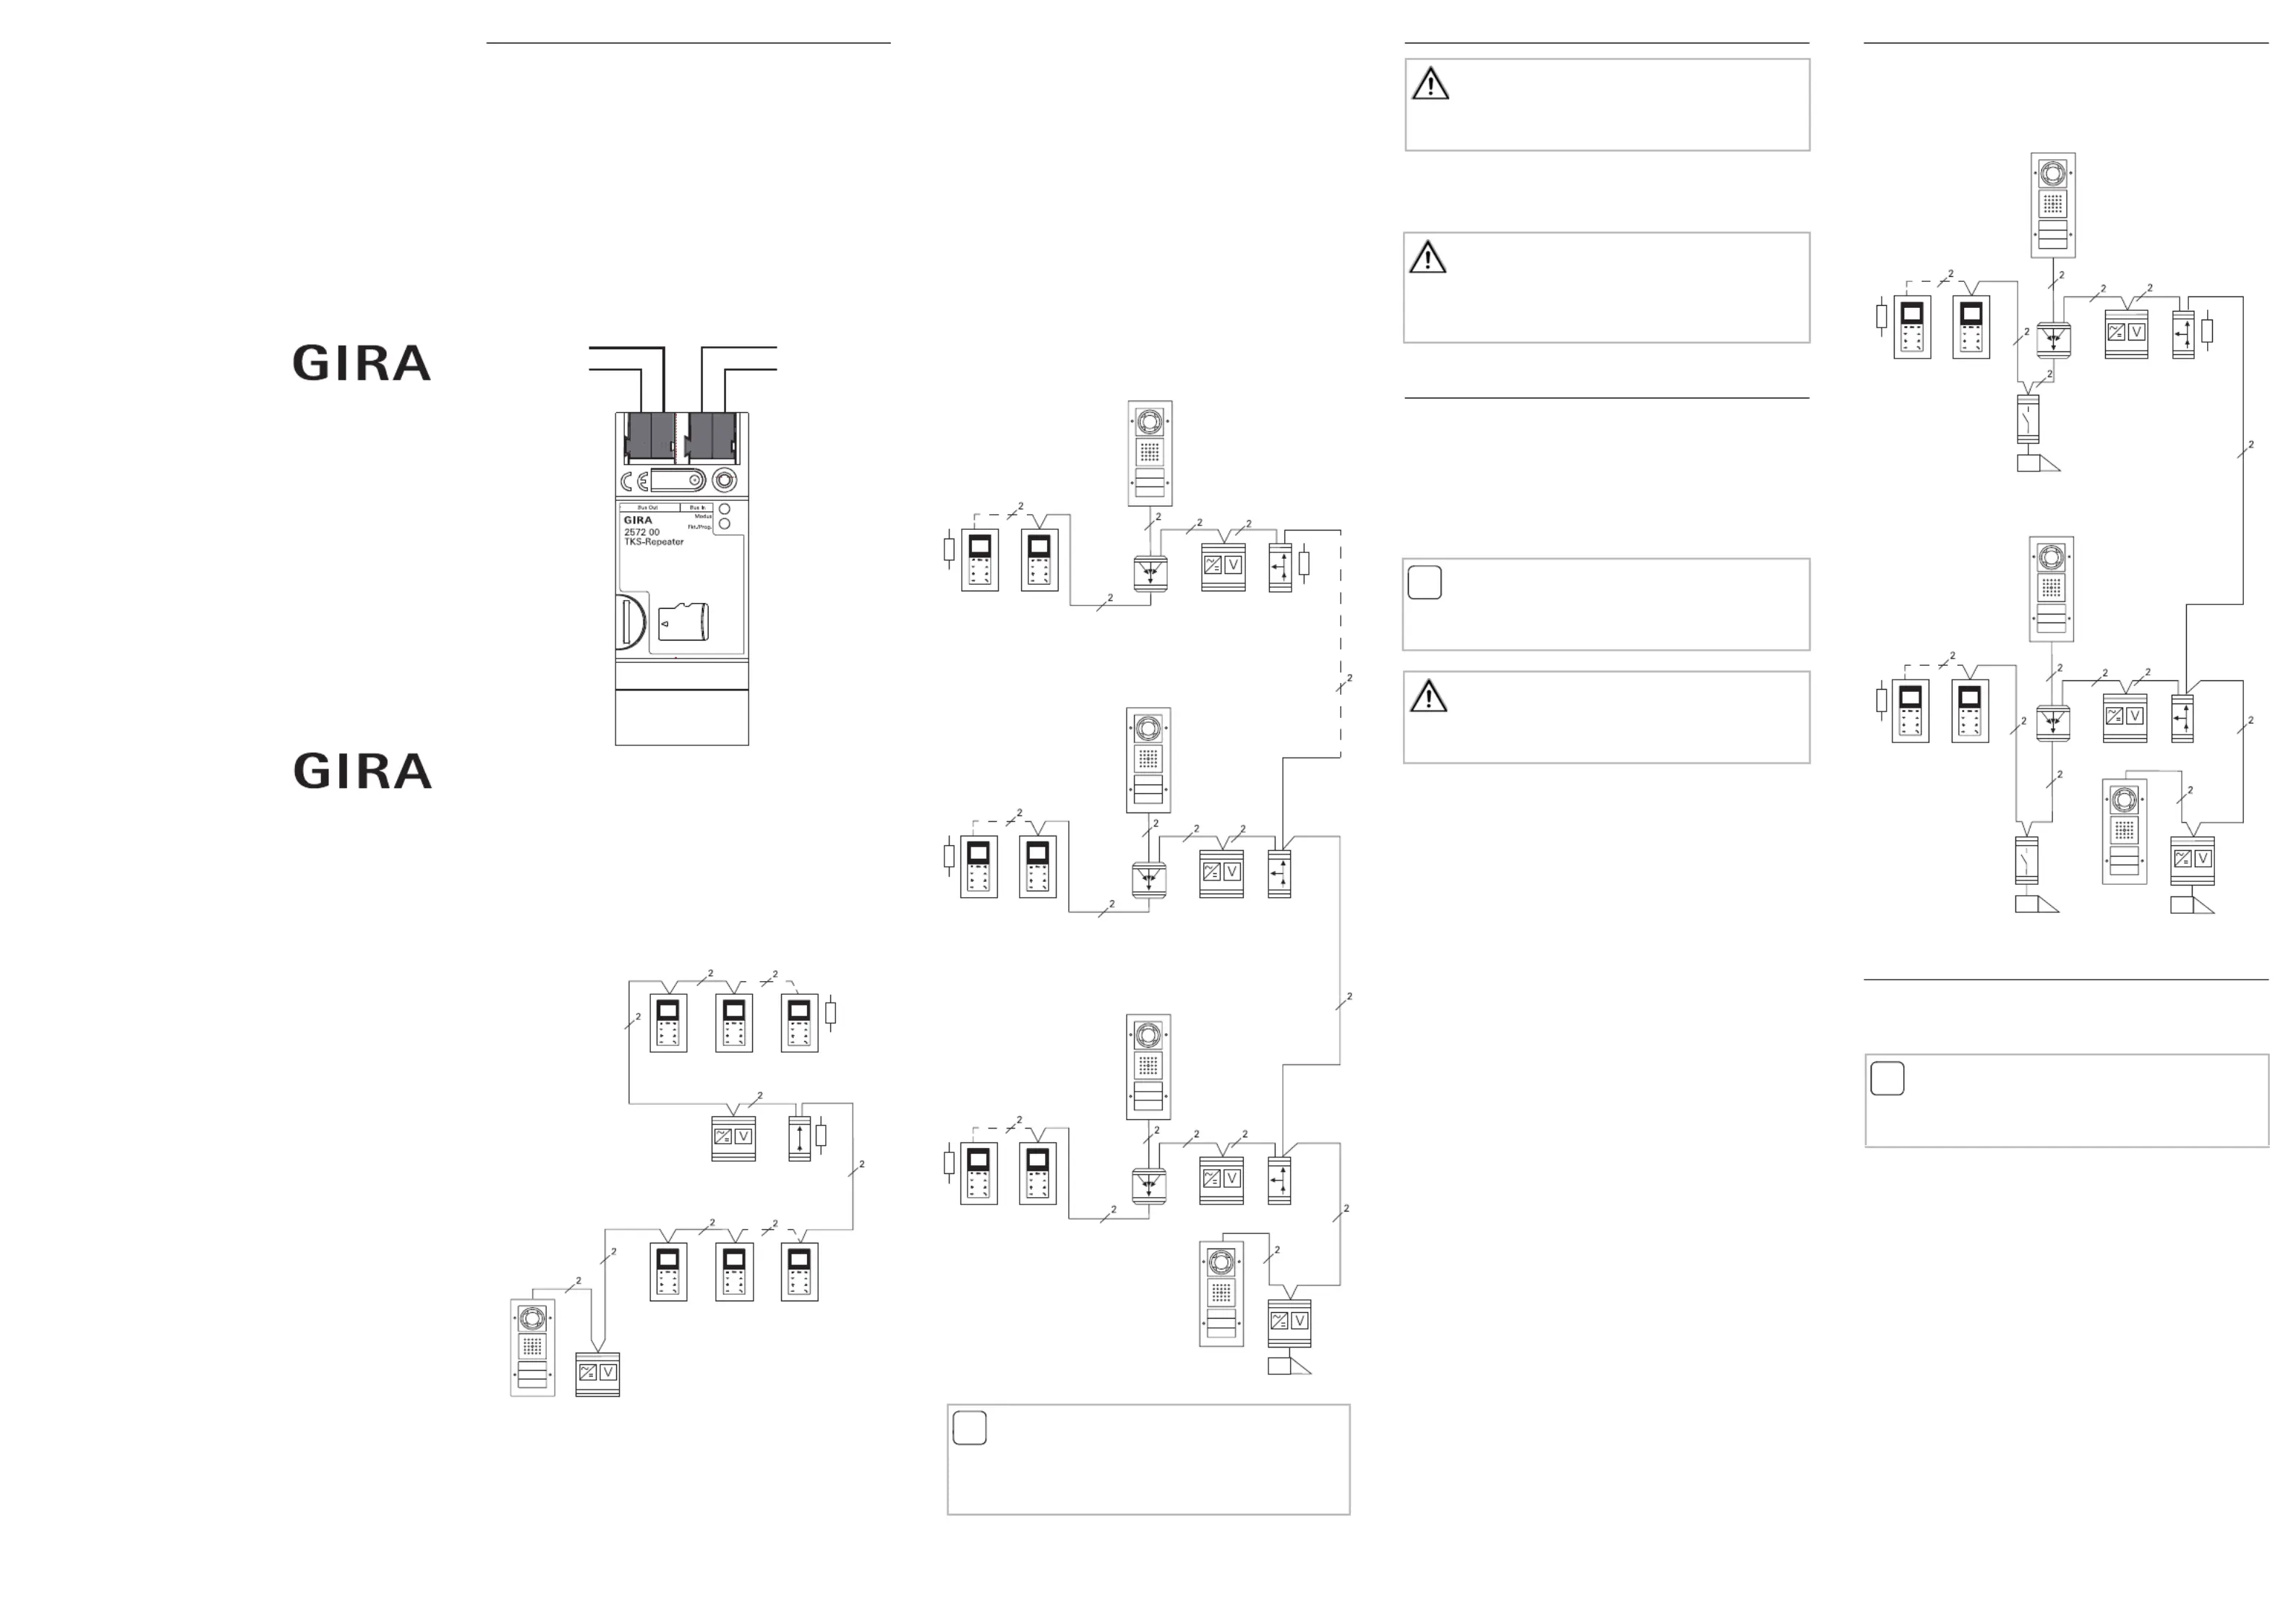
Gira 2572 00 Manual


Læs gratis den danske manual til Gira 2572 00 (2 sider) i kategorien Wifi repeater. Denne vejledning er vurderet som hjælpsom af 3 personer og har en gennemsnitlig bedømmelse på 4.9 stjerner ud af 2 anmeldelser. Har du et spørgsmål om Gira 2572 00, eller vil du spørge andre brugere om produktet?

Side 1/2
Operating instructions
DCS repeater
2572 00
Gira
Giersiepen GmbH & Co. KG
Electrical installation
systems
P.O. Box 1220
Phone +49 (0) 21 95 - 602 - 0
Fax +49 (0) 21 95 - 602 - 339
www.gira.de
info@gira.de
Device description
The DCS repeater is an active component for expanding a
Gira door communication system. It is for range extension
and for increasing the number of devices. The DCS repeater
amplifies audio and data signals of the door communication
system in both directions.
In systems with video function, the DCS repeater performs
the function of a video amplifier: The DCS repeater
increases the volume of the incoming video signal at the
"Bus In" input to the maximum permissible bus volume and
outputs it at the "Bus Out" output. In doing so, line
attenuation from the source of the video signal to the input
of the DCS repeater is compensated.
Each line segment requires its own control device, and the
DCS repeater counts as one device in each of both line
segments.
Depending on system size, the DCS repeater can be
operated in 2 different operating modes:
Repeater mode
In "Repeater mode" the DCS repeater interconnects 2 line
segments so that the number of devices in a video or audio
door communication system and cable range can be
doubled.
A second control device is needed for supply of the second
line segment.
Multi-conversation mode
In "Multi-conversation mode" the complete system is
subdivided into several lines (1 main line, up to 5 ancillary
lines) interconnected via the DCS repeater. Each line is
supplied by its own control device.
A total of five DCS Repeaters can be used in one system in
Multi-conversation mode.
In "multi-conversation" operating mode, incoming calls are
forwarded to the ancillary line when required with the aid of
a filter table automatically generated during start-up. Thus,
according to topology, it is possible to conduct multiple
conversations in one complete system. However, it must be
considered that only one conversation can be active for
each line.
A conversation from the main line to a non-assigned
ancillary line is also possible with an already existing
conversation in another ancillary line. Similarly, internal
conversations can be conducted between two unassigned
ancillary lines if the main line is not assigned.
Mounting
For installation protected from dripping and sprayed water,
the DCS repeater control device is mounted on a top-hat rail
in the distribution.
Connection terminals
Connection to the Gira 2-wire bus is with plug terminals.
Bus In
Connection for the incoming signal of the Gira 2-wire bus.
Bus Out
Connection for the outgoing signal of the Gira 2-wire bus.
The video signal is forwarded in amplified state via Bus Out.
Door opener on main and ancillary lines
If a system requires several door openers, only the door
opener function of the control device on the main line can
be used. All other door openers must be controlled using
switching actuators.
Start-up
Start-up of the door communication system is identical to
start-up of Gira door communication systems without a
repeater.
Bus Out Bus In
Bus Bus
Out In
Line segment 1
Line segment 2
i
Integrating a door station in an ancillary line
If a door station is to be integrated into an ancillary line,
this must be connected to the control device via a video
multiplexer.
Bus Bus
Out In
Bus Bus
Out In
Bus Bus
Out In
Main line
Ancillary line
Ancillary line
Main lineMain line
Ancillary line
Important
Installation and mounting of electrical devices may only be
carried out by a qualified electrician.
Equipotential bonding
In door communication systems installed over several
separate buildings, sufficient equipotential bonding must
be ensured between control devices.
i
Video signal direction
The video signal in the DCS repeater is forwarded only in
one direction from Bus In to Bus Out.
Separate cable routing
Cable feed to Bus In and Bus Out must be in separate
cables.
i
Activating programming mode
For start-up, programming mode is only activated on the
control device of the main line.
Bus Bus
Out In
Bus Bus
Out In
15/13 10499282
Operation
Change mode (Repeater mode/multi-conversation
mode)
Factory setting: Repeater mode
1. Press the "Systemprogr." button on the control device
for 3 sec. to start programming mode.
The LED at the control device flashes yellow.
The LED "Fkt./Prog." on the DCS repeater flashes green.
2. Press and hold the programming button on the DCS
repeater for 9 s.
The LED "Fkt./Prog." briefly flashes green after 3, 6 and
9 s.
LED mode changes from green to yellow:
Multi-conversation mode is active.
or
LED mode changes from yellow to green: Repeater-
mode is active
Deleting the filter table
If a device (home station, door station etc.) that functions
across lines is replaced in the door communication system,
or if an already programmed DCS repeater is to be used in
another system, the filter table of the DCS repeater must be
deleted. A backup file must then be implemented or the
complete system must be started up again.
1. Press the "Systemprogr." button on the control device
for 3 sec. to start programming mode.
The LED at the control device flashes yellow.
The LED "Fkt./Prog." on the DCS repeater flashes green.
2. Press and hold the programming button on the DCS
repeater for 6 s to delete the filter table.
The LED "Fkt./Prog." briefly flashes green after 3 and 6 s.
The LED "Fkt./Prog." lights up green for 3 s:
The filter table has been deleted and terminating
resistance was set to "off".
LED "Fkt./Prog." flashes 3 times: Deleting has failed,
please repeat step 2.
Switching terminating resistance on or off
Factory setting: Terminating resistance "off"
In door communication systems with video devices,
terminating resistance must be activated on the DCS
Repeaters installed at the end of the line.
1. Press the "Systemprogr." button on the control device
for 3 sec. to start programming mode.
The LED at the control device flashes yellow.
The LED "Fkt./Prog." on the DCS repeater flashes green.
2. Press and hold the programming button on the DCS
repeater for 12 s.
The LED "Fkt./Prog." briefly flashes green after 3, 6, 9
and 12 s.
The LED "Fkt./Prog." lights up green:
Terminating resistance switched on.
The LED "Fkt./Prog." flashes green 3 times: Terminating
resistance switched off.
Creating a backup
A data backup of the DCS repeater configuration can be
generated. This is useful for example when a DCS repeater
has to be replaced due to a device defect. Data backup
should thus be implemented immediately following start-
up.
A microSD card (SDHC) is needed to create a backup of the
DCS repeater. This is contained in the scope of supply of the
DCS repeater. The DCS repeater can also be started up
without a microSD card.
Files saved on the microSD card should be saved to a
computer and appropriately named (e.g. Repeater1.US)
following the backup process.
Saving data to the microSD card
1. Insert a microSD card into the card slot
2. Press the "Systemprogr." button on the ancillary line
control device for 3 sec. to start programming mode.
The LED at the control device flashes yellow.
The LED "Fkt./Prog." on the DCS repeater flashes green.
3. Press the "Systemprogr." button within 3 s on the
ancillary line control device to exit programming mode.
The LED "Fkt./Prog." lights up red:
Data are saved to the microSD card.
The LED "Fkt./Prog." lights up green for 3 s:
Saving successful.
The LED "Fkt./Prog." flashes green 3 times:
Saving failed, microSD card is defective or erroneously
formatted.
4. Remove the microSD card, save the file to a computer
and name it appropriately.
Copying data from the microSD card to the DCS repeater
1. Rename the backup file to be copied to the DCS
repeater to CFMASTER.TXT on the computer and save it
to a microSD card.
2. Press the "Systemprogr." button on the control device
for 3 sec. to start programming mode.
The LED at the control device flashes yellow.
The LED "Fkt./Prog." on the DCS repeater flashes green.
3. Press and hold the programming button on the DCS
repeater for 6 s to set the repeater to factory setting and
delete all data.
The LED "Fkt./Prog." lights up green for 3 s: DCS repeater
reset to factory setting.
LED "Fkt./Prog." flashes 3 times: Resetting failed, please
repeat step 3.
4. Following successful resetting on the control device,
press the "Systemprogr." button to exit programming
mode.
5. Insert the microSD card with backup file into the SD slot.
The LED "Fkt./Prog." lights up yellow:
Data are copied to the DCS repeater.
The LED "Fkt./Prog." lights up green:
Copying successful.
The LED "Fkt./Prog." flashes green 3 times:
Copying failed, microSD card defective, erroneously
formatted, or has no data.
Replacing the DCS repeater
If a DCS repeater in a system is to be replaced, it is not
necessary to start-up the complete system again.
Depending on application, the following procedures are
required:
In repeater mode without video function
If a DCS repeater in repeater mode is to be replaced in a
system without video function, no further start-up steps
must be carried out.
In repeater mode with video function
If a DCS repeater in repeater mode is to be replaced in a
system with video function, it is sufficient when a call
button is made known to the DCS repeater from each door
station video:
1. Press the "Systemprogr." button on the control device
for 3 sec. to start programming mode.
The LED at the control device flashes yellow.
The LED "Fkt./Prog." on the DCS repeater flashes green.
2. Press a call button on the door station for 3 seconds.
Release the call button following the brief
acknowledgement tone.
The door station outputs a long acknowledgement tone.
3. Press and hold the programming button on the DCS
repeater for 3 s to enter the call button into the filter
table of the DCS repeater.
In multi-conversation mode
If a DCS repeater in multi-conversation mode is replaced, all
call buttons of the door station(s) must be made known to
the DCS repeater:
1. Press the "Systemprogr." button on the control device
for 3 sec. to start programming mode.
The LED at the control device flashes yellow.
The LED "Fkt./Prog." on the DCS repeater flashes green.
2. Press and hold the call buttons to be made known for 3 s
at the door station. Release the call button following the
brief acknowledgement tone.
The door station outputs a long acknowledgement tone.
3. Press and hold the programming button on the DCS
repeater for 3 s to enter the call button into the filter
table of the DCS repeater.
4. Repeat step 3 until all call buttons are entered into the
filter table of the DCS repeater.
LED "Mode" displays
Technical data
Power supply: 26 V DC ± 2 V (bus voltage)
Connections: 2 plug terminals Bus In
2 plug terminals Bus Out
Temperature range: -5 °C to +45 °C
Memory card: microSD card (SDHC)
to max. 32 GB
Dimensions: DRA device / 2 HP
Symbols used
Symbols used in the topologies have the following
meanings:
DCS repeater in multi-conversation mode
DCS repeater in repeater mode
Terminating resistance activated
Surface-mounted home station video
Door station with colour camera
Video control device
Video multiplexer
DCS switching actuator
Door opener
Warranty
The warranty is provided in accordance with statutory
requirements via the specialist trade.
Please submit or send faulty devices postage paid together
with an error description to your responsible salesperson
(specialist trade/installation company/specialist electrical
trade).
They will forward the devices to the Gira Service Center.
i
Terminating resistance in audio systems
In door communication systems consisting only of audio
devices, DCS repeater terminating resistance does not
have to be activated.
i
Saving the backup to a new DCS repeater
To save a backup to another DCS repeater (e.g. if a device
is defective) the corresponding backup file must be
renamed to CFMASTER.TXT.
Colour Operating mode
green Repeater mode
yellow Multi-conversation mode
red No BUS connection on terminal pair 1 to the
main control device
off No BUS voltage on terminal pair 2


Produkt Specifikationer

Mærke: Gira
Kategori: Wifi repeater
Model: 2572 00

Har du brug for hjælp?

Hvis du har brug for hjælp til Gira 2572 00 stil et spørgsmål nedenfor, og andre brugere vil svare dig