Panasonic H-RSA100400 Manual

Panasonic Linse H-RSA100400

Læs gratis den danske manual til Panasonic H-RSA100400 (2 sider) i kategorien Linse. Denne vejledning er vurderet som hjælpsom af 2 personer og har en gennemsnitlig bedømmelse på 4.3 stjerner ud af 1.5 anmeldelser. Har du et spørgsmål om Panasonic H-RSA100400, eller vil du spørge andre brugere om produktet?

Side 1/2
[India Only]
Information on hazardous constituents as specified in sub-rule1 of rule16 in electrical and electronic
equipment.
Declaration of Conformity with the requirements of the E-Waste (Management) Amendment Rules,
2023 with the sub-rule1 of rule16 limits with respect to Lead, Mercury, Cadmium, Hexavalent chromium,
Polybrominated biphenyls, Polybrominated diphenyl ethers.
The content of hazardous substance with the exemption of the applications listed in SCHEDULE II of
the E-Waste (Management) Amendment Rules, 2023:
2. Cadmium (Cd) – not over 0.01% by weight.
3. Mercury (Hg) – not over 0.1% by weight.
4. Hexavalent chromium (Cr6+) – not over 0.1% by weight.
5. Polybrominated biphenyls (PBBs) – not over 0.1% by weight.
6. Polybrominated diphenyl ethers (PBDEs) – not over 0.1% by weight.
For the purpose of recycling to facilitate effective utilization of resources, please return this
product to a nearby authorized collection center, registered dismantler of recycler, or
Panasonic service center when disposing of this product.
Customer care number ( Toll free ) : 1800 103 1333 ,1800 108 1333
Please see the Panasonic website for further information on collection centers, etc. or call
the customer care toll-free number
https://www.panasonic.com/in/corporate/e-waste-management.html
Do's & Don’ts
No.
Do's Don'ts
1
All electrical and electronic products are
required to be handed over only to the
Authorized recycler.
The product should not be opened by the user
himself /herself, but only by authorized service
personnel.
2
The product should be handed over only to
authorized recycler for disposal.
The product is not meant for re-sale to any
unauthorized agencies / scrap dealers /
kabariwalas.
3
Keep the product in an isolated area, after it
becomes non-functional / unrepairable so as to
prevent its accidental breakage.
The product is not meant for mixing into
household waste stream.
4
Refer to Operating Instructions for handling of
end of life products
Do not keep any replaced spare part(s) from
the product in an exposed area.
5
Always dispose of products that have reached
end of life at Panasonic Life Solutions India
Authorized Service Centre.
Do not donate old electronic items to anybody.
Do not dispose of your product in garbage bins
along with municipal waste that ultimately
reaches landfill.
6
Wherever possible or as instructed, separate
the packaging material according to
responsible waste disposal options and sorting
for recycling.
Do not give e-waste to informal and
unorganized sectors like Local Scrap Dealers /
Rag Pickers.
Manufactured by:
Panasonic Entertainment & Communication Co., Ltd.
1-10-12, Yagumo-higashi-machi, Moriguchi City, Osaka, Japan
Importer for UK:
Panasonic UK, a branch of Panasonic Marketing Europe GmbH
Maxis 2, Western Road, Bracknell, Berkshire, RG12 1RT
Importer for EU:
Panasonic Marketing Europe GmbH
Hagenauer Strasse 43, 65203 Wiesbaden, Germany
Authorized Representative in EU:
Panasonic Marketing Europe GmbH
Panasonic Testing Centre
Winsbergring 15, 22525 Hamburg, Germany
Fabriqué par:
Panasonic Entertainment & Communication Co., Ltd.
1-10-12, Yagumo-higashi-machi, ville de Moriguchi, Osaka,
Japon
Importateur:
Panasonic Marketing Europe GmbH
Hagenauer Strasse 43, 65203 Wiesbaden, Allemagne
Représentant autorisé dans l’UE:
Panasonic Marketing Europe GmbH
Panasonic Testing Centre
Winsbergring 15, 22525 Hambourg, Allemagne
Hergestellt von:
Panasonic Entertainment & Communication Co., Ltd.
1-10-12, Yagumo-higashi-machi, Moriguchi City, Osaka, Japan
Importeur:
Panasonic Marketing Europe GmbH
Hagenauer Strasse 43, 65203 Wiesbaden, Deutschland
Vertretungsberechtigter in der EU:
Panasonic Marketing Europe GmbH
Panasonic Testing Centre
Winsbergring 15, 22525 Hamburg, Deutschland
Fabricado por:
Panasonic Entertainment & Communication Co., Ltd.
1-10-12, Yagumo-higashi-machi, Ciudad de Moriguchi, Osaka,
Japón
Importador:
Panasonic Marketing Europe GmbH
Hagenauer Strasse 43, 65203 Wiesbaden, Alemania
Representante Autorizado para la UE:
Panasonic Marketing Europe GmbH
Panasonic Testing Centre
Winsbergring 15, 22525 Hamburgo, Alemania
Fabbricato da:
Panasonic Entertainment & Communication Co., Ltd.
1-10-12, Yagumo-higashi-machi, Città di Moriguchi, Osaka, Giappone
Importatore:
Panasonic Marketing Europe GmbH
Hagenauer Strasse 43, 65203 Wiesbaden, Germania
Rappresentante autorizzato nell’UE:
Panasonic Marketing Europe GmbH
Panasonic Testing Centre
Winsbergring 15, 22525 Amburgo, Germania
Panasonic Entertainment
& Communication Co., Ltd.
Web Site/Site Web: http://www.panasonic.com
Panasonic Entertainment
& Communication Co., Ltd.
2023
1
1GE2Z233CXZ
2
3
5
4
2GE8Z233CXZ
1GE1Z136Z
SFC0360
1ZE4Z233CXZ
1 2 3 4 5 6 7 8
9
10
11
14
12
13
1
2
3
4
Panasonic Warranty
1.
Subject to the conditions of this warranty Panasonic or its Authorised Service Centre will perform necessary service on
the product, without charge for parts or labour, if in the opinion of Panasonic the product is found to have a
manufacturing defect within one (1) year or (12 months) (the “warranty period”) from the date of purchase appearing
on your purchase receipt.
2. This warranty only applies to Panaso ld by Panasonic Australia, it’s Authorised nic products purchased in Australia and so
Distributors, or Dealers, and only where the products are used and serviced within Australia or its territories. Warranty
cover only applies to the services that are carried out by a Panasonic Authorised Service Centre and only if valid proof
of purchase is presented when the warranty service is requested.
3. This warranty only applies if the product has been installed and/or used in accordance with the manufacturer’s
recommendations (as noted in the operating instructions) under normal use and reasonable care (in the opinion of
Panasonic). The warranty does not cover damage, malfunction or failure resulting from use of incorrect voltages,
incorrect installation, accident, misuse, neglect, build-up of dirt or dust, abuse, maladjustment of customer controls,
mains supply problems, thunderstorm activity, infestation by insects or vermin, tampering or repair by unauthorised
persons (including unauthorised alterations), exposure to abnormally corrosive conditions, or any foreign object or
matter having entered the product.
4. This warranty does not cover the following items unless the fault or defect existed at the time of purchase:
(a) Consumable parts
(b) Cosmetic parts
(c) Worn or damaged parts
(d) Information stored on Hard Disk Drives, Optical Discs, USB Devices, SD Cards, Tapes
(e) DTV reception issues caused by TV Aerial / Cabling / Wall socket(s)
5. Some products may be supplied with Ethernet connection hardware. The warranty is limited on such products and will
not cover:
(a) Internet and or DLNA connection / setup related problems
(b) Access fees and or charges incurred for internet connection
(c) Incompatible software or software not specifically stipulated in the product operations manual; and
(d) Any indirect or consequential costs associated with the incorrect use or misuse of the hardware, its connection to
the internet or any other device.
6. To claim warranty service, when required, you should:
Contact Panasonic’s Customer Care Centre on 132 600 for Service Centre information.
Confirm the opening and acceptance times with the Authorised Service centre that you choose.
Then send or take the product to a Panasonic Authorised Service Centre together with your proof of purchase
receipt.
Any freight and insurance costs associated with the transport of the product to and/or from your nearest
Authorised Service Centre must be arranged and paid for by you.
7. The warranties hereby conferred do not extend to, and exclude, any costs associated with the installation, de-
installation or re-installation of a product, including costs related to the mounting, de-mounting or remounting of any
screen, (and any other ancillary activities), delivery, handling, freighting, transportation or insurance of the product or
any part thereof or replacement of and do not extend to, and exclude, any damage or loss occurring by reason of,
during, associated with, or related to such installation, de-installation, re-installation or transit.
Panasonic Authorised Service Centres are located in major metropolitan areas and most regional centres of Australia,
however, coverage will vary dependant on product. For advice on exact Authorised Service Centre locations for your
product, please telephone our Customer Care Centre on 132600 or visit our website and use the Service Centre Locator.
In addition to your rights under this warranty, Panasonic products come with consumer guarantees that cannot be
excluded under the Australian Consumer Law. If there is a major failure with the product, you can reject the product and
elect to have a refund or to have the product replaced or if you wish you may elect to keep the goods and be compensated
for the drop in value of the goods. You are also entitled to have the product repaired or replaced if the product fails to be
of acceptable quality and the failure does not amount to a major failure.
If there is a major failure in regard to the product which cannot be remedied then you must notify us within a reasonable
period by contacting the Panasonic Customer Care Centre. If the failure in the product is not a major failure then Panasonic
may choose to repair or replace the product and will do so in a reasonable period of time from receiving notice from you.
THIS WARRANTY CARD AND THE PURCHASE DOCKET (OR SIMILAR PROOF OF PURCHASE)
SHOULD BE RETAINED BY THE CUSTOMER AT ALL TIMES
If you require assistance regarding warranty conditions or any other enquiries, please visit the Panasonic
Australia website
www.panasonic.com.au
or
contact by phone on
132 600
If phoning in, please ensure you have your operating instructions available.
Panasonic Australia Pty. Limited
ACN 001 592 187 ABN 83 001 592 187
1 Innovation Road, Macquarie Park NSW 2113
www.panasonic.com.au
PRO-031-F11 Issue: 5.0 23-01-2018
[For_Australia]
E
GC
Thank you for purchasing Panasonic product.
Please read these instructions carefully before using this product, and
save this manual for future use.
The lens can be used with a digital camera compatible with the lens
mount standard for the Micro Four Thirds
TM
System.
It cannot be mounted on the Four Thirds
TM
mount specification camera.
For smoother recording, we recommend updating the firmware of the
digital camera/lens to the latest version.
For the latest information on the firmware or to download/update the
firmware, visit the following support website:
https://panasonic.jp/support/global/cs/dsc/
(English only)
Micro Four Thirds
TM
and Micro Four Thirds Logo marks are trademarks or
registered trademarks of OM Digital Solutions Corporation, in Japan, the
United States, the European Union and other countries.
Four Thirds
TM
and Four Thirds Logo marks are trademarks or
registered trademarks of OM Digital Solutions Corporation, in Japan,
the United States, the European Union and other countries.
LEICA is a registered trademark of Leica Microsystems IR GmbH.
ELMAR is a registered trademark of Leica Camera AG. The LEICA
DG lenses are manufactured using measurement instruments and
quality assurance systems that have been certified by Leica Camera
AG based on the company’s quality standards.
Other names, company names, product names mentioned in this document
are trademarks or registered trademarks of the companies concerned.
The appearance and specifications of products described in this
document may differ from the actual products you have purchased
due to later enhancements.
Keep the unit as far away as possible from electromagnetic
equipment (such as microwave ovens, TVs, video games, radio
transmitters, high-voltage lines etc.).
Do not use the camera near cell phones because doing so may result
in noise adversely affecting the pictures and sound.
If the camera is adversely affected by electromagnetic equipment and
stops functioning properly, turn the camera off and remove the battery
and/or the connected AC adaptor. Then reinsert the battery and/or
reconnect the AC adaptor and turn the camera on.
-If you see this symbol-
Handling of the lens
When using this lens, take care not to drop, bump, or apply
undue force to it. Doing so may cause malfunction or damage to
this lens and the digital camera.
Images may be affected by dust, dirt, and soiling (water, oil,
fingerprints, etc.) on the lens surface. Before and after recording, use
a blower to blow off dust and dirt from the surface of the lens, then
lightly wipe with a soft dry cloth to remove soiling.
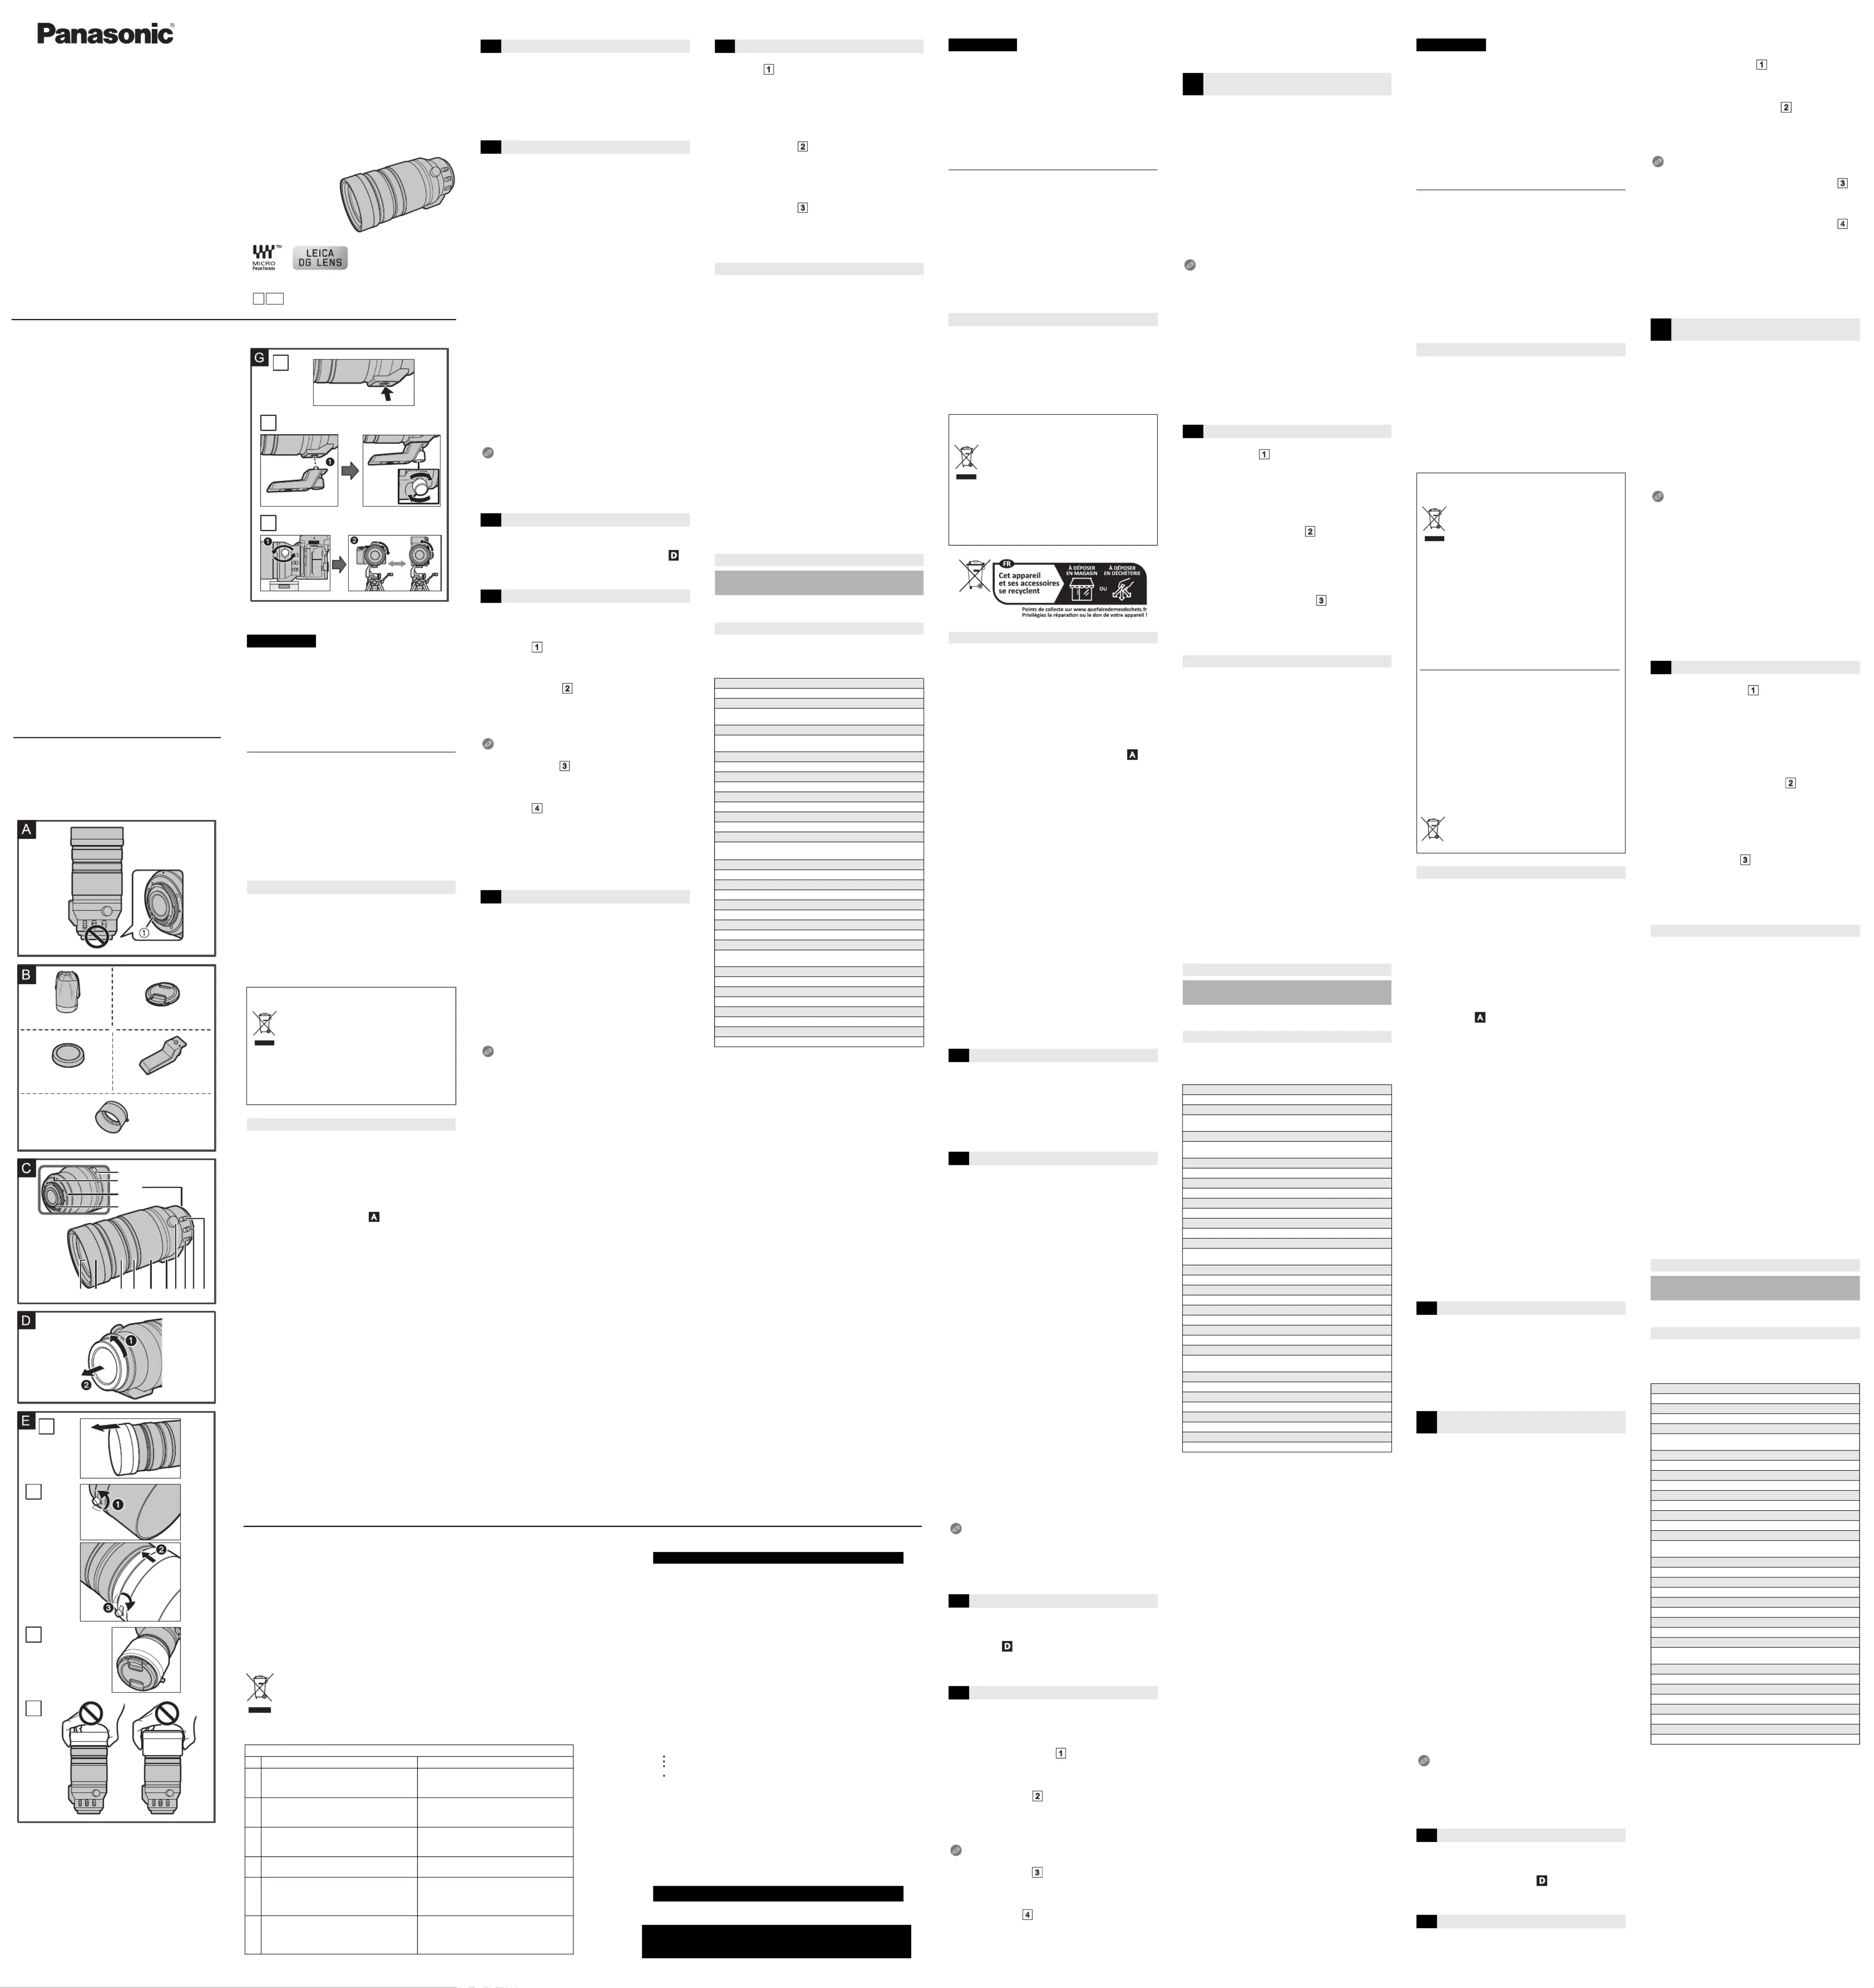
When the lens is not in use, be sure to attach the lens cap and lens rear cap
to prevent dust and other particles from accumulating on or entering the lens.
To protect the lens contact points 1, do not do the following. These
may cause malfunction.
(See illustration )
Touch the lens contact points.
Allow the lens contact points to become dirty.
Place the lens with its mount surface facing down.
Dust and splash resistant
Splash Resistant and Dust Resistant are terms used to describe
an extra level of protection this lens offers against exposure to a
minimal amount of moisture, water or dust. These terms do not
guarantee that damage will not occur if this lens is subjected to
direct contact with water or dust infiltration.
Take the following precautions to provide satisfactory dust and
splash resistant performance. If the lens is not working properly,
consult the dealer or Panasonic.
Attach to a digital camera that is dust and splash resistant.
When attaching or removing the lens, be careful so that foreign
objects such as sand, dust, and water droplets do not adhere to or
enter the lens mount rubber, contact points, digital camera and lens.
If the lens is exposed to water droplets or other liquids, wipe them
off with a soft, dry cloth.
To improve the dust and splash resistant performance of the lens, a
lens mount rubber is used in the mount.
The lens mount rubber will leave scuff marks on the digital camera
mount, but this does not impact performance.
For information on changing the lens mount rubber, contact Panasonic.
Condensation (when the lens is fogged up)
Condensation occurs when the ambient temperature or humidity changes.
Please be careful, as it may cause lens stains, mold and malfunction.
If condensation occurs, turn off the digital camera and leave it for approx. 2
hours. The fog will disappear naturally when the temperature of the digital
camera becomes close to the ambient temperature.
Information for Your Safety
Disposal of Old Equipment
Only for European Union and countries with recycling systems
This symbol on the products, packaging, and/or accompanying
documents means that used electrical and electronic products
must not be mixed with general household waste.
For proper treatment, recovery and recycling of old
products, please take them to applicable collection
points in accordance with your national legislation.
By disposing of them correctly, you will help to save
valuable resources and prevent any potential negative
effects on human health and the environment.
For more information about collection and recycling, please contact
your local authority.
Penalties may be applicable for incorrect disposal of this waste, in
accordance with national legislation.
Precautions
3
2
1
ENGLISH
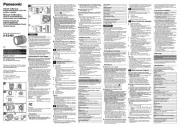
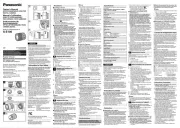
Check that all the accessories are supplied before using the product.
Product numbers correct as of August 2023. These may be subject to
change.
1Lens pouch
2Lens cap
¢
3Lens rear cap
¢
4External tripod mount
5Lens hood
¢Fitted to the lens at the time of purchase.
1Lens surface
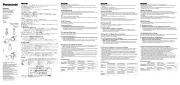
2Built-in slide lens hood
3Focus ring
Rotates the focus ring to focus when set to MF (Manual Focus).
You can set the amount of movement for focusing using the focus
ring with the menus in compatible digital cameras. Refer to the
operating instructions for the digital camera for details.
4Zoom lock ring
When carrying the lens, rotate this ring to lock the zoom ring to
prevent the lens from extending under its own weight.
Do not rotate the zoom ring when the zoom lock ring is set to [LOCK].
5Zoom ring
Zooms to telephoto or wide-angle.
6Tripod mount
7Orientation locking knob
8O.I.S. switch
The stabilizer function is set to activate if the O.I.S. switch is set to [ON].
We recommend setting the O.I.S. switch to [OFF] when using a
tripod.
9AF/MF switch
Switches between AF (Auto Focus) and MF (Manual Focus).
When the digital camera is set to MF, the operation will be MF
irrespective of the setting on the AF/MF switch.
10 Focusing distance range selector switch
[FULL]: It can focus between the ranges of 1.3 m (4.27 feet) to
.
[5m-
]: It can focus between the ranges of 5.0 m (16.4 feet) to
.
The speed of focusing with auto focus will be faster.
11 [ZOOM LIMIT] switch
Limits the rotational range of the zoom ring to the focal lengths
available when shooting while using the teleconverter.
12 Lens fitting mark
13 Lens mount rubber
14 Contact points
Note
There may be differences in focus when you use zoom after focusing.
Focus again.
While shooting video, in some situations, AF operation and stabilizer
operation of the lens may be heard. It is recommended to record as follows:
Set to MF to record
Turn off the image stabilizer and use a tripod for recording
For information on how to attach the lens, refer to the operating
instructions for your digital camera.
Attach the lens after turning off the digital camera.
Attach the lens after removing the lens rear cap.
(See illustration )
After removing the lens from the digital camera, be sure to attach the
lens cap and lens rear cap to prevent dust and other particles from
accumulating on or entering the lens.
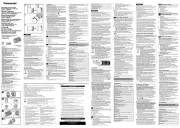
The lens comes with a built-in slide lens hood and supplied lens hood.
With the latter, you can block extra light even more effectively.
The built-in slide lens hood and supplied lens hood can be used
together at the same time.
To use the built-in slide lens hood, slide it in the direction of the arrow.
(See illustration )
We recommend locking the zoom ring with the zoom lock ring before
performing operations.
Attaching the Lens Hood (Supplied Accessory)
(See illustration )
1 Rotate the lens hood screw in the direction of the arrow to
loosen it (
1
).
2 Insert the lens hood until it stops (2).
3 Rotate the lens hood screw in the direction of the arrow to
fasten the lens hood securely (3).
Note
The supplied lens hood can be attached in the reverse direction when
carrying.
(See illustration )
When recording with the flash, to prevent vignetting, we recommend
not using a lens hood.
To prevent dropping of the lens, you should never carry the lens by
just holding either the built-in lens hood or the supplied lens hood.
(See illustration )
Notes on filter use
It is possible to attach the lens cap or the supplied lens hood with the
filter already attached.
There may be some vignetting in recorded images if multiple filters
are attached simultaneously.
It is not possible to attach any items other than filters such as a conversion
lens or adaptor to the front of the lens and use it in combination with this lens.
Lens damage may result if such items are attached.
A teleconverter (DMW-TC14/DMW-TC20) can be attached to this
lens. (As of August 2023)
Refer to our website for the most up-to-date information on
compatible teleconverters.
Do not attach anything other than a compatible teleconverter. Doing
so may cause damage to or adversely affect the performance of the
lens or teleconverter.
Attaching the Teleconverter
1 Rotate the zoom ring to make the focal length closer than at
least 250 mm towards the telephoto end.
2 Set the [ZOOM LIMIT] switch to [ON].
3 Attach the teleconverter.
Refer to the Operating Instructions for the teleconverter for
details about how to attach and detach it.
After removing the teleconverter, set the [ZOOM LIMIT] switch
to [OFF].
Operate the [ZOOM LIMIT] switch with the focal length closer
than at least 250 mm towards the telephoto end.
Note
The lens can be damaged or soiled while the teleconverter is attached,
so make sure the [ZOOM LIMIT] switch is [ON].
It is not possible to shoot with the focal length closer than 210 mm
towards the wide end with the teleconverter attached, and video
recording will also stop. The focal length during zoom operations is
limited to between 210 mm and 400 mm when the [ZOOM LIMIT] switch
is set to [ON]. Do not try to force the zoom towards the wide end as this
can result in malfunction.
The F-number gets darker by one step when the teleconverter
(DMW-TC14) is attached.
The F-number gets darker by two steps when the teleconverter
(DMW-TC20) is attached.
Focal lengths available for shooting when
using a teleconverter
When using DMW-TC14: 294 mm to 560 mm
When using DMW-TC20: 420 mm to 800 mm
B
Supplied Accessories
C
Names and Functions of Components
[LOCK]: Locks the zoom ring.
[UNLOCK]: Unlocks the zoom ring.
D
Attaching the Lens
E
Using the Lens Hoods
F
Using the Teleconverter (Optional)
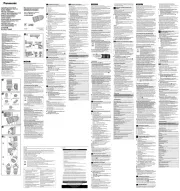
When using a tripod, attach it to the tripod mount of the lens.
(See illustration )
We recommend that you avoid attaching the tripod to the tripod
mount of the digital camera to prevent lens damage that may occur
when carrying the lens.
In the following cases, before attaching a tripod, attach the supplied
external tripod mount to the lens:
When the lens or digital camera comes in contact with the tripod
When a battery grip that comes in contact with the tripod is used
Attaching the external tripod mount (supplied)
(See illustration )
1 Insert the external tripod mount attachment screw (
1
1
1
11
) into
the tripod mount of the lens.
2 Rotate the external tripod mount attachment screw in the
direction of the arrows to fasten it firmly.
Do not strike or apply strong pressure to the external tripod mount.
Changing the vertical/horizontal orientation
(See illustration )
You can loosen the orientation locking knob (
1
) to rotate the lens
together with the digital camera (
2
).
This way, you can quickly switch between the vertical and horizontal
orientation while the tripod is in use.
After changing the orientation, tighten the orientation locking knob
firmly and check that it is not loose.
Do not spray the lens with insecticides or volatile chemicals.
If such substances get onto the lens they can damage the exterior
case or cause the paint to peel.
Do not point the lens at the sun or other strong light sources.
This may cause the lens to collect an excessive amount of light,
resulting in fire and malfunction.
Do not use while directly touching the lens at low temperatures
for a long period of time.
In cold places (environments below 0 o oC (32 F), such as ski
slopes), prolonged direct contact with the lens may cause skin
injury. Use gloves or similar when using the lens for long periods.
When cleaning, wipe lightly using a soft dry cloth that does not
produce dust.
Do not use solvents such as benzine, thinners, alcohol, kitchen
cleansers, etc., as this can cause problems such as deformation of
the casing or peeling of the coating.
Do not use wipes with chemicals.
Do not keep products made of rubber, PVC or similar materials in
contact with the lens for a long period of time.
Do not disassemble or alter this product.
When the lens is not going to be used for a prolonged period, we
recommend storing with a desiccant (silica gel).
Check all the parts before recording when you have not used the lens
for a long period of time.
Avoid using or storing the lens in any of the following locations as this
may cause problems in operation or malfunctioning:
In direct sunlight or on a beach in summer
In locations with high temperatures and humidity levels or severe
changes in temperature and humidity
In sandy or dusty locations
Where there is fire
Near heaters, air conditioners or humidifiers
Where water may make the lens wet
Where there is vibration
Inside a vehicle
Refer also to the operating instructions for the digital camera.
This is the sound of the internal lenses moving or the aperture
operating. It is not a malfunction.
The specifications are subject to change for performance
enhancement.
INTERCHANGEABLE LENS FOR DIGITAL CAMERA
“LEICA DG VARIO-ELMAR 100-400mm/F4.0-6.3 ASPH./POWER
O.I.S.”
G
Using the Tripod Mount
Cautions for Use
Troubleshooting
A rattling sound, etc. is heard when the digital camera is turned
on or off or the lens is shaken.
There is a sound from the lens when taking pictures.
Specifications
Mount
Micro Four Thirds Mount
Focal length
f=100 mm to 400 mm (35 mm film camera equivalent: 200 mm to
800 mm)
Lens construction
20 elements in 13 groups (1 aspherical ED lens, 1 UED lens, 2 ED
lenses)
Aperture type
9 diaphragm blades/circular aperture diaphragm
Maximum aperture
F4.0 (Wide) to F6.3 (Tele)
Minimum aperture value
F22
Angle of view
12x (Wide) to 3.1x (Tele)
In focus distance
[FULL]: 1.3 m (4.27 feet) to / [5 m- ]: 5.0 m (16.4 feet) to (from
the focus distance reference line)
Maximum image magnification
0.25k (35 mm film camera equivalent: 0.5k)
Optical Image Stabilizer
Yes
Filter diameter
72 mm
Maximum diameter
q83.0 mm (3.3 )
Overall length
Approx. 171.5 mm (6.8q) (from the tip of the lens to the base side of
the lens mount)
Mass (Weight)
Approx. 985 g (2.17 lb) (excluding the external tripod mount)
Dust and splash resistant
Yes
Recommended operating temperature
j o o o o10 C to 40 C (14 F to 104 F)
Permissible relative humidity
10 %RH to 80 %RH
Merci d’avoir fait l’achat d’un produit Panasonic.
Veuillez lire attentivement les présentes instructions avant d’utiliser ce
produit, et conserver ce manuel pour utilisation ultérieure.
L'objectif peut être utilisé de pair avec un appareil photo numérique
compatible avec l'objectif à monture standard pour le système Micro
Four Thirds
TM
(Micro Quatre Tiers).
Il ne peut pas être monté sur les appareils à monture Four Thirds
TM
(Quatre Tiers).
Pour un enregistrement plus fluide, nous vous conseillons de mettre à
jour la version du micrologiciel de l’appareil photo numérique/objectif.
Pour les plus récentes informations sur le micrologiciel ou pour le
télécharger/mettre à jour, visitez le site d’assistance suivant :
https://panasonic.jp/support/global/cs/dsc/
(En anglais uniquement)
Micro Four Thirds
TM
(Micro Quatre Tiers) et le logo Micro Four Thirds
sont des marques de commerce ou des marques déposées d’OM
Digital Solutions Corporation au Japon, aux États-Unis, en Union
européenne et dans d’autres pays.
Four Thirds
TM
(Quatre Tiers) et le logo Four Thirds sont des marques de
commerce ou des marques déposées d’OM Digital Solutions Corporation
au Japon, aux États-Unis, en Union européenne et dans d’autres pays.
LEICA est une marque déposée de Leica Microsystems IR GmbH.
ELMAR est une marque déposée de Leica Camera AG. Les objectifs
DG de LEICA sont fabriqués avec des instruments de mesure
homologués par Leica Camera AG et des systèmes de contrôle de la
qualité fondés sur des normes approues par Leica.
Les autres noms, raisons sociales et appellations de produits cités
dans ce document sont des marques de commerce ou des marques
déposées de leurs détenteurs respectifs.
L’apparence et les spécifications des produits décrits dans ce document
peuvent être différentes de celles des produits que vous avez réellement
achetés, en raison des améliorations apportées ultérieurement.
Évitez d’approcher l’élément de tout équipement magnétisé (four
à micro-ondes, téléviseur, équipement de jeux vidéo, émetteur
radio, ligne à haute tension, etc.).
N’utilisez pas l’appareil photo à proximité d’un téléphone cellulaire;
cela pourrait entraîner un bruit nuisible à l’image et au son.
Advenant le cas où le fonctionnement de l’appareil serait dérangé par un
champ magnétique, coupez le contact, retirez la batterie ou débranchez
l’adaptateur secteur pour ensuite soit remettre la batterie en place, soit
rebrancher l’adaptateur. Remettez l’appareil en marche.
-Si vous voyez ce symbole-
Manipulation de l’objectif
Lorsque vous utilisez cet objectif, veillez à ne pas le faire tomber, le
cogner ou appuyer trop fort dessus. Dans le cas contraire, cela
pourrait endommager ou causer le dysfonctionnement de cet
objectif et de l’appareil photo numérique.
Les images peuvent être affectées par la poussière, la saleté et les
salissures (eau, gras, empreintes de doigt) présentes sur la surface de la
lentille. Avant et après l’enregistrement, utilisez un souffleur pour éliminer
la poussière et la saleté de la surface de la lentille, puis essuyez-la
légèrement avec un chiffon doux et sec pour éliminer les salissures.
Lorsque l’objectif n’est pas utilisé, veillez à mettre en place le capuchon
d’objectif et le capuchon d’objectif arrière pour empêcher la poussière et
autres particules de s’y accumuler ou de pénétrer à l’intérieur de celui-ci.
Pour protéger les points de contact de l’objectif
1
, ne faites pas ce qui suit
car cela pourrait causer un dysfonctionnement. (Voir illustration )
Toucher les points de contact de l’objectif.
Laisser les points de contact se salir.
Poser l’objectif sur sa surface de montage.
Résistance à la poussière et aux éclaboussures
Résistance à la poussière et aux éclaboussures est utilisée pour
décrire le niveau supplémentaire de protection qu'offre cet
objectif contre l'exposition à une quantité minimale d'humidité,
d'eau ou de poussière. Elle ne garantit pas que des dommages
ne surviendront pas si cet objectif est soumis au contact direct
de l'eau ou à une infiltration de poussière.
Respectez les précautions suivantes pour que les performances
de résistance à la poussière et aux éclaboussures soient
satisfaisantes. Si l’objectif ne fonctionne pas correctement,
contactez le revendeur ou Panasonic.
Installez-le sur un appareil photo numérique qui résiste à la
poussière et aux éclaboussures.
Lors de la mise en place ou du retrait de l’objectif, veillez à ce
qu’aucun corps étranger tel que du sable, de la poussière ou des
gouttes d’eau, n’adhère au caoutchouc de la monture, aux points
de contact, à l’appareil photo numérique et à l’objectif.
Si l’objectif est exposé à des éclaboussures d’eau ou à d’autres
liquides, essuyez le liquide à l’aide d’un chiffon doux et sec.
Pour améliorer les performances de résistance à la poussière et aux
éclaboussures de l’objectif, un joint en caoutchouc est intégré dans la
monture de l’objectif.
Le joint en caoutchouc de l’objectif laisse des marques sur la
monture de l’appareil photo numérique, mais cela n’a aucune
incidence sur les performances.
Pour en savoir plus sur le remplacement du joint en caoutchouc de
la monture de l’objectif, contactez Panasonic.
Condensation (lorsque l’objectif est embué)
Il y a formation de condensation lorsque la température ambiante ou
le taux d’humité change. Faites attention, car cela pourrait créer des
taches, de la moisissure et causer un dysfonctionnement.
En cas de condensation, mettez l’appareil photo hors marche et
laissez-le ainsi pendant environ 2 heures. La buée disparaît
naturellement lorsque la température de l’appareil photo numérique
se rapproche de celle ambiante.
Vérifiez que tous les accessoires sont fournis avant d’utiliser le produit.
Les numéros de produit sont corrects à compter d’août 2023. Ceux-ci
sont susceptibles d’être modifiés.
1Étui pour objectif
2Protège-objectif
¢
3Capuchon arrière d’objectif
¢
4Monture externe pour trépied
5Parasoleil
¢Installé sur l’objectif au moment de l’achat.
1Surface de l’objectif
2Parasoleil coulissant intég
3Bague de mise au point
Tournez afin de mettre au point lors de la prise de photos en mise
au point manuelle (MF).
Vous pouvez régler l'amplitude de mouvement de la mise au point
en utilisant la bague de focus avec les menus des appareils photo
numériques compatibles. Consultez le mode d’emploi de l'appareil
photo numérique pour avoir des détails.
4Bague de verrouillage du zoom
Lorsque vous transportez l'objectif, tournez cette bague pour
verrouiller la bague de zoom afin d'éviter que l'objectif se déploie
sous son propre poids.
Ne faites pas tourner la bague de zoom lorsque la bague de
verrouillage du zoom est réglée sur [LOCK].
5Bague de zoom
Tournez pour
zoomer vers téléphoto ou grand-angle.
6Monture pour trépied
7Bouton de verrouillage de l’orientation
8Commutateur O.I.S. (S.O.I.)
La fonction du stabilisateur est réglée pour s'activer si le
commutateur O.I.S. (S.O.I.) est réglé sur [ON].
Nous vous conseillons de régler le commutateur O.I.S. (S.O.I.) sur
[OFF] (NON) lorsque vous utilisez un trépied.
9Commutateur AF/MF (MPA/MPM)
Permet de basculer entre la mise au point automatique (AF) et la
mise au point manuelle (MF).
Lorsque l'appareil photo numérique est réglé sur [MF], le
fonctionnement sera [MF] en dépit du réglage du commutateur AF/MF.
10 Sélecteur de la plage de distance de la mise au point
[FULL]: La mise au point se fait dans une plage allant de
1,3 m (4,27 pi) à
.
[5m-
]: La mise au point se fait dans une plage allant de
5,0 m (16,4 pi) à
. La vitesse de mise au point avec la
11 Commutateur [ZOOM LIMIT]
Limite la plage de rotation de la bague de zoom à la longueur
focale disponible lors de la prise de vue en utilisant le
téléconvertisseur.
12 Repère pour la mise en place de l’objectif
13 Garniture en caoutchouc de l’objectif
14 Points de contact
Nota
Il pourrait y avoir des différences de mise au point lorsque vous utilisez le
zoom après avoir fait la mise au point. Refaites la mise au point.
Si le bruit du fonctionnement
de la mise au point automatique
et celui du
stabilisateur vous ennuie durant un enregistrement vidéo, il est
conseillé d'enregistrer en effectuant ce qui suit :
Régler sur MPM pour enregistrer
Désactiver le stabilisateur de l’image et utiliser un trépied pour enregistrer
Pour de plus amples informations sur la manière d’installer l’objectif,
consultez le manuel d’utilisation de l’appareil photo numérique.
Installez l’objectif après avoir mis l’appareil photo numérique hors marche.
Installez l’objectif après avoir retiré le capuchon d’objectif arrière.
(Voir illustration )
Après avoir retiré l’objectif de l’appareil photo numérique, veillez à
mettre en place le capuchon d’objectif et le capuchon d’objectif
arrière pour empêcher la poussière et autres particules de s’y
accumuler ou de pénétrer à l’intérieur de celui-ci.
L’objectif est doté d’un parasoleil coulissant intégré et d’un parasoleil
fourni. Avec ce dernier, vous pouvez bloquer encore plus efficacement
la lumière supplémentaire.
Le parasoleil coulissant intégré et le parasoleil fourni peuvent être
utilisés tous les deux en même temps.
Pour utiliser le parasoleil coulissant intégré, faites-le glisser dans le
sens de la flèche. (Voir illustration )
Nous vous conseillons de verrouiller la bague de zoom avec la bague
de verrouillage du zoom avant d’effectuer cela.
Fixation du parasoleil (Fourni)
(Voir illustration )
1 Tournez la vis du parasoleil dans le sens de la flèche pour le
desserrer (1).
2 Insérez le parasoleil jusqu'à ce qu'il s'arrête (2).
3 Tournez la vis du parasoleil dans le sens de la flèche pour le
fixer solidement (3).
Nota
Le parasoleil fourni peut être fixé dans le sens inverse pour le
transport. (Voir illustration )
Lors d’un enregistrement avec flash, afin d’éviter le vignetage, nous
vous conseillons de ne pas utiliser de parasoleil.
Pour éviter de laisser tomber l'objectif, il ne faut jamais le transporter
en le tenant simplement par le parasoleil intégré ou le parasoleil
fourni. (Voir illustration )
Remarques sur l’utilisation d’un filtre
Il est possible d’installer le capuchon d’objectif ou le parasoleil fourni
avec le filtre déjà en place.
Il pourrait se produire un effet de vignetage sur les images
enregistrées si plusieurs filtres sont utilisés simultanément.
Précautions à prendre
Élimination des équipements usagés
Applicable uniquement dans les pays membres de l’Union
européenne et les pays disposant de systèmes de recyclage.
Apposé sur le produit lui-même, sur son emballage, ou figurant
dans la documentation qui l’accompagne, ce pictogramme
indique que les appareils électriques et électroniques usagés
doivent être séparés des ordures ménagères.
Afin de permettre le traitement, la valorisation et le
recyclage adéquats des appareils usagés, veuillez les
conformément à la législation nationale en vigueur.
En les éliminant conformément à la réglementation en vigueur,
vous contribuez à éviter le gaspillage de ressources
précieuses ainsi qu’à protéger la santé humaine et l’environnement.
Pour de plus amples renseignements sur la collecte et le recyclage,
veuillez vous renseigner auprès des collectivités locales.
Le non-respect de la réglementation relative à l’élimination des
déchets est passible d’une peine d’amende.
Précautions
B
Accessoires fournis
C
Noms et fonctions des composants
[LOCK]: Verrouille la bague de zoom.
[UNLOCK]: Déverrouille la bague de zoom.
D
Mise en place de l’objectif
E
Utilisation des parasoleils
FRANÇAIS
Il n’est pas possible d’installer des éléments autres que des filtres, tel
qu’une lentille de conversion ou un adaptateur, à l’avant de l’objectif
et de les utiliser avec ce dernier.
L’objectif pourrait être endommagé si de tels éléments sont mis en place.
Un téléconvertisseur (DMW-TC14/DMW-TC20) peut être instal sur
cet objectif. (À compter d’août 2023)
Visitez notre site Web pour avoir les toutes dernières informations sur les
téléconvertisseurs compatibles.
N'installez rien d'autre qu'un téléconvertisseur compatible. Cela
pourrait causer des dommages ou affecter de façon négative les
performances de l'objectif ou du téléconvertisseur.
Mise en place du téléconvertisseur
1 Faites tourner la bague de zoom pour rapprocher la
longueur focale d’au moins 250 mm vers l’extrémi
téléphoto.
2 Mettez le commutateur [ZOOM LIMIT] sur [ON].
3 Mettez en place le téléconvertisseur.
Consultez le manuel d’utilisation du téléconvertisseur pour
avoir plus de détails sur la manière de le mettre en place et de
le retirer.
Après avoir retiré le téléconvertisseur, mettez le commutateur
[ZOOM LIMIT] sur [OFF].
Actionnez le commutateur [ZOOM LIMIT] avec une longueur
focale rapprochée d’au moins 250 mm vers l’extrémité
téléphoto.
Nota
L’objectif peut être endommagé ou sali lors de la mise en place du
téléconvertisseur, en conséquence assurez-vous que le commutateur
[ZOOM LIMIT] est sur [ON].
Il n’est pas possible de prendre des photos avec une longueur focale
inférieure à 210 mm vers l’extrémité grand-angle avec le
téléconvertisseur en place et de plus l’enregistrement vidéo s’arrêtera. La
longueur focale durant les actions de zoom est limitée entre 210 mm et
400 mm lorsque le commutateur [ZOOM LIMIT] est réglé sur [ON].
N’essayez pas de forcer le zoom vers l’extrémité grand-angle car cela
pourrait causer un dysfonctionnement.
Le nombre d’ouverture s'assombrit d'un pas lorsque le téléconvertisseur
(DMW-TC14) est en place.
Le nombre d’ouverture s'assombrit de deux pas lorsque le
téléconvertisseur (DMW-TC20) est en place.
Longueurs focales disponibles pour une prise
de vue en utilisant un téléconvertisseur
En utilisant le modèle DMW-TC14: 294 mm à 560 mm
En utilisant le modèle DMW-TC20: 420 mm à 800 mm
Pour utiliser un trépied, il faut le fixer sur la monture pour trépied de
l’objectif. (Voir illustration )
Nous vous conseillons d’éviter de fixer le trépied sur la monture pour
trépied de l’appareil photo pour éviter d’endommager l’objectif, ce qui
pourrait arriver lors de son transport.
Dans les cas suivants, avant de fixer un trépied, installez la monture
externe pour trépied fournie sur l’objectif :
Si l’objectif ou l’appareil photo sont en contact avec le trépied
Si une prise d’alimentation en contact avec le trépied est utilisée
Installation de la monture externe pour trépied
(fournie) (Voir illustration )
1 Insérez la vis de fixation de la monture externe pour trépied
(1) dans la monture pour trépied de l’objectif.
2 Tournez la vis de fixation de la monture externe pour trépied
dans le sens des flèches pour fixer le trépied solidement.
Ne heurtez pas et n’appliquez aucune pression sur la monture
externe pour trépied.
Changement de l’orientation verticale/
horizontale (Voir illustration )
Vous pouvez débloquer le bouton de verrouillage de l’orientation (
1
)
pour faire tourner l’objectif ainsi que l’appareil photo numérique (
2
).
De cette façon, vous pouvez changer rapidement l’orientation verticale
et horizontale tout en utilisant le trépied.
Après avoir changé l’orientation, serrez fermement le bouton de
verrouillage de l’orientation et vérifiez qu’il n’y a pas de jeu.
Ne pulvérisez pas d’insecticides ou de substances chimiques
volatiles sur l’objectif.
Si de telles substances atteignent l’objectif, celui-ci pourrait être
endommagé, ou la peinture pourrait s’écailler.
Ne pointez pas l’objectif vers le soleil ou d’autres sources
intenses de lumière.
Lobjectif pourrait recueillir une quantité excessive de lumière,
causant un feu et un dysfonctionnement.
Ne touchez pas directement l’objectif durant un long moment
lorsque la température est basse.
Dans les endroits froids (température ambiante en-dessous de 0
o
C
(32
o
F), comme sur les pistes de ski), le contact direct et prolongé avec
l'objectif peut causer des blessures. Utilisez des gants ou quelque
chose de similaire pour utiliser l'objectif durant un long moment.
Lors du nettoyage, essuyez délicatement avec un chiffon doux
et sec sans peluche.
N’utilisez pas de solvants comme le benzène, des diluants, de
l’alcool, des détergents de cuisine, etc., car cela pourrait déformer
le boîtier ou décoller le revêtement.
Ne pas utiliser de lingettes chimiques.
Ne laissez pas de produits en caoutchouc, PVC ou matériaux
similaires au contact de l’objectif pendant longtemps.
Ne démontez pas et n’altérez pas ce produit.
Si l’objectif ne doit plus être utilisé pendant une période prolongée, nous
vous conseillons de le ranger avec un produit déshydratant (gel de silice).
Vérifiez tous les éléments avant d’enregistrer si vous n’avez pas
utilisé l’objectif depuis longtemps.
Évitez d’utiliser ou de ranger l’objectif dans l’un des endroits suivants car cela
pourrait causer des problèmes durant lutilisation ou des dysfonctionnements :
À la lumière directe du soleil ou sur la plage en été
Dans des endroits soumis à des températures et à des taux d’humidité
élevés ou à d’importantes variations de température et d’humidité
Dans des endroits sablonneux ou poussiéreux
Où il y a du feu
Près de radiateurs, climatiseurs, humidificateurs
Là où l’eau est susceptible de mouiller l’objectif
Où il y a des vibrations
À l’intérieur d’un véhicule
Consultez également le manuel d’utilisation de l’appareil photo.
Il s'agit du bruit que fait le déplacement des lentilles internes ou le
fonctionnement de l'ouverture. Ce n'est pas un dysfonctionnement.
Ces spécifications peuvent être soumises à des changements pour de
meilleures performances.
OBJECTIF INTERCHANGEABLE POUR APPAREIL PHOTO NUMÉRIQUE
“LEICA DG VARIO-ELMAR 100-400mm/F4.0-6.3
ASPH./S.O.I.
PUISSANT”
F
Utilisation du téléconvertisseur (en
option)
G
Utilisation de la monture pour trépied
Précautions d’utilisation
Dépannage
Un cliquetis, etc., se fait entendre lorsque l’appareil photo
numérique est mis en/hors marche ou lorsque l’objectif est secoué.
Il y a un bruit provenant de l’objectif lors des prises de vues.
Spécifications
Monture
Monture Micro Quatre Tiers (Micro Four Thirds)
Longueur focale
f=100 mm à 400 mm (Équivalent à un film de 35 mm : 200 mm à
800 mm)
Construction de l’objectif
20 éléments dans 13 groupes (1 lentille ED asphériques, 1 lentille
UED, 2 lentilles ED)
Type de diaphragme
9 lamelles de diaphragme/diaphragme à ouverture circulaire
Ouverture maximale
F4.0 (Grand-angle) à F6.3 (Téléobjectif)
Valeur d’ouverture minimum
F22
Angle de vue
12x (Grand-angle) à 3,1o (Téléobjectif)
Distance de mise au point
[FULL] : 1,3 m (4,27 pi) à / [5 m- ] : 5,0 m (16,4 pi) à (à partir
de la ligne de référence de la distance de mise au point)
Grossissement maximum de l’image
0,25k (Équivalent à un film de 35 mm : 0,5k)
Stabilisateur optique de l’image
Oui
Diamètre filtre
72 mm
Diamètre maximum
83,0 mm (3,3 po)
Longueur totale
Environ 171,5 mm (6,8 po) (du bout de l’objectif à la base de la
monture de l’objectif)
Poids
Environ 985 g (2,17 lb) (sans la monture externe pour trépied)
Résistance à la poussière et aux éclaboussures
Oui
Température de fonctionnement recommandée
j o o o o10 C à 40 C (14 F à 104 F)
Humidité relative admissible
10 %RH à 80 %RH
Vielen Dank für Ihren Kauf dieses Panasonic-Produkts.
Bitte lesen Sie diese Anleitung vor der Inbetriebnahme dieses Produkts
aufmerksam durch, und bewahren Sie dieses Handbuch für spätere
Bezugnahme griffbereit auf.
Das Objektiv kann mit einer Digital-Kamera verwendet werden, welche
mit dem Objektivanschluss-Standard für das Micro Four
Thirds
TM
-System kompatibel ist.
Objektive dieser Ausführung lassen sich nicht auf Kameras mit
Four-Thirds
TM
-Bajonett aufsetzen.
Zum reibungslosen Aufnehmen wird empfohlen, die Firmware von
Digital-Kamera/Objektiv auf die neueste Version zu aktualisieren.
Um aktuelle Informationen zur Firmware einzusehen oder die
Firmware herunterzuladen, rufen Sie die unten aufgeführte
Support-Website auf:
https://panasonic.jp/support/global/cs/dsc/
(Nur Englisch)
Micro Four Thirds
TM
und die für Micro Four Thirds verwendeten Logos
sind Markenzeichen oder eingetragene Markenzeichen der OM Digital
Solutions Corporation in Japan, den USA, der EU und anderen Ländern.
Four Thirds
TM
und die für Four Thirds verwendeten Logos sind
Markenzeichen oder eingetragene Markenzeichen der OM Digital
Solutions Corporation in Japan, den USA, der EU und anderen Ländern.
LEICA ist ein eingetragenes Markenzeichen der Leica Microsystems IR
GmbH. ELMAR ist ein eingetragenes Markenzeichen der Leica Camera
AG. Die Herstellung der LEICA DG-Objektive erfolgt unter Verwendung
von Messinstrumenten und Qualitätssicherungssystemen, die von der
Leica Camera AG auf Grundlage der Qualitätsstandards des
Unternehmens zertifiziert wurden.
Andere Namen, Unternehmens- und Produktbezeichnungen, welche
in diesem Dokument genannt werden, sind Markenzeichen oder
eingetragene Markenzeichen der jeweiligen Unternehmen.
Das Erscheinungsbild und die technischen Daten der in dieser
Bedienungsanleitung beschriebenen Produkte können aufgrund von
Weiterentwicklungen vom tatsächlichen Produkt abweichen.
Halten Sie das Gerät so weit wie möglich von Geräten und
Einrichtungen fern, die elektromagnetische Felder erzeugen (wie
Mikrowellengeräte, Fernsehgeräte, Videospielgeräte, Funksender,
Hochspannungsleitungen usw.).
Verwenden Sie die Kamera nicht in der Nähe von Mobiltelefonen. Es
könnten sonst Bild- und Tonstörungen auftreten.
Wenn die Kamera durch elektromagnetische Felder anderer Geräte
gestört wird und Fehlfunktionen auftreten, schalten Sie die Kamera
aus. Nehmen Sie den Akku heraus und/oder trennen Sie das
Netzadapter ab. Setzen Sie den Akku dann wieder ein und/oder
stecken Sie das Netzadapter wieder ein und schalten Sie die Kamera
ein.
-Bedeutung des nachstehend abgebildeten Symbols-
Handhabung des Objektivs
Achten Sie bei der Verwendung dieses Objektivs darauf, dass es
nicht herunterfällt und keinen Stößen und übermäßiger
Krafteinwirkung ausgesetzt wird. Andernfalls kann es zu
Funktionsstörungen oder Schäden an diesem Objektiv und der
Digital-Kamera kommen.
Die Bilder können durch Staub, Schmutz und Verschmutzungen
(Wasser, Öl, Fingerabdrücke usw.) auf der Linsenoberfläche
beeinträchtigt werden. Verwenden Sie vor und nach dem Aufnehmen
einen Blasebalg, um Staub und Schmutz von der Oberfläche des
Objektivs zu entfernen, und wischen Sie es dann vorsichtig mit einem
weichen, trockenen Tuch ab, um Verschmutzungen zu entfernen.
Wenn das Objektiv nicht verwendet wird, bringen Sie den vorderen
und hinteren Objektivdeckel an, damit sich keine Staub- oder
anderen Partikel auf der Linse oder im Objektiv ansammeln.
Um die Kontaktpunkte 1 des Objektivs zu schützen, vermeiden Sie
Folgendes. Anderenfalls kann es zu Fehlfunktionen kommen.
(
Siehe Abbildung
)
Kontaktpunkte des Objektivs berühren.
Zulassen, dass die Kontaktpunkte des Objektivs verschmutzen.
Das Objektiv mit der Fassung nach unten ablegen.
Staub- und Spritzwasserschützt
Die Bezeichnung "staub- und spritzwassergeschützt" bezieht
sich auf ein zusätzliches Schutzniveau dieses Objektivs gegen
das Eindringen minimaler Mengen von Feuchtigkeit/Wasser und
Staub. Diese Bezeichnung bedeutet keine Garantie gegen
Beschädigungen, wenn dieses Objektiv direktem Kontakt mit
eindringendem Wasser oder Staub ausgesetzt wird.
Treffen Sie die folgenden Vorsichtsmaßnahmen, um einen
angemessenen Staub- und Spritzwasserschutz zu
gewährleisten. Wenn das Objektiv nicht richtig funktioniert,
wenden Sie sich an Ihren Händler oder an Panasonic.
Bringen Sie das Objektiv an eine Digitalkamera an, die staub-
und spritzwasserdicht ist.
Achten Sie beim Anbringen und Entfernen des Objektivs darauf,
dass keinerlei Fremdmaterial wie Sand, Staub, Wassertropfen usw.
auf Objektivfassungsgummi, Kontaktpunkte, Digital-Kamera und
Objektiv gelangen.
Wenn das Objektiv Spritzwasser oder anderen Flüssigkeiten ausgesetzt
wurde, wischen Sie es mit einem weichen, trockenen Tuch ab.
Zur Verbesserung der Staub- und Spritzwasserdichtigkeit des
Objektivs ist ein Objektivfassungsgummi am Bajonett angebracht.
Durch das Objektivfassungsgummi kommt es zu Schleifspuren an der
Digital-Kamera. Dadurch wird die Leistung jedoch nicht beeinträchtigt.
Für Informationen zum Austausch des Objektivfassungsgummis
wenden Sie sich bitte an Panasonic.
Kondensation (Beschlagen des Objektivs)
Kondensation tritt auf, wenn sich Umgebungstemperatur oder
Luftfeuchtigkeit ändern. Seien Sie vorsichtig, da dies Ablagerungen am
Objektiv, Schimmelbildung und Funktionsstörungen verursachen kann.
Wenn Kondensation auftritt, schalten Sie die Digital-Kamera aus und
warten ca. 2 Stunden lang. Die Kondensation hört von selbst auf, wenn sich
die Digital-Kameratemperatur an die Umgebungstemperatur annähert.
Überprüfen Sie, ob sämtliches Zubehör mitgeliefert wurde, bevor Sie
das Produkt verwenden.
Die Produktnummern beziehen sich auf den Stand von August 2023.
Änderungen sind vorbehalten.
1Objektivbeutel
2Objektivdeckel
¢
3Hinterer Objektivdeckel
¢
4Externer Stativanschluss
5Gegenlichtblende
¢Zum Kaufzeitpunkt am Objektiv angebracht.
1Linsenfläche
2Integrierte Gegenlichtblende
3Schärfenring
In der MF (manueller Fokus)-Einstellung drehen Sie zum
Scharfstellen den Fokusring.
In den Menüs kompatibler Digitalkameras können Sie den Umfang der
Bewegung beim Scharfstellen mit dem Fokusring einstellen. Einzelheiten
finden Sie in der Bedienungsanleitung Ihrer Digitalkamera.
4Zoom-Feststellring
Wenn Sie dieses Objektiv transportieren, drehen Sie diesen Ring,
um den Zoomring zu arretieren, damit das Objektiv nicht durch
sein eigenes Gewicht herausgezogen wird.
Drehen Sie nicht am Zoomring, wenn der Zoom-Feststellring in die
Position [LOCK] gedreht wurde.
5Zoom-Ring
Ermöglicht das Zoomen in die Tele- oder Weitwinkelstellung.
6Stativbefestigung
7Ausrichtungs-Feststellknopf
8O.I.S.-Schalter
Wenn der O.I.S.-Schalter auf [ON] eingestellt ist, wird die
Stabilisatorfunktion aktiviert.
Es empfiehlt sich, den O.I.S.-Schalter auf [OFF] zu stellen, wenn Sie ein
Stativ verwenden.
9AF/MF-Schalter
Umschalten zwischen AF (Autofokus) und MF (manueller Fokus).
Wenn die Digitalkamera auf MF eingestellt ist, ist unabhängig von der
Stellung des AF/MF-Schalters die manuelle Fokussierung (MF) aktiviert.
10 Bereichswahlschalter für den Fokusabstand
[FULL]: Scharfstellung im Bereich von 1,3 m bis
.
[5m-
]: Scharfstellung im Bereich von 5,0 m bis
. In dieser
Einstellung ist die Scharfstellung im Autofokus schneller.
11 [ZOOM LIMIT]-Schalter
Begrenzt den Drehbereich des Zoomrings auf die verfügbaren
Brennweiten bei Aufnahmen mit dem Telekonverter.
12 Markierung zum Ansetzen des Objektivs
13 Objektivfassungsgummi
14 Kontaktpunkt
Hinweis
Der Schärfepunkt kann sich verschieben, wenn Sie nach der
Scharfstellung den Zoom benutzen. Wiederholen Sie die Scharfstellung.
Wenn das Betriebsgeräusch von AF und Stabilisator bei der Videoaufnahme
störend ist, wird empfohlen, die Aufnahme wie folgt durchzuführen:
Wählen Sie zum Aufnehmen die Einstellung MF aus
Schalten Sie den Bildstabilisator aus und verwenden Sie ein Stativ
für die Aufnahme
Informationen zum Aufsetzen des Objektivs finden Sie in der
Bedienungsanleitung Ihrer Digitalkamera.
Setzen Sie das Objektiv nach dem Ausschalten der Digitalkamera auf.
Setzen Sie das Objektiv nach dem Abnehmen des hinteren
Objektivdeckels auf. (Siehe Abbildung )
Nachdem Sie das Objektiv von der Digitalkamera abgenommen haben,
bringen Sie den vorderen und hinteren Objektivdeckel an, damit sich keine
Staub- oder anderen Partikel auf der Linse oder im Objektiv ansammeln.
Zum Umfang des Objektivs gehören eine integrierte Gegenlichtblende
und eine mitgelieferte Gegenlichtblende. Mit der zuletzt genannten
werden Streulicht und Blendeffekte noch wirksamer vermindert.
Informationen für Ihre Sicherheit
Entsorgung von Altgeräten und Batterien
Nur für die Europäische Union und Länder mit
Recyclingsystemen
Dieses Symbol auf den Produkten, der Verpackung und/
oder den Begleitdokumenten bedeutet, dass gebrauchte
elektrische und elektronische Produkte sowie Batterien
nicht in den allgemeinen Hausmüll gegeben werden dürfen.
Bitte führen Sie alte Produkte und verbrauchte Batterien
zur Behandlung, Aufarbeitung bzw. zum Recycling
gemäß den gesetzlichen Bestimmungen den
zuständigen Sammelpunkten zu.
Zusätzlich ist die Rückgabe unter bestimmten
Voraussetzungen auch bei Vertreibern (Verkaufsfläche
für Elektro- und Elektronikgeräte von mindestens 400 m² und
Lebensmitteleinzelhändler, die über eine Gesamtverkaufsfläche von
mindestens 800 m² verfügen und mehrmals im Kalenderjahr oder
dauerhaft auch Elektro- und Elektronikgeräte anbieten und auf dem
Markt bereitstellen) möglich. Die Rücknahme hat kostenlos beim
Kauf eines gleichartigen Neugerätes zu erfolgen (1:1 Rücknahme).
Unabhängig davon, gibt es die Möglichkeit, die Altgeräte kostenlos
an den Vertreiber zurückzugeben (0:1 Rücknahme; Abmessungen
kleiner als 25 cm und weniger als drei Altgeräte).
Vertreiber, die unter Verwendung von Fernkommunikationsmitteln
ihre Produkte verkaufen, sind zur Rücknahme von Altgeräten
verpflichtet, wenn die Lager- und Versandflächen für Elektro- und
Elektronikgeräte mindestens 400 m² betragen.
Onlineverzeichnis der Sammel- und Rücknahmestellen:
https://www.ear-system.de/ear-verzeichnis/sammel-und-ruecknahmestellen.
Enthalten die Produkte Batterien und Akkus oder Lampen, die aus
dem Altgerät zerstörungsfrei entnommen werden können, sind Sie
als Endnutzer gesetzlich dazu verpflichtet, diese vor der Entsorgung
zu entnehmen und getrennt als Batterie bzw. Lampe zu entsorgen.
Batterien können zusätzlich im Handelsgeschäft unentgeltlich
zurückgegeben werden.
Indem Sie diese Produkte und Batterien ordnungsgemäß entsorgen,
helfen Sie dabei, wertvolle Ressourcen zu schützen und eventuelle
negative Auswirkungen, insbesondere beim Umgang mit
lithiumhaltigen Batterien, auf die menschliche Gesundheit und die
Umwelt zu vermeiden.
Für mehr Informationen zu Sammlung und Recycling, wenden Sie
sich bitte an Ihren örtlichen Abfallentsorgungsdienstleister.
Gemäß Landesvorschriften können wegen nicht ordnungsgemäßer
Entsorgung dieses Abfalls Strafgelder verhängt werden.
Datenschutz
Wir weisen alle Endnutzer von Elektro- und Elektronikaltgeräten
darauf hin, dass Sie für das Löschen personenbezogener Daten auf
den zu entsorgenden Altgeräten selbst verantwortlich sind.
Hinweis für das Batteriesymbol (Symbol unten):
Dieses Symbol kann in Kombination mit einem
chemischen Symbol abgebildet sein. In diesem Fall erfolgt
dieses auf Grund der Anforderungen derjenigen
Richtlinien, die für die betreffende Chemikalie erlassen
wurden.
Vermeidung von Störungen
B
Beiliegendes Zubehör
C
Bezeichnungen und Funktionen der
einzelnen Kamerateile
[LOCK]: Arretiert den Zoomring.
[UNLOCK]: Gibt den Zoomring wieder frei.
D
Aufsetzen des Objektivs
E
Gegenlichtblenden
DEUTSCH
Die integrierte Gegenlichtblende und die mitgelieferte
Gegenlichtblende können gleichzeitig verwendet werden.
Um die integrierte Gegenlichtblende zu verwenden, schieben Sie sie
in Pfeilrichtung. (Siehe Abbildung )
Wir empfehlen Ihnen, den Zoomring mit dem Zoom-Feststellring zu
arretieren, bevor Sie Operationen ausführen.
Gegenlichtblende aufsetzen (Mitgeliefertes
Zubehör) (Siehe Abbildung )
1 Drehen Sie den Schraubverschluss der Gegenlichtblende in
Pfeilrichtung, um sie zu lösen (
1
).
2 Führen Sie die Gegenlichtblende bis zum Anschlag ein (2).
3 Drehen Sie die Gegenlichtblenden-Schraube in
Pfeilrichtung, um das Objektiv gut festzuziehen (3).
Hinweis
Beim Transport kann die mitgelieferte Gegenlichtblende in
umgekehrter Richtung angebracht werden. (Siehe Abbildung )
Um beim Aufnehmen mit Blitzlicht Vignettierungen zu verhindern,
empfehlen wir, keine Gegenlichtblende zu benutzen.
Um ein Herunterfallen des Objektivs zu vermeiden, sollten Sie das
Objektiv beim Tragen niemals nur an der eingebauten oder der
mitgelieferten Gegenlichtblende festhalten. (Siehe Abbildung )
Hinweise zur Verwendung von Filtern
Es ist möglich, den Objektivdeckel und die mitgelieferte
Gegenlichtblende bei bereits aufgesetzten Filtern zu verwenden.
Beim gleichzeitigen Anbringen mehrerer Filter kann es zu
Abschattungen in den aufgenommenen Bildern kommen.
Außer Filtern können keine anderen Objekte – etwa Vorsatzlinsen
oder Adapter – vor dem Objektiv angebracht und in Kombination mit
diesem Objektiv verwendet werden.
Durch Anbringen solcher Objekte kann es zu Beschädigungen des
Objektivs kommen.
An diesem Objektiv kann ein Telekonverter (DMW-TC14/DMW-TC20)
befestigt werden. (Stand: August 2023)
Auf unserer Website finden Sie aktuelle Informationen zu
kompatiblen Telekonvertern.
Bringen Sie ausschließlich kompatible Telekonverter an. Anderenfalls
kann es zu Beschädigungen oder Leistungsbeeinträchtigungen des
Objektivs bzw. Telekonverters kommen.
Anbringen des Telekonverters
1 Drehen Sie den Zoomring, um die Brennweite dichter als
mindestens 250 mm zum Tele-Ende hin einzustellen.
2 Stellen Sie den [ZOOM LIMIT]-Schalter auf [ON].
3 Bringen Sie den Telekonverter an.
Nähere Informationen zum Anbringen und Abnehmen finden
Sie in der Bedienungsanleitung des Telekonverters.
Nach dem Abnehmen des Telekonverters stellen Sie den
[ZOOM LIMIT]-Schalter auf [OFF].
Benutzen Sie den [ZOOM LIMIT]-Schalter mit einer
Brennweiteneinstellung dichter als mindestens 250 mm zum
Tele-Ende hin.
Hinweis
Das Objektiv kann beschädigt oder verschmutzt werden, wenn der
Telekonverter angebracht ist. Stellen Sie deshalb sicher, dass der
[ZOOM LIMIT]-Schalter auf [ON] gestellt ist.
Es ist nicht möglich, Aufnahmen bei einer Brennweite dichter als 210 mm
zum Weitwinkelende zu machen, wenn der Telekonverter angebracht ist,
und Videoaufnahmen werden auch beendet. Die Brennweite ist während
Zoomoperationen auf zwischen 210 mm und 400 mm begrenzt, wenn der
[ZOOM LIMIT]-Schalter auf [ON] gestellt ist. Versuchen Sie nicht, den
Zoom mit Gewalt zum Weitwinkelende hin einzustellen, weil dies zu
Fehlfunktionen führen kann.
Die Blendenzahl wird um eine Stufe dunkler, wenn der Telekonverter
(DMW-TC14) angebracht ist.
Die Blendenzahl wird um zwei Stufen dunkler, wenn der Telekonverter
(DMW-TC20) angebracht ist.
Verfügbare Brennweiten für Aufnahmen mit
einem Telekonverter
Bei Verwendung des DMW-TC14: 294 mm bis 560 mm
Bei Verwendung des DMW-TC20: 420 mm bis 800 mm
Wenn Sie ein Stativ verwenden, befestigen Sie es am Stativanschluss
des Objektivs. (Siehe Abbildung )
Es wird empfohlen, das Stativ nicht am Stativanschluss der
Digital-Kamera anzubringen, um Beschädigungen am Objektiv zu
vermeiden, wenn das Objektiv transportiert wird.
Bringen Sie in den folgenden Fällen den mitgelieferten externen
Stativanschluss am Objektiv an, bevor Sie ein Stativ befestigen:
Wenn Objektiv oder Digital-Kamera in Kontakt mit dem Stativ
kommen
Wenn ein Akkugriff verwendet wird, der in Kontakt mit dem Stativ
kommt
Externen Stativanschluss (mitgeliefert)
anbringen (Siehe Abbildung )
1 Setzen Sie die Befestigungsschraube des externen
Stativanschlusses (
1
1
1
11
) in den Stativanschluss des Objektivs
ein.
2 Drehen Sie die Befestigungsschraube des externen
Stativanschlusses in Pfeilrichtung, um sie fest zu montieren.
Üben Sie keinerlei übermäßige Kraft auf den externen
Stativanschluss aus.
Vertikale/horizontale Ausrichtung ändern
(Siehe Abbildung )
Sie können den Ausrichtungs-Feststellknopf (
1
) lösen, um das
Objektiv zusammen mit der Digital-Kamera (
2
) zu drehen.
Auf diese Weise können Sie bei Stativverwendung schnell zwischen
der vertikalen und der horizontalen Ausrichtung wechseln.
Nach einer Änderung der Ausrichtung ziehen Sie den
Ausrichtungs-Feststellknopf fest an und überprüfen Sie, dass dieser
nicht locker ist.
Sprühen Sie keine Insektizide oder flüchtige Chemikalien auf
das Objektiv.
Falls solche Substanzen auf das Objektiv gelangen, könnten sie zur
Beschädigung des Objektivs oder zum Abblättern der Farbe führen.
Richten Sie das Objektiv nicht gegen die Sonne oder andere
starke Lichtquellen.
Das Objektiv könnte zu viel Licht aufnehmen, was zu Bränden oder
Fehlfunktionen führen kann.
Nicht verwenden, während das Objektiv bei niedrigen
Temperaturen über längere Zeiträume direkt berührt wird.
In kalten Umgebungen (unter 0 oC, z. B. auf Skipisten) kann ein
längeres Berühren des Objektivs zu Hautverletzungen führen.
Tragen Sie Handschuhe o. ä., wenn Sie das Objektiv über einen
längeren Zeitraum hinweg verwenden.
Verwenden Sie beim Reinigen vorsichtige Wischbewegungen
mit einem weichen, trockenen und staubfreien Tuch.
Verwenden Sie zur Reinigung des Geräts keine Lösungsmittel wie
Waschbenzin, Verdünner, Alkohol, Küchenreiniger etc., da diese
zur Verformung des Gehäuses oder zum Ablösen der
Beschichtung führen können.
Verwenden Sie keine mit Chemikalien getränkten Reinigungstücher.
Gegenstände aus Gummi, PVC oder ähnlichen Materialien dürfen
nicht für längere Zeit mit dem Objektiv in Berührung kommen.
Verändern und zerlegen Sie dieses Produkt nicht.
Wenn das Objektiv über einen längeren Zeitraum nicht benutzt wird,
wird die Lagerung mit einem Trockenmittel (Kieselgel) empfohlen.
Wenn das Objektiv über längere Zeit nicht benutzt wurde, überprüfen
Sie vor einer Aufnahme alle Teile des Objektivs.
Verwenden Sie die Gegenlichtblende nicht unter den folgenden
Bedingungen und lagern Sie sie auch nicht unter den folgenden
Bedingungen, da es ansonsten zu Bedienproblemen und
Funktionsstörungen kommen kann:
Bei direktem Sonnenlicht oder im Sommer an der Küste
An Orten mit hohen Temperaturen, hoher Feuchtigkeit oder starken
Temperatur-/Feuchtigkeitsschwankungen
An sandigen oder staubigen Orten
Bei einem Brand
In der Nähe von Heizkörpern, Klimaanlagen oder Luftbefeuchtern
Wenn das Objektiv durch Wasser nass werden kann
Wo Erschütterungen vorhanden sind
In einem Fahrzeug
Siehe auch die Bedienungsanleitung der Digitalkamera.
Dieses Geräusch entsteht durch die Bewegung der inneren Linsen oder
die Betätigung der Blende. Es handelt sich nicht um eine Fehlfunktion.
Die Spezifikationen können zur Leistungsverbesserung ohne
Ankündigung geändert werden.
WECHSELOBJEKTIV FÜR DIGITAL-KAMERA
“LEICA DG VARIO-ELMAR 100-400mm/F4.0-6.3 ASPH./POWER
O.I.S.”
F
Benutzung des Telekonverters
(Sonderzubehör)
G
Stativanschluss
Vorsichtsmaßnahmen
Fehlerbehebung
Beim Ein- oder Ausschalten der Digitalkamera oder beim
Schütteln des Objektivs ist ein Rattern o. ä. zu hören.
Beim Aufnehmen von Bildern ist ein Geräusch aus dem Objektiv zu hören.
Spezifikationen
Fassung
Micro Four Thirds-Anschluss
Brennweite
f=100 mm bis 400 mm (Kleinbild-Äquivalent: 200 mm bis 800 mm)
Objektivaufbau
20 Elemente in 13 Gruppen (1 asphärische ED-Linse, 1 UED-Linse,
2 ED-Linsen)
Blende
9 Blendenlamellen/Runde Blende
Maximale Blendenöffnung
F4.0 (Weitwinkel) bis F6.3 (Tele)
Minimale Blende
F22
Bildwinkel
12x (Weitwinkel) bis 3,1x (Tele)
Schärfebereich
[FULL]: 1,3 m bis / [5 m-]: 5,0 m bis (von der Bezugslinie für
Fokusentfernung)
Maximale Vergrößerung
0,25k (Kleinbild-Äquivalent: 0,5k)
Optischer bildstabilisator
Ja
Filterdurchmesser
72 mm
Max. Durchmesser
83,0 mm
Gesamtlänge
Ca. 171,5 mm (vom Rand des Objektivs bis zur Grundseite der
Objektivfassung)
Gewicht
Ca. 985 g (ohne externen Stativanschluss)
Staub- und Spritzwasserschützt
Ja
Empfohlene Betriebstemperatur
j o o10 C bis 40 C
Zulässige relative Luftfeuchtigkeit
10 %RH bis 80 %RH
Operating Instructions
INTERCHANGEABLE LENS FOR
DIGITAL CAMERA
Manuel d’utilisation
OBJECTIF INTERCHANGEABLE POUR
APPAREIL PHOTO NUMÉRIQUE
Bedienungsanleitung
WECHSELOBJEKTIV FÜR
DIGITAL-KAMERA
Instrucciones de funcionamiento
ÓPTICA INTERCAMBIABLE PARA
CÁMARA DIGITAL
Istruzioni per l’uso
LENTI INTERCAMBIABILI PER
FOTOCAMERA DIGITALE
使用說明書
使用說明書
使用說明書
使用說明書使用說明書
數位相機用可替換鏡頭
數位相機用可替換鏡頭
數位相機用可替換鏡頭
數位相機用可替換鏡頭數位相機用可替換鏡頭
Инструкция по эксплуатации
СМЕННЫЙ ОБЪЕКТИВ ДЛЯ
ЦИФРОВОЙ ФОТОКАМЕРЫ
Model No./Modèle/Model Nr./Modelo N./
Modello N./
型號
型號
型號
型號型號
/Модель .
H-RSA100400
DVQX2431ZA
F0823KN0
Gracias por comprar un producto Panasonic.
Lea cuidadosamente estas instrucciones antes de usar este producto,
y guarde este manual para usarlo en el futuro.
La lente puede ser usada con una cámara digital compatible con el
estándar de montaje de lente del sistema Micro Four Thirds
TM
.
No se puede montar en una cámara con estándar de soporte Four Thirds
TM
.
Para una grabación más uniforme, se recomienda que actualice el
firmware de la cámara digital/lente con la versión más reciente.
Para la información más reciente sobre el firmware o para descargarlo/
actualizarlo, visite la siguiente página de atención al cliente:
https://panasonic.jp/support/global/cs/dsc/
(Solo en inglés)
El logotipo Micro Four Thirds
TM
y Micro Four Thirds son marcas
comerciales o marcas comerciales registradas de OM Digital Solutions
Corporation, en Japón, Estados Unidos, la Unión Europea y otros países.
El logotipo Four Thirds
TM
y Four Thirds son marcas comerciales o
marcas comerciales registradas de OM Digital Solutions Corporation,
en Japón, Estados Unidos, la Unión Europea y otros países.
LEICA es una marca registrada de Leica Microsystems IR GmbH.
ELMAR es una marca registrada de Leica Camera AG. Los objetivos
LEICA DG se fabrican usando instrumentos de medida y sistemas de
garantía de calidad certificados por Leica Camera AG en base a los
estándares de calidad de la compañía.
Otros nombres, nombres de empresas y nombres de producto
mencionados en este documento son marcas comerciales o marcas
comerciales registradas de las empresas en cuestión.
La apariencia y las especificaciones de los productos descritos en
este documento pueden diferir de los productos reales comprados
debido a posteriores mejoras.
Mantenga la unidad lo más lejos que sea posible de equipos
electromagnéticos (como hornos de microondas, televisores,
vídeo juegos, trasmisores radio, líneas de alto voltaje, etc.).
No utilice la cámara cerca de teléfonos móviles, p2-ya que lo de hacerlo puede
producir ruido que afectará negativamente a las imágenes y el sonido.
Si la cámara queda afectada negativamente por un equipo electromagnético
y deja de funcionar correctamente, apague la cámara y quite la batería y/o el
adaptador de CA conectado. Luego vuelva a insertar la batería y/o vuelva a
conectar el adaptador de CA y encienda la cámara.
-Si ve este símbolo-
Manipulación de la lente
Al utilizar esta lente, tenga cuidado de no dejarla caer, golpearla
o aplicar una fuerza excesiva sobre ella. Hacerlo podría causar
un mal funcionamiento o daños en la lente y la cámara digital.
Las imágenes pueden verse afectadas por el polvo y la suciedad
(agua, aceite, huellas dactilares, etc.) de la superficie de la lente.
Antes y después de grabar, use un soplador para eliminar el polvo y
la suciedad de la superficie de la lente y luego limpie ligeramente con
un paño suave y seco para eliminar la suciedad.
Cuando la lente no esté en uso, asegúrese de colocar la tapa de la
lente y la tapa trasera de la lente para evitar que el polvo y otras
partículas se acumulen en la lente o entren en ella.
Para proteger los puntos de contacto de la lente
1
, no haga lo siguiente,
ya que podría causar un mal funcionamiento. (Ver ilustración )
Tocar los puntos de contacto de la lente.
Dejar que los puntos de contacto de la lente se ensucien.
Colocar la lente con la superficie de montaje hacia abajo.
Resistencia al polvo y a las salpicaduras
Resistencia al polvo y a las salpicaduras es un término que se utiliza
para describir un nivel adicional de protección que esta lente ofrece
frente a la exposición a una cantidad mínima de humedad, agua y polvo.
Este término no garantiza que no se produzcan daños si esta lente se
somete a contacto directo con agua o infiltración de polvo.
Tome las siguientes precauciones para un rendimiento satisfactorio de
resistencia al polvo y a las salpicaduras. Si la lente no funciona
correctamente, consulte con su distribuidor o con Panasonic.
Móntela en una cámara digital que sea resistente al polvo y a
las salpicaduras.
Al colocar o quitar la lente, tenga cuidado de que materiales extraños
como arena, polvo o gotas de agua no se adhieran a la lente o entren en
la goma de montaje, los puntos de contacto, la cámara digital y la lente.
Si la lente quedara expuesta a gotas de agua u otros líquidos,
séquela con un paño suave seco.
Para mejorar la resistencia al polvo y a las salpicaduras de la lente,
en la montura se utiliza una goma de montaje de la lente.
La goma de montaje de la lente dejará marcas de roce en la
montura de la cámara digital, pero esto no afecta al desempeño.
Para obtener información sobre cómo cambiar la goma de montaje
de la lente, póngase en contacto con Panasonic.
Condensación (cuando las lentes están empañadas)
La condensación se produce cuando la temperatura ambiente o la
humedad cambia. Tenga cuidado con la condensación, p2-ya que podría
provocar manchas y moho en la lente y producirse un mal funcionamiento.
Si se produce condensación, apague la cámara digital y déjela aprox.
2 horas. La neblina desaparecerá naturalmente cuando la temperatura
de la cámara digital se aproxime a la temperatura ambiente.
Antes de usar el producto, compruebe que estén suministrados todos
los accesorios.
Números de productos correctos a partir de agosto de 2023. Pueden
estar sujetos a cambio.
1Estuche de la lente
2Tapa de la lente
¢
3Tapa trasera de la lente
¢
4Montaje del trípode externo
5Parasol
¢Acoplado a la lente al momento de la compra.
1Superficie del objetivo
2Visera de la lente deslizante integrada
3Anillo del enfoque
Gire el anillo de enfoque para enfocar cuando esté en MF (enfoque manual).
Puede ajustar lo que se mueve el enfoque utilizando el anillo de
enfoque con los menús de cámaras digitales compatibles. Consulte las
instrucciones de funcionamiento de la cámara digital para más detalles.
4Anillo de bloqueo del zoom
Al transportar la lente, gire este anillo para bloquear el anillo del
zoom y así prevenir que la lente se extienda por su propio peso.
No gire el anillo del zoom cuando el anillo de bloqueo del zoom está en
[LOCK].
5Anillo de zoom
Hace zoom hasta teleobjetivo o gran angular.
6Montaje del trípode
7Perilla de bloqueo de la orientación
8Interruptor O.I.S.
La función del estabilizador se configura como activa si el
interruptor O.I.S. está en la posición [ON].
Le recomendamos que ajuste el interruptor O.I.S. a [OFF] cuando usa
un trípode.
9Interruptor AF/MF
Alterna entre AF (enfoque automático) y MF (enfoque manual).
Cuando la cámara digital se ajusta en MF, funcionará en MF
independientemente del ajuste del interruptor AF/MF.
10 Interruptor selector del rango de distancia de enfoque
[FULL]: Puede enfocar entre los rangos de 1,3 m (4,27 pies) a
.
[5m-
]: Puede enfocar entre los rangos de 5,0 m (16,4 pies) a
.
Con el enfoque automático, la velocidad de enfoque
aumentará.
11 Interruptor [ZOOM LIMIT]
Limita el rango de rotación del anillo del zoom a las distancias
focales disponibles cuando se toman imágenes utilizando el tele
convertidor.
12 Marca para ajustar la lente
13 Goma de montaje de la lente
14 Punto de contacto
Nota
Puede haber diferencias en el enfoque cuando se usa el zoom
después de enfocar. Enfoque de nuevo.
Si el sonido del funcionamiento AF y del estabilizador le molesta durante la
grabación de vídeo, se recomienda grabar de la siguiente manera:
Ajuste en MF para grabar
Apague el estabilizador de imagen y utilice un trípode para grabar
Para obtener información sobre cómo colocar la lente, consulte
las instrucciones de funcionamiento de su cámara digital.
Coloque la lente después de apagar la cámara digital.
Coloque la lente después de quitar la tapa trasera de la lente.
(Ver ilustración )
Después de quitar la lente de la cámara digital, asegúrese de colocar
la tapa de la lente y la tapa trasera de la lente para evitar que el polvo
y otras partículas se acumulen en la lente o entren en ella.
La lente viene con una visera deslizante integrada y una visera de la
lente suministrada. Con esta última, puede bloquear la luz extra aún
más eficazmente.
La visera de la lente deslizante integrada y la visera de la lente
suministrada se pueden usar juntas al mismo tiempo.
Para usar la visera de la lente deslizante integrada, deslícela en la
dirección de la flecha. (Ver ilustración )
Recomendamos bloquear el anillo del zoom con el anillo de bloqueo
del zoom antes de realizar operaciones.
Unión de la visera del objetivo (Accesorio
suministrado) (Ver ilustración )
1
Gire el tornillo de la visera de la lente en la dirección de la
flecha para aflojarla (
1
).
2
Inserte la tapa del objetivo hasta que pare (
2
).
3 Gire el tornillo de la tapa del objetivo en la dirección de la
flecha para asegurar la tapa del objetivo correctamente (3).
Nota
Puede colocar el parasol suministrado en la dirección inversa durante
el transporte. (Ver ilustración )
Cuando se graba con flash, para evitar el viñeteado, se recomienda
no utilizar parasol.
Para evitar que la lente se caiga, nunca debe transportarla
simplemente sujetando el parasol incorporado o el parasol
suministrado. (Ver ilustración )
Notas sobre el uso de filtros
Se puede colocar la tapa de la lente o la visera de la lente
suministrada con el filtro p2-ya puesto.
Si se colocan varios filtros simultáneamente, podría producirse
viñeteado en las imágenes grabadas.
No es posible colocar en la parte frontal de la lente, y utilizarlo en
combinación con ella, otro elemento que no sea un filtro, como una
lente de conversión o un adaptador.
La lente podría dañarse si se colocan tales objetos.
Se puede colocar un tele convertidor (DMW-TC14/DMW-TC20) en
esta lente. (A partir de agosto de 2023)
Consulte nuestro sitio web para la información s actualizada sobre
tele convertidores compatibles.
No coloque nada que no sea un tele convertidor compatible. Hacerlo podría
dañar o afectar negativamente el desempeño de la lente o el tele convertidor.
Acoplar el tele convertidor
1 Gire el anillo del zoom para acercar la distancia focal a al
menos 250 mm hacia el extremo de teleobjetivo.
2 Ajuste el interruptor [ZOOM LIMIT] en [ON].
3 Monte el tele convertidor.
Consulte las instrucciones de funcionamiento del tele
convertidor para obtener más información sobre cómo
montarlo y desmontarlo.
Después de quitar el tele convertidor, ajuste el interruptor
[ZOOM LIMIT] en [OFF].
Accione el interruptor [ZOOM LIMIT] con la distancia focal más
cercana a al menos 250 mm hacia el extremo de teleobjetivo.
Nota
La lente podría dañarse o ensuciarse mientras el tele convertidor está
montado, así que asegúrese de que el interruptor [ZOOM LIMIT] esté en
[ON].
Con el tele convertidor montado, no se pueden tomar imágenes con una
distancia focal inferior a 210 mm hacia el extremo de gran angular y la
grabación de vídeo también se detendrá. La distancia focal durante las
operaciones de zoom está limitada a entre 210 mm y 400 mm cuando el
interruptor [ZOOM LIMIT] está en [ON]. No intente forzar el zoom hacia el
extremo de gran angular, p2-ya que podría resultar en un farro de
funcionamiento.
El número F se oscurece un paso cuando se acopla el tele convertidor
(DMW-TC14).
El número F se oscurece dos pasos cuando se acopla el tele convertidor
(DMW-TC20).
Distancias focales disponibles para tomar
imágenes con un tele convertidor
Cuando se utiliza DMW-TC14: 294 mm a 560 mm
Cuando se utiliza DMW-TC20: 420 mm a 800 mm
Cuando utilice un trípode, fíjelo al montaje del trípode de la lente.
(Ver ilustración )
Se recomienda evitar fijar el trípode al montaje del trípode de la
cámara digital para evitar daños en la lente que podrían producirse
cuando se transporta la misma.
En los siguiente casos, antes de fijar un trípode, fije el montaje del
trípode externo suministrado a la lente:
Cuando la lente o cámara digital entra en contacto con el trípode
Cuando se utiliza una empuñadura con batería que entra en
contacto con el trípode
Cómo fijar el montaje del trípode externo
(suministrado) (Ver ilustración )
1 Inserte el tornillo de fijación del montaje del trípode externo
(
1
1
1
11
) en el montaje del trípode de la lente.
2 Gire el tornillo de fijación del montaje del trípode externo en
la dirección de las flechas para fijarlo firmemente.
No golpee o aplique una fuerte presión al montaje del trípode
externo.
Cómo cambiar la orientación vertical/
horizontal (Ver ilustración )
Puede aflojar la perilla de bloqueo de la orientación (
1
) para girar la
lente junto con la cámara digital (
2
).
De este modo, puede cambiar rápidamente entre una orientación
vertical y horizontal mientras usa el trípode.
Después de cambiar la orientación, apriete la perilla de bloqueo de la
orientación con firmeza y compruebe que no está floja.
No rocíe la lente con insecticidas o productos químicos volátiles.
Si dichas substancias caen en el objetivo, éstas pueden dañarlo o
hacer desconchar su barniz.
No apunte con el objetivo al sol u otras fuentes de luz intensa.
Esto podría hacer que el objetivo recogiera demasiada luz, lo que
podría provocar un incendio y una avería.
No la utilice si va a tocar directamente la lente a bajas
temperaturas durante un periodo de tiempo prolongado.
En lugares fríos (entornos por debajo de 0 o oC (32 F), como las
pistas de esquí), el contacto directo prolongado con la lente puede
provocar lesiones en la piel. Use guantes o algo similar cuando
utilice la lente durante periodos largos.
Al limpiar, limpie ligeramente con un paño suave y seco que no
produzca polvo.
No utilice disolventes como gasolina, diluyentes, alcohol, detergentes
para cocina, etc., ya que podrían causar problemas como la
deformación de la carcasa o el desprendimiento del revestimiento.
No utilice toallitas con productos químicos.
No deje productos de goma, PVC o materiales similares en contacto
directo con la lente durante un largo periodo.
No desarme ni altere este producto.
Cuando la lente no se vaya a usar durante un periodo de tiempo
prolongado, se recomienda guardarla con un desecante (gel de sílice).
Compruebe todas las partes antes de comenzar a grabar cuando no
haya usado la lente durante un periodo de tiempo prolongado.
Evite usar o guardar la lente en cualquiera de las siguientes ubicaciones,
ya que esto podría causar problemas en el funcionamiento o fallas:
Bajo la luz directa del sol o bien a lo largo de la costa durante el verano
En ubicaciones con altas temperaturas y altos niveles de humedad
o cambios bruscos de temperatura y humedad
En lugares arenosos o polvorientos
Donde haya llamas
Cerca de calefactores, acondicionadores de aire o humedecedores
Donde el agua pueda mojar la lente
Donde haya vibraciones
Dentro de un vehículo
Consulte además las instrucciones de funcionamiento de la cámara digital.
Este es el sonido de las lentes internas moviéndose o de la
operación de apertura. No se trata de un funcionamiento defectuoso.
Las especificaciones están sujetas a cambios para la mejora del
rendimiento.
ÓPTICA INTERCAMBIABLE PARA CÁMARA DIGITAL
“LEICA DG VARIO-ELMAR 100-400mm/F4.0-6.3 ASPH./POWER
O.I.S.”
Grazie per aver acquistato un prodotto Panasonic.
Leggere attentamente queste istruzioni prima di utilizzare il presente
prodotto, e conservare questo manuale per usi futuri.
Questo obiettivo può essere usato con una fotocamera digitale con
attacco compatibile con lo standard Micro Four Thirds
TM
System.
Non montabile su una fotocamera con specifiche sul supporto Four Thirds
TM
.
Per un utilizzo ottimale, raccomandiamo di aggiornare il firmware
della fotocamera digitale/obiettivo alla versione più recente.
Per le informazioni precenti sul firmware o per scaricare/aggiornare
il firmware, visitare il seguente sito web del supporto:
https://panasonic.jp/support/global/cs/dsc/
(solo in inglese)
Micro Four Thirds
TM
e il logo Micro Four Thirds sono marchi o marchi
registrati di OM Digital Solutions Corporation, in Giappone, negli Stati
Uniti, nell’Unione Europea e in altri paesi.
Four Thirds
TM
e il logo Four Thirds sono marchi o marchi registrati di
OM Digital Solutions Corporation, in Giappone, negli Stati Uniti,
nell’Unione Europea e in altri paesi.
LEICA è un marchio registrato di Leica Microsystems IR GmbH.
ELMAR è un marchio registrato di Leica Camera AG. Gli obiettivi
LEICA DG sono prodotti utilizzando strumenti di misurazione e
sistemi di garanzia della qualità certificati da Leica Camera AG in
base agli standard di qualità dell’azienda.
Altri nomi, nomi di aziende, nomi di prodotti contenuti in questo
documento sono marchi o marchi registrati delle relative aziende.
L’aspetto e le specifiche dei prodotti descritti in questo documento
possono differire rispetto ai prodotti effettivi acquistati a causa dei
miglioramenti apportati in seguito.
Tenere l’unità il più possibile lontana da apparecchi elettromagnetici
(come forni a microonde, TV, videogiochi, radiotrasmittenti, linee
dell’alta tensione, ecc.).
Non utilizzare la fotocamera vicino a telefoni cellulari, perché ciò può
causare disturbi che influenzano negativamente immagini e suoni.
Se il funzionamento della fotocamera digitale è disturbato da apparecchi
elettromagnetici, spegnere la fotocamera e rimuovere la batteria e/o
l’adattatore CA collegato. Quindi inserire nuovamente la batteria e/o
ricollegare l’adattatore CA. Infine, riaccendere la fotocamera.
-Se vedete questo simbolo-
Utilizzo dell’obiettivo
Quando si usa questo obiettivo, fare attenzione che non cada e
che non subisca urti e non applicare forza eccessiva su di esso.
In caso contrario si potrebbero provocare malfunzionamenti o
danni all’obiettivo ed alla fotocamera digitale.
Le immagini possono essere influenzate da polvere, sporco e macchie
(acqua, olio, impronte digitali, ecc.) sulla superficie della lente. Prima e dopo
la registrazione, usare un soffietto per rimuovere polvere e sporco dalla
superficie della lente, quindi strofinare delicatamente con un panno morbido
asciutto per rimuovere lo sporco.
Quando non si usa l’obiettivo, fissare il copriobiettivo ed il
copriobiettivo posteriore per evitare che polvere ed altre particelle si
accumulino sull’obiettivo o entrino al suo interno.
Per proteggere i punti di contatto dell’obiettivo
1
, non fare quanto segue.
Queste azioni potrebbero provocare malfunzionamenti. (Vedere la figura )
Toccare i punti di contatto dell’obiettivo.
Lasciare che i punti di contatto dell’obiettivo si sporchino.
Posizionare l’obiettivo con la sua superficie di innesto rivolta verso il basso.
Resistenza alla polvere ed agli schizzi
Resistenza alla polvere ed agli schizzi sono termini utilizzati per
descrivere un ulteriore livello di protezione offerto da questo obiettivo,
contro l'esposizione a minime quantità di umidità, acqua o polvere.
Questi termini non garantiscono che l'obiettivo non subisca danni
qualora venga a diretto contatto con l'acqua o con infiltrazioni di polvere.
Prendere le seguenti precauzioni per garantire prestazioni soddisfacenti
in termini di resistenza alla polvere ed agli schizzi. Se l’obiettivo non
funziona correttamente, contattare il rivenditore o Panasonic.
Installare su una fotocamera digitale resistente alla polvere ed agli schizzi.
Quando si installa o si rimuove l’obiettivo, fare attenzione che
materiali estranei come sabbia, polvere, e goccioline di acqua non
aderiscano o penetrino nella gomma sull’innesto dell’obiettivo, nei
punti di contatto, nella fotocamera digitale e nell’obiettivo.
Se l’obiettivo viene esposto a goccioline d’acqua o altri liquidi,
rimuoverle con un panno asciutto morbido.
Per migliorare le prestazioni dell’obiettivo in termini di resistenza alla
polvere ed agli schizzi, sull’innesto dell’obiettivo è presente una
protezione in gomma.
La gomma sull’innesto dell’obiettivo lascerà segni di striscio sull’innesto
della fotocamera digitale, ma questo non influisce sulle prestazioni.
Per informazioni sulla sostituzione della protezione in gomma
sull’innesto dell’obiettivo, contattare Panasonic.
Condensa (quando l’obiettivo è appannato)
La condensa si forma quando cambia la temperatura ambiente o
l’umidità. Fare attenzione, in quanto può causare macchie, muffa e
malfunzionamento dell’obiettivo.
Se si verifica della condensa, spegnere la fotocamera digitale ed attendere
circa 2 ore. La condensa scomparirà naturalmente quando la temperatura
della fotocamera digitale si avvicinerà a quella dell’ambiente.
Controllare che tutti gli accessori siano in dotazione prima di utilizzare il
prodotto.
I codici dei prodotti sono aggiornati ad agosto 2023. È possibile che
subiscano delle modifiche.
1Borsa per l'obiettivo
2Copriobiettivo
¢
3Copriobiettivo posteriore
¢
4Attacco treppiede esterno
5Paraluce
¢Installato sull’obiettivo al momento dell’acquisto.
1Superficie dell’obiettivo
2Paraluce scorrevole incorporato
3Ghiera di messa a fuoco
Ruotare la ghiera di messa a fuoco per mettere a fuoco quando
l’impostazione è MF (messa a fuoco manuale).
È possibile impostare quanto si sposta la messa a fuoco usando la
ghiera di messa a fuoco con i menu nelle fotocamere digitali
compatibili. Per ulteriori informazioni consultare le istruzioni per
l’uso della fotocamera digitale.
4Ghiera blocco zoom
Quando si trasporta l'obiettivo, ruotare questa ghiera per bloccare
la ghiera dello zoom per evitare che la lente si estenda a causa
del proprio peso.
Non ruotare la ghiera dello zoom quando la ghiera di blocco dello zoom
è impostata su [LOCK].
5Ghiera dello zoom
Consente di zoomare su telefoto o grandangolo.
6Attacco treppiede
7Manopola blocco orientamento
8Interruttore O.I.S.
La funzione stabilizzatore è impostata in modo da attivarsi se il
selettore O.I.S. è posizionato su [ON].
Si consiglia di posizionare l’interruttore O.I.S. su [OFF] quando si
utilizza un treppiede.
9Selettore AF/MF
Commuta tra AF (messa a fuoco automatica) e MF (messa a
fuoco manuale).
Quando la fotocamera digitale è impostata su MF, il
funzionamento sarà MF indipendentemente dall'impostazione
del selettore AF/MF.
10 Selettore gamma distanza messa a fuoco
[FULL]: La distanza utile di messa a fuoco è di 1,3 m a
.
[5m-
]: La distanza utile di messa a fuoco è di 5,0 m a
. La
messa a fuoco automatica sarà più rapida.
11 Interruttore [ZOOM LIMIT]
Limita il range di rotazione della ghiera dello zoom alle lunghezze
focali disponibili quando si effettua una ripresa mentre si utilizza il
teleconverter.
12 Segno per l’installazione dell’obiettivo
13 Protezione in gomma sull’innesto dell’obiettivo
14 Punto di contatto
Nota
Possono esserci differenze nella messa a fuoco quando si usa lo
zoom dopo la messa a fuoco. Mettere nuovamente a fuoco.
Se il suono di funzionamento della messa a fuoco automatica e dello
stabilizzatore disturba durante la registrazione di video, si consiglia di
registrare come segue:
Impostare su MF per registrare
Disattivare lo stabilizzatore di immagine ed usare un treppiede per
la registrazione
Per informazioni su come installare l’obiettivo, consultare le
istruzioni per l’uso della propria fotocamera digitale.
Installare l’obiettivo dopo aver spento la fotocamera digitale.
Installare l’obiettivo dopo aver rimosso il copriobiettivo posteriore.
(Vedere la figura )
Dopo aver rimosso l’obiettivo dalla fotocamera digitale, accertarsi di
fissare il copriobiettivo ed il copriobiettivo posteriore per evitare che
polvere ed altre particelle si accumulino sull’obiettivo o entrino al suo
interno.
L'obiettivo è fornito con un paraluce incorporato scorrevole e un
paraluce in dotazione. Con quest'ultimo, è possibile bloccare la luce in
eccesso in modo ancora più efficace.
Il paraluce incorporato scorrevole ed il paraluce in dotazione possono
essere usati insieme contemporaneamente.
Per usare il paraluce incorporato scorrevole, farlo scorrere in
direzione della freccia. (Vedere la figura )
Raccomandiamo di bloccare la ghiera dello zoom con la ghiera di
blocco dello zoom prima di effettuare le operazioni.
Installazione del paraluce
(Accessorio in dotazione) (Vedere la figura )
1 Ruotare la vite del paraluce nella direzione indicata dalla
freccia per allentarla (
1
).
2 Inserire il paraluce finché non si arresta (2).
3 Ruotare la vite del paraluce nella direzione indicata dalla
freccia per fissare saldamente il paraluce (3).
Nota
Durante il trasporto il paraluce in dotazione può essere montato al
contrario. (Vedere la figura )
Quando si esegue una registrazione con il flash, per evitare l’effetto
vignetta si consiglia di non utilizzare un paraluce.
Per evitare di far cadere l'obiettivo, non trasportare mai l'obiettivo
tenendo solo il paraluce incorporato o il paraluce in dotazione.
(Vedere la figura )
Note sull’uso del filtro
È possibile installare il copriobiettivo o il paraluce in dotazione con il filtro
già installato.
Se vengono installati contemporaneamente più filtri, sulle immagini
registrate può apparire un effetto vignetta.
Non è possibile installare elementi diversi dai filtri, ad esempio
convertitori o adattatori, sulla parte anteriore dell’obiettivo ed usarli in
combinazione con questo obiettivo.
Se vengono installati elementi di questo tipo, l’obiettivo potrebbe
venire danneggiato.
Su questo obiettivo è possibile installare un teleconverter
(DMW-TC14/DMW-TC20).
(Informazioni aggiornate ad agosto 2023).
Consultare il nostro sito web per le informazioni più aggiornate sui
teleconverter compatibili.
Non installare niente di diverso da un teleconverter compatibile. Farlo
può danneggiare o influire negativamente sulle prestazioni
dell'obiettivo o del teleconverter.
Installazione del teleconverter
1 Ruotare la ghiera dello zoom verso l'estremità telefoto, per
impostare una lunghezza focale di almeno 250 mm.
2 Posizionare l’interruttore [ZOOM LIMIT] su [ON].
3 Installare il teleconverter.
Vedere le istruzioni d'uso del teleconverter per informazioni su
come installarlo e rimuoverlo.
Dopo aver rimosso il teleconverter, posizionare l’interruttore
[ZOOM LIMIT] su [OFF].
Azionare l'interruttore [ZOOM LIMIT], solo quando è stata
impostata una lunghezza focale di almeno 250 mm ruotando la
ghiera dello zoom verso l'estremità telefoto.
Nota
L’obiettivo può danneggiarsi o sporcarsi mentre è installato il
teleconverter, per cui occorre accertarsi che l’interruttore [ZOOM LIMIT]
sia posizionato su [ON].
Non è possibile scattare foto quando la lunghezza focale è inferiore a
210 mm verso il lato grandangolo e il teleconverter è installato; anche la
registrazione di video si interromperà. Quando si utilizza lo zoom e
l’interruttore [ZOOM LIMIT] è posizionato su [ON], la lunghezza focale è
limitata a valori compresi tra 210 mm e 400 mm. Non cercare di portare
forzatamente lo zoom verso l’estremità grandangolo, per evitare un
possibile malfunzionamento.
L’F-number diventa più scuro di uno step quando è installato il
teleconverter (DMW-TC14).
L’F-number diventa più scuro di due step quando è installato il
teleconverter (DMW-TC20).
Lunghezze focali disponibili per gli scatti
quando si utilizza un teleconverter
Quando si utilizza DMW-TC14: da 294 mm a 560 mm
Quando si utilizza DMW-TC20: da 420 mm a 800 mm
Quando si usa un treppiede, fissarlo all’attacco treppiede dell’obiettivo.
(Vedere la figura )
Raccomandiamo di evitare di fissare il treppiede all’attacco treppiede
della fotocamera digitale per evitare danni all’obiettivo che possono
verificarsi quando si trasporta l’obiettivo.
Nei seguenti casi, prima di fissare un treppiede, fissare all’obiettivo
l’attacco treppiede esterno in dotazione:
Quando l’obiettivo o la fotocamera digitale vengono a contatto con
il treppiede
Quando si usa un battery grip che viene a contatto con il treppiede
Installazione dell'attacco del treppiede esterno
(in dotazione) (Vedere la figura )
1 Inserire la vite di fissaggio dell'attacco del treppiede esterno
(
1
1
1
11
) nell'attacco del treppiede dell'obiettivo.
2 Ruotare la vite di fissaggio dell'attacco del treppiede esterno
in direzione delle frecce per fissarlo saldamente.
Non colpire o applicare una forte pressione sull’attacco treppiede
esterno.
Modifica dell'orientamento verticale/
orizzontale (Vedere la figura )
È possibile allentare la manopola di blocco dell'orientamento (
1
) per
ruotare l'obiettivo insieme alla fotocamera digitale (
2
).
In questo modo, è possibile passare velocemente dall'orientamento
verticale a quello orizzontale mentre si usa il treppiede.
Dopo aver modificato l'orientamento, stringere a fondo la manopola di
blocco dell'orientamento e verificare che non sia allentata.
Non spruzzare insetticidi o sostanze chimiche volatili sull’obiettivo.
Se tali sostanze vengono a contatto con l’obiettivo possono
danneggiarlo o provocare il distacco di vernice.
Non puntare direttamente l’obiettivo verso il sole o verso intense
sorgenti luminose.
L’obiettivo potrebbe raccogliere una quantità eccessiva di luce,
prendendo fuoco e rovinandosi.
Non usare toccando direttamente l’obiettivo a temperature
basse per lungo tempo.
In luoghi freddi (ambienti con temperatura inferiore a 0 oC, come
piste da sci), un contatto diretto prolungato con l'obiettivo potrebbe
causare lesioni cutanee. Utilizzare guanti o simili quando si utilizza
a lungo l'obiettivo.
Per la pulizia, strofinare delicatamente con un panno asciutto
che non produca polvere.
Non utilizzare solventi come benzina, diluenti, alcol, detergenti da
cucina, ecc. perché questo può causare problemi come la
deformazione del corpo o la rimozione della finitura esterna.
Non usare panni con sostanze chimiche.
Non tenere a lungo a contatto con l’obiettivo prodotti in plastica, PVC
o materiali simili.
Non smontare o modificare questo prodotto.
Quando l’obiettivo non verrà usato per un periodo prolungato, si
consiglia di riporlo con un essiccante (gel di silice).
Controllare tutte le parti prima di registrare quando non si è usato
l’obiettivo per un lungo periodo di tempo.
Evitare di usare o lasciare l’obiettivo in uno dei seguenti luoghi perché
questo può causare problemi operativi o malfunzionamento:
Esposta alla luce del sole, o in spiaggia d’estate
In luoghi caratterizzati da temperature e livelli di umidità elevati o
forti sbalzi di temperatura e umidità
In luoghi con sabbia o polvere
Dove sono presenti fiamme
Vicino a caloriferi, condizionatori o umidificatori
Dove l’acqua può bagnare l’obiettivo
Dove sono pre senti vibrazioni
All’interno di un’auto
Vedere anche le istruzioni per l’uso della fotocamera digitale.
Si tratta del suono del movimento delle lenti interne o del
funzionamento dell’apertura. Non si tratta di un malfunzionamento.
Le specifiche sono soggette a modifica per migliorare le prestazioni.
LENTI INTERCAMBIABILI PER FOTOCAMERA DIGITALE
“LEICA DG VARIO-ELMAR 100-400mm/F4.0-6.3 ASPH./POWER
O.I.S.”
購買 Panasonic
使用本產品前細閱讀這並保留本說明書供日後使
本鏡
Micro Four Thirds
TM
System
標準相數位相機
無法4/3
TM
(Four Thirds
TM
)接口規格的相機
了更暢地拍攝將數位相機 韌體更新至最版本/
需韌體資訊更新韌體請造訪下列支援網站/
https://panasonic.jp/support/global/cs/dsc/
Micro Four Thirds
TM
Micro Four Thirds 標誌OM Digital Solutions
Corporation 在日歐盟和其他國家冊商
Four Thirds
TM
Four Thirds 標誌OM Digital Solutions Corporation
在日歐盟和其他國家冊商
LEICA Leica Microsystems IR GmbH的註冊商 ELMAR Leica
Camera AG 的註冊商 LEICA DG 是採Leica Camera AG
質標準認的測試儀器和品系生產的產
文中提到其他名公司名品名稱皆為其各公司冊商
文中所記述的產品外觀與規格因日後的產品改良而與購買的
際產品不同
使
使
使
使使
波爐
如微波爐
如微波爐
如微波爐如微波爐
視訊
視訊
視訊
視訊視訊
無線
無線
無線
無線無線
線等
線等
線等
線等線等
勿在話附近使用相機否則質量
果相機由於受帶磁設備影能正常工作先將其關閉取出
/
或斷
供應器
新插入
/
供應器相機
使
使
使
使使
使用本鏡
使用本鏡
使用本鏡
使用本鏡使用本鏡
小心不
小心不
小心不
小心不小心不
撞擊或度施力
撞擊或度施力
撞擊或度施力
撞擊或度施力撞擊或度施力
否則可能造本鏡
否則可能造本鏡
否則可能造本鏡
否則可能造本鏡否則可能造本鏡
和數位相機或損壞
和數位相機或損壞
和數位相機或損壞
和數位相機或損壞和數位相機或損壞
有污塵和指印能會影像
攝前後使吹塵除鏡的灰塵和用軟乾布輕輕
擦拭以清除
防止灰塵或其他微粒附著不使用鏡請裝
護鏡1請避免下列動作否則可
觸碰
讓鏡
將安
防濺
防濺
防濺
防濺防濺
防濺是指本鏡對於少量的濕氣
防濺是指本鏡對於少量的濕氣
防濺是指本鏡對於少量的濕氣
防濺是指本鏡對於少量的濕氣防濺是指本鏡對於少量的濕氣
塵具有附防護
塵具有附防護
塵具有附防護
塵具有附防護塵具有附防護
本鏡接接觸水有灰
本鏡接接觸水有灰
本鏡接接觸水有灰
本鏡接接觸水有灰本鏡接接觸水有灰
並不保會發生損壞
並不保會發生損壞
並不保會發生損壞
並不保會發生損壞並不保會發生損壞
下列意事操作
下列意事操作
下列意事操作
下列意事操作下列意事操作
到所要的防防濺
到所要的防防濺
到所要的防防濺
到所要的防防濺到所要的防防濺
果本鏡
果本鏡
果本鏡
果本鏡果本鏡
法正確運
法正確運
法正確運
法正確運法正確運
經銷商或
經銷商或
經銷商或
經銷商或經銷商或 諮詢
諮詢
諮詢
諮詢諮詢
Panasonic
到可防濺
到可防濺
到可防濺
到可防濺到可防濺
心安移除以免水滴等異附著
橡膠數位相機
其他用軟布將其擦
改善的防防濺接口使接口橡膠
接口數位相機口上摩擦的痕
有關更換接口橡膠的資請與Panasonic聯繫
水氣
水氣
水氣
水氣水氣
當鏡
當鏡
當鏡
當鏡當鏡
周圍度或化大時會發生水氣請注以免
及故
果發生水氣請關閉數位相機將其放置約 小時數位相機2
度接周圍度時化將自然消
在使用本產品之前請確認內是否提供了以下所有附
品型號為 所取後可能會有變2023 8
1
2
¢
3
¢
4腳架台座
5
¢購買時已安
1
2置滑
3焦環
設為 MF手動對動對焦環進行
使用相數位相機能表定使焦環的焦移
有關詳細資數位相機的使用說明書
4變焦鎖
攜帶防止鏡因其自身重量而抽出請轉此環鎖
焦環
變焦鎖環設定到
[LOCK]
變焦環
5變焦環
變焦為遠攝或廣
6腳架台座
7方向定旋
8O.I.S. 開關
開關設定到O.I.S. [ON]啟動定器功
使腳架開關設定到O.I.S. [OFF]
9AF/MF 開關
切換 AF動對MF手動對
數位相機設 開關設MF AF/MF MF
10 焦距開關
[FULL]:
可以在
1.3 m
的範圍內對
[5m-
]:
可以在
5.0 m
的範圍內對
動對焦的焦速度將
11 [ZOOM LIMIT] 開關
使距鏡拍攝時變焦環的轉範制在可用的焦距
12 裝標記
13 接口橡膠
14
在對完成後變焦能會有請重新對
您介錄製
AF
定器操作議用下列方式錄製
設為
MF
錄製
請關閉器並使腳架
有關如何安裝鏡的資訊
有關如何安裝鏡的資訊
有關如何安裝鏡的資訊
有關如何安裝鏡的資訊有關如何安裝鏡的資訊
數位相機的使用說明書
數位相機的使用說明書
數位相機的使用說明書
數位相機的使用說明書數位相機的使用說明書
裝鏡
裝鏡
裝鏡
裝鏡裝鏡
關閉數位相機
關閉數位相機
關閉數位相機
關閉數位相機關閉數位相機
裝鏡先取下
防止灰塵或其他微粒附著從數位相機上取下後務
本鏡置滑和提供的鏡 可以更
擋住
置滑和提供的鏡可以同時一使
使置滑將其朝箭示的方向
在執操作前議用變焦鎖環鎖變焦環
裝鏡
裝鏡
裝鏡
裝鏡裝鏡
提供的附
提供的附
提供的附
提供的附提供的附
1 ( )
朝箭示的方向罩螺絲將其
朝箭示的方向罩螺絲將其
朝箭示的方向罩螺絲將其
朝箭示的方向罩螺絲將其朝箭示的方向罩螺絲將其1
2 ( )
插入罩直到停止為止
插入罩直到停止為止
插入罩直到停止為止
插入罩直到停止為止插入罩直到停止為止 2
3朝箭示的方向罩螺絲牢牢地固定住
朝箭示的方向罩螺絲牢牢地固定住
朝箭示的方向罩螺絲牢牢地固定住
朝箭示的方向罩螺絲牢牢地固定住朝箭示的方向罩螺絲牢牢地固定住
( )3
攜帶時可以以方向安提供的鏡
使用閃拍攝時為避免暈影不建使用鏡
為避不可只握住內置的鏡或提供
濾鏡使用注意事
濾鏡使用注意事
濾鏡使用注意事
濾鏡使用注意事濾鏡使用注意事
可以在安裝著濾鏡的狀態下安裝鏡或提供的鏡
同時安多個濾鏡拍攝影像可現部分暈影效
不可安裝除濾鏡以外任何品到並搭配鏡使例如
換器
裝這能會使損壞
可將增距鏡 DMW-TC14/DMW-TC20裝至此鏡上。2023
月當為準8
有關兼容增距鏡的最資訊我們的網站
切勿安兼容增距鏡以外任何件。否則可能會造成損壞或嚴
或增距鏡的
距鏡
距鏡
距鏡
距鏡距鏡
1變焦環
變焦環
變焦環
變焦環變焦環
使焦距端至
使焦距端至
使焦距端至
使焦距端至使焦距端至250 mm
2
[ZOOM LIMIT] 開關為
開關為
開關為
開關為開關為 [ON]
3距鏡
距鏡
距鏡
距鏡距鏡
有關如何安和取下增距鏡的詳細資距鏡的使用說
明書
取下增距鏡開關為[ZOOM LIMIT] [OFF]
焦距端至
250 mm
操作
[ZOOM LIMIT]
開關
安裝增距鏡時鏡頭可能受損或沾上髒污請確保 開關設[ZOOM LIMIT]
定為 [ON]
安裝增距鏡時焦距離廣角端 將無法拍攝錄影也會停止210 mm
[ZOOM LIMIT] 開關設定為 變焦操作的焦距限制在[ON] 210 mm
400 mm 之間請勿強制將焦距調向廣角端這可能導致故障
安裝增距鏡 值會變暗一級DMW-TC14F
安裝增距鏡 值會變暗兩級DMW-TC20F
使距鏡拍攝時可用的焦距
使距鏡拍攝時可用的焦距
使距鏡拍攝時可用的焦距
使距鏡拍攝時可用的焦距使距鏡拍攝時可用的焦距
使 DMW-TC14 294 mm 560 mm
使 DMW-TC20 420 mm 800 mm
使腳架將其安腳架
我們建免將三腳架裝至數位相機的腳架防止攜帶
時可損壞
以下情在安腳架先在上安附的外接三
或數位相機到三腳架
到三腳架的把手在使
腳架台座
腳架台座
腳架台座
腳架台座腳架台座
提供
提供
提供
提供提供
1 (
將外腳架台座安裝螺絲
將外腳架台座安裝螺絲
將外腳架台座安裝螺絲
將外腳架台座安裝螺絲將外腳架台座安裝螺絲
1
1
1
11
)插入到腳架台座中
插入到腳架台座中
插入到腳架台座中
插入到腳架台座中插入到腳架台座中
2朝箭示的方向動外腳架台座安裝螺絲將其牢牢地固定
朝箭示的方向動外腳架台座安裝螺絲將其牢牢地固定
朝箭示的方向動外腳架台座安裝螺絲將其牢牢地固定朝箭示的方向動外腳架台座安裝螺絲將其牢牢地固定
切勿擊打外接三腳架或對其過猛
變縱
變縱
變縱
變縱變縱/
可以方向定旋(
1
) (以和數位相機起轉
2
)
可以在使腳架時在向和向之切換
方向後方向定旋確認它不
用殺蟲劑或揮性化學品噴灑鏡
用殺蟲劑或揮性化學品噴灑鏡
用殺蟲劑或揮性化學品噴灑鏡
用殺蟲劑或揮性化學品噴灑鏡用殺蟲劑或揮性化學品噴灑鏡
果此品接能會損壞
勿將或其他強光
勿將或其他強光
勿將或其他強光
勿將或其他強光勿將或其他強光
這會使致火災和故
勿在低溫環境下間直接接觸鏡
勿在低溫環境下間直接接觸鏡
勿在低溫環境下間直接接觸鏡
勿在低溫環境下間直接接觸鏡勿在低溫環境下間直接接觸鏡
寒冷
0
o
C
間直接接觸鏡
致皮受傷使用鏡使套或
清潔
清潔
清潔
清潔清潔
請用會產生灰的軟乾布輕輕擦拭
請用會產生灰的軟乾布輕輕擦拭
請用會產生灰的軟乾布輕輕擦拭
請用會產生灰的軟乾布輕輕擦拭請用會產生灰的軟乾布輕輕擦拭
使汽油稀釋酒精廚房等溶否則可能造
像是使外殼變形或使鍍膜
使化學物質
讓橡膠PVC 材質的製與鏡長期
勿拆或改裝本產
不使用本鏡在存放時放入一些乾矽膠
假如已間未使用鏡在拍攝前先檢查
請避免在下列地使或儲存為這能會操作失或故
方或夏天的海
度或
在多地方
有火
空調或加
在可能有濕鏡地方
受到
數位相機的使用說明書
是內部鏡動或光圈操作的聲
規格更以改善效
數位相機用可替換
數位相機用可替換
數位相機用可替換
數位相機用可替換數位相機用可替換
“LEICA DG VARIO-ELMAR 100-400mm/F4.0-6.3
ASPH./POWER
O.I.S.”
對於台
對於台
對於台
對於台對於台
Благодарим за приобретение продукции Panasonic.
Перед использованием этого изделия, пожалуйста, внимательно
прочитайте данные инструкции и сохраните это руководство для
дальнейшего использования.
Этот объектив можно использовать с цифровой фотокамерой, совместимой со
стандартом крепления объективов системы Micro Four Thirds
TM
.
Не предусмотрена его установка на фотокамеры со
спецификацией крепления Four Thirds
TM
.
Для беспроблемной записи рекомендуется обновить встроенное
программное обеспечение цифровой фотокамеры/объектива до
последней версии.
Чтобы узнать последнюю информацию о встроенном
программном обеспечении или /скачать обновить его, посетите
следующий веб-сайт поддержки:
https://panasonic.jp/support/global/cs/dsc/
( )Только на английском языке
Micro Four Thirds
TM
и знаки логотипа Micro Four Thirds являются
товарными знаками или зарегистрированными товарными
знаками OM Digital Solutions Corporation в Японии, Соединенных
Штатах, Европейском Союзе и других странах.
Four Thirds
TM
и знаки логотипа Four Thirds являются товарными
знаками или зарегистрированными товарными знаками OM
Digital Solutions Corporation в Японии, Соединенных Штатах,
Европейском Союзе и других странах.
LEICA является зарегистрированным товарным знаком Leica
Microsystems IR GmbH. ELMAR является зарегистрированным
товарным знаком Leica Camera AG. Объективы LEICA DG
производятся с использованием измерительных приборов и
систем контроля качества, сертифицированных Leica Camera AG
на основе корпоративных требований к качеству.
Другие названия названия, компаний и изделий, упомянутые в этой
инструкции, являются товарными знаками или зарегистрированными
товарными знаками соответствующих компаний.
Внешний вид и технические характеристики изделий, описанных в данном
руководстве, могут отличаться от фактического вида и характеристик
приобретенных вами изделий вследствие их последующего улучшения.
Храните прибор вдали от источников электромагнитного излучения
(например, микроволновых печей, телевизоров, оборудования для
видеоигр, радиопередатчиков, высоковольтных линий и т.д.).
Не пользуйтесь фотокамерой вблизи сотовых телефонов, так как
телефоны могут вызвать помехи, отрицательно сказывающиеся
на качестве снимков и звука.
Если камера подвергается негативному влиянию электромагнитного
излучения и перестает работать нормально, выключите камеру,
извлеките батарею / и или подключенный сетевой адаптер переменного
тока вставьте. Затем снова батарею /и или снова подключите сетевой
адаптер переменного тока и включите камеру.
Обращение с объективом
При использовании этого объектива старайтесь не ронять,
не не него ударять его и нажимать на слишком сильно, так
как это может привести к неисправности или повреждению
объектива и цифровой фотокамеры.
В случае попадания на поверхность объектива пыли, грязи и
загрязнений (воды, масла, отпечатков пальцев и т. п.) качество
изображений может ухудшиться. Перед съемкой и после нее сдуйте
пыль и грязь с поверхности объектива с помощью щетки с грушей, а
затем осторожно удалите загрязнения сухой мягкой тканью.
Когда объектив не используется, наденьте на него крышку
объектива и заднюю крышку объектива, чтобы пылинки и другие
частицы не на скапливались объективе и не попадали внутрь.
Для защиты контактов объектива 1нельзя выполнять указанные
ниже действия. Они могут привести к неисправности.
( См. рисунок
)
Прикасаться к контактам объектива.
Допускать загрязнения контактов объектива.
Ставить объектив монтажной поверхностью вниз.
Пылезащищённость и брызгозащищенность
Пылезащищённость и брызгозащищенность это термины,
используемые для описания дополнительного уровня защиты
данного объектива от воздействия минимального количества
влаги, воды или пыли . Эти термины не гарантируют отсутствие
повреждений в случае прямого контакта данного объектива с
водой или проникновения в него пыли.
Соблюдайте указанные ниже меры предосторожности для
удовлетворительного характеристик действия пылезащищённости
и брызгозащищенности. Если объектив работает неправильно,
обратитесь в пункт продажи или компанию Panasonic.
Прикрепляйте объектив к пылезащищённой и
брызгозащищенной цифровой фотокамере.
Прикрепляя инородные или снимая объектив, следите за тем, чтобы
частицы, например песок, пыль и капли воды, не на попали
поверхность или проникли внутрь резинового уплотнительного кольца
объектива, контактов, цифровой фотокамеры и объектива.
Если на объектив попадут капли воды или иной жидкости,
вытрите их сухой мягкой тканью.
Для улучшения пылезащищённости и брызгозащищенности
объектива в месте прикрепления используется резиновое
уплотнительное кольцо объектива.
От резинового уплотнительного кольца объектива на
креплении цифровой фотокамеры остаются потертости, но это
не на влияет ее работу.
За информацией о замене резинового уплотнительного кольца
объектива обращайтесь в компанию Panasonic.
Конденсация (когда объектив затуманивается)
Конденсация происходит, когда окружающая температура или
влажность изменяются. Остерегайтесь конденсации, поскольку
она может вызвать появление пятен и плесени на объективе и
привести к неисправности.
Если произошла конденсация, выключите цифровую фотокамеру
и оставьте ее прибл. на 2 часа. Запотевание исчезнет само
собой, когда температура цифровой фотокамеры сравняется с
температурой окружающей .среды
Перед использованием изделия убедитесь, что все
принадлежности поставлены в комплекте.
Номера изделий верны по состоянию на август 2023 г. Они могут
изменяться.
1Чехол для объектива
2Крышка объектива
¢
3Задняя крышка объектива
¢
4Крепление для внешнего штатива
5Бленда объектива
¢Установлены на объективе на момент покупки.
1Поверхность линзы
2Встроенная скользящая бленда объектива
3Кольцо фокусировки
При установке на MF (режим ручной фокусировки)
фокусировка выполняется вращением кольца фокусировки.
Степень перемещения при фокусировке с помощью кольца
фокусировки можно установить в меню совместимых
цифровых фотокамер. Подробную информацию см. в
инструкции по эксплуатации цифровой фотокамеры.
4Кольцо блокировки трансфокатора
Перенося объектив, поверните это кольцо для блокировки
кольца трансфокатора, чтобы объектив не выдвигался под
собственным весом.
Не поворачивайте кольцо трансфокатора, когда кольцо блокировки
трансфокатора установлено на [LOCK].
5Кольцо трансфокатора
Увеличение изображения в режиме телефото или
уменьшение в широкоугольном режиме.
6Крепление для штатива
7Ручка блокировки ориентации
8Переключатель O.I.S.
Функция стабилизатора включается при установке
переключателя O.I.S. на [ON].
При использовании штатива рекомендуется устанавливать
переключатель O.I.S. в положение [OFF].
9Переключатель AF/MF
Переключение между AF (режимом автофокусировки) и MF
( режимом ручной фокусировки).
Если на цифровой фотокамере установлен режим MF,
режим ручной фокусировки будет работать независимо от
установки переключателя AF/MF.
10 Переключатель диапазона фокусного расстояния
[FULL]: Возможность фокусировки в диапазоне от 1,3 м до
.
[5m-
]: Возможность фокусировки в диапазоне от 5,0 м до
.
Скорость фокусировки с использованием
автофокусировки увеличивается.
11 Переключатель [ZOOM LIMIT]
Установка для диапазона вращения кольца трансфокатора
предельных значений фокусного расстояния, доступных при
съемке с использованием телеконвертера.
12 Метка установки объектива
13 Резиновое уплотнительное кольцо объектива
14 Монтажная поверхность
Примечание
При использовании функции увеличения после выполнения фокусировки
фокус может измениться. Выполните фокусировку повторно.
Если вас беспокоит звук работы автофокусировки и стабилизатора во время
видеосъемки, рекомендуется выполнять запись следующим :образом
Установить для съемки режим MF
Выключить стабилизатор изображения и использовать для
съемки штатив
Информацию о прикреплении объектива см. в инструкции по
эксплуатации цифровой фотокамеры.
Прежде чем прикреплять объектив, выключите цифровую
фотокамеру.
Прежде чем прикреплять объектив, снимите заднюю крышку
объектива. (См. рисунок )
Сняв объектив с цифровой фотокамеры, наденьте на него крышку
объектива и заднюю крышку объектива, чтобы пылинки и другие
частицы не скапливались на объективе и не попадали внутрь.
Объектив оснащен встроенной скользящей блендой объектива и
поставляется в комплекте с блендой объектива. Благодаря
последней можно еще эффективнее блокировать излишний свет.
Встроенную скользящую бленду объектива и бленду объектива,
поставляемую в комплекте, можно использовать одновременно.
Чтобы использовать встроенную скользящую бленду объектива,
сдвиньте ее в направлении, указанном стрелкой. (См. рисунок )
До выполнения операций рекомендуется заблокировать кольцо
трансфокатора кольцом блокировки трансфокатора.
Присоединение бленды объектива
(Принадлежность в комплекте)
(См. рисунок )
1 Поверните винт бленды объектива в направлении,
указанном стрелкой, чтобы его ослабить (
1
).
2Вставьте бленду объектива до конца (2).
3 Поверните бленду объектива в направлении, указанном
стрелкой, чтобы ее надежно закрепить (3).
Примечание
Бленду объектива, которая поставляется в комплекте, при
переноске можно прикрепить в обратном направлении.
(См. рисунок )
При избежание съемке со вспышкой во затемнения рекомендуется
не использовать бленду объектива.
Чтобы не допустить падения объектива, его ни в коем случае
нельзя переносить , держась только за встроенную бленду
объектива или бленду объектива, которая поставляется в
комплекте. (См. рисунок )
Примечания об использовании фильтра
Когда установлен фильтр, вместе с ним можно прикрепить
крышку объектива объектива или бленду , поставляемую в
комплекте.
Если одновременно установить несколько фильтров, на записанных
изображениях может появиться небольшое затемнение.
Кроме фильтров , к передней части объектива невозможно прикрепить
какие- либо принадлежности, например преобразовательный объектив
или адаптер, и использовать вместе с объективом.
Прикрепление таких принадлежностей может привести к
повреждению объектива.
К данному объективу можно прикрепить телеконвертер
(DMW-TC14/DMW-TC20).
( По состоянию на август 2023 г.)
Последнюю информацию о совместимых телеконвертерах см. на
нашем веб-сайте.
Не прикрепляйте никаких других компонентов, кроме
совместимого телеконвертера, так как это может привести к
повреждению объектива или телеконвертера либо отрицательно
повлиять на их работу.
Прикрепление телеконвертера
1 Поверните кольцо трансфокатора, чтобы приблизить
фокусное расстояние не на менее чем 250 мм в сторону
режима телефото.
2 Установите переключатель [ZOOM LIMIT] в положение
[ON].
3 Прикрепите телеконвертер.
В инструкции по эксплуатации телеконвертера можно
найти подробную информацию о его прикреплении и
снятии.
После снятия телеконвертера установите переключатель
[ZOOM LIMIT] в положение [OFF].
Используйте переключатель [ZOOM LIMIT] с фокусным
расстоянием, приближенным не менее чем на 250 мм в
сторону режима телефото.
Примечание
Когда прикреплен телеконвертер, объектив может поврежден быть
или испачкан, поэтому обязательно установите переключатель
[ZOOM LIMIT] в положение [ON].
Съемка с прикрепленным телеконвертером при фокусном
расстоянии ближе 210 мм в сторону широкоугольного режима будет
невозможна, а также остановится видеозапись. Когда
переключатель [ZOOM LIMIT] установлен в положение [ON],
фокусное расстояние время во операций трансфокации ограничено
значениями от 210 мм до 400 мм. Не пытайтесь принудительно
приблизить трансфокатор к широкоугольному режиму, так как это
может привести к неисправности.
С прикрепленным телеконвертером (DMW-TC14) диафрагменное
число изменяется на одну ступень в сторону затемнения.
С прикрепленным телеконвертером (DMW-TC20) диафрагменное
число изменяется на две ступени в сторону затемнения.
Доступные фокусные расстояния для
съемки с использованием телеконвертера
При использовании DMW-TC14: от 294 мм до 560 мм
При использовании DMW-TC20: от 420 мм до 800 мм
При использовании штатива прикрепите его к креплению для
штатива на объективе. (См. рисунок )
Не рекомендуется прикреплять штатив к креплению для штатива
на цифровой фотокамере во избежание повреждения объектива,
которое может произойти во время переноски объектива.
В следующих случаях, прежде чем прикреплять штатив,
прикрепите к объективу внешнее крепление для штатива,
которое поставляется в комплекте:
Если объектив или цифровая фотокамера соприкасается со
штативом
Если используется батарейная ручка, которая соприкасается
со штативом
Прикрепление внешнего крепления для
штатива (поставляется в комплекте)
(См. рисунок )
1Вставьте винт внешнего крепления для штатива в
крепление для штатива на объективе. (
1
1
1
11
)
2 Поверните винт внешнего крепления для штатива в
направлении, показанном стрелками, чтобы туго его
затянуть.
Не не ударяйте и подвергайте воздействию сильного давления
внешнее крепление для штатива.
Изменение вертикальной/горизонтальной
ориентации (См рисунок. )
Если ослабить ручку блокировки ориентации (
1
), можно
повернуть объектив вместе с цифровой фотокамерой (
2
).
Таким образом, при использовании штатива можно быстро
переключаться между вертикальной и горизонтальной
ориентацией.
Изменив ориентацию, туго затяните ручку блокировки
ориентации и убедитесь, что она не ослаблена.
Не допускайте попадания на объектив инсектицидов и
летучих химических веществ.
При попадании на объектив такие вещества могут повредить
объектив или привести к отслаиванию краски.
Не направляйте объектив на солнце или другие источники
сильного света.
Это может привести к поступлению чрезмерного количества
света и вызвать неисправность возгорание или .
В случае использования в течение длительного времени при
низкой температуре не прикасайтесь непосредственно к объективу.
В холодных местах ( 0 , с температурой ниже oC, например на
лыжных склонах), прямой продолжительный контакт с
объективом может привести к повреждениям кожи. При
длительном использовании объектива надевайте перчатки.
Чтобы удалить загрязнения, осторожно протрите изделие
сухой мягкой тканью без пыли.
Не используйте для чистки такие растворители, как бензин,
разбавитель, спирт, моющие средства для кухни и т.д., поскольку это
может привести к деформации корпуса либо отслоению покрытия.
Не используйте салфетки .с химическими веществами
Не допускайте длительного контакта с объективом изделий из
резины, ПВХ или подобных материалов.
Запрещается разбирать или изделие вносить изменения в.
Если объектив не будет использоваться в течение длительного времени,
рекомендуется хранить его влагопоглотителем вместе с (силикагелем).
Если объектив не использовался в течение длительного
времени, до съемки проверьте все его составные части.
Избегайте использования или хранения объектива в каком-либо
из перечисленных мест, т. к. это может привести к проблемам в
работе или неисправности:
Под воздействием прямых солнечных лучей на или пляже летом
В с высокой местах температурой и влажностью или резкими
перепадами температуры и влажности
В с местах большим количеством пыли или песка
Возле огня
Возле обогревателей, кондиционеров или увлажнителей
В с местах рядом водой, где объектив может намокнуть
Где присутствует вибрация
В автомобиле
См. также инструкцию по эксплуатации цифровой фотокамеры.
Этот звук вызван перемещением внутренних линз или работой
диафрагмы и не свидетельствует о неисправности.
Для улучшения работы изделия его технические характеристики
могут быть изменены.
СМЕННЫЙ ОБЪЕКТИВ ДЛЯ ЦИФРОВОЙ ФОТОКАМЕРЫ
“LEICA DG VARIO-ELMAR 100-400mm/F4.0-6.3
ASPH./POWER
O.I.S.
Информация для покупателя
Установленный производителем в п порядке . 2 ст. 5 Федерального
Закона РФО защите прав потребителейсрок службы данного
изделия равен 7 годам с даты производства при условии, что изделие
используется в строгом соответствии с настоящей инструкцией по
эксплуатации и применимыми техническими стандартами.
Импортёр
ООО «Панасоник Рус»
Россия, 115162, Москва, ул. Шаболовка, .31д Г, этаж/ помещение
антресоль 1этажа/10
тел. 8-800-200-21-00
Información para su seguridad
Eliminación de Aparatos Viejos
Solamente para la Unión Europea y países con
sistemas de reciclado.
Este símbolo en los productos, su embalaje o en los
documentos que los acompañen significa que los
productos eléctricos y electrónicos usadas no deben
mezclarse con los residuos domésticos.
Para el adecuado tratamiento, recuperación y reciclaje
de los productos viejos llévelos a los puntos de recogida
de acuerdo con su legislacn nacional.
Si los elimina correctamente ayudará a preservar
valiosos recursos y evitará potenciales efectos
negativos sobre la salud de las personas y sobre el medio ambiente.
Para más información sobre la recogida o reciclaje, por favor
contacte con su ayuntamiento.
Puede haber sanciones por una incorrecta eliminación de este
residuo, de acuerdo con la legislación nacional.
Prevención contra las averías
1
1GE2Z233CXZ
2
3
5
4
2GE8Z233CXZ
1GE1Z136Z
SFC0360
1ZE4Z233CXZ
1 2 3 4 5 6 7 8
9
10
11
14
12
13
1
2
3
4
3
2
1
ESPAÑOL
B
Accesorios suministrados
C
Nombres y funciones de los
componentes
[LOCK]: Bloquea el anillo del zoom.
[UNLOCK]: Desbloquea el anillo del zoom.
D
Colocar la lente
E
Cómo usar las viseras de la lente
F
Uso del tele convertidor (opcional)
G
Cómo usar el montaje del trípode
Precauciones para el uso
Búsqueda de averías
Cuando se enciende o apaga la cámara digital o cuando se
sacude la lente, se oye un sonido de traqueteo.
Hay un sonido que proviene de la lente cuando se toman imágenes.
Especificaciones
Montura
Montaje Micro Four Thirds
Longitud focal
f=100 mm a 400 mm (Igual a una cámara de película de 35 mm:
200 mm a 800 mm)
Estructura de la lente
20 elementos en 13 grupos (1 lente ED asféricas, 1 lente UED,
2 lentes ED)
Tipo de abertura
9 aspas de diafragma/Diafragma de apertura circular
Apertura máxima
F4.0 (Gran angular) a F6.3 (Teleobjetivo)
Valor de abertura mínimo
F22
Ángulo visual
12x (Gran angular) a 3,1o (Teleobjetivo)
En la distancia del enfoque
[FULL]: 1,3 m (4,27 pies) a / [5 m-]: 5,0 m (16,4 pies) a
(desde la línea de referencia de la distancia de enfoque)
Máxima ampliación de la imagen
0,25k (Igual a una cámara de película de 35 mm: 0,5k)
Estabilizador óptico de la imagen
Diámetro del filtro
72 mm
Diámetro máximo
83,0 mm (3,3q)
Longitud total
Aprox. 171,5 mm (6,8q)
(desde la punta de la lente en hasta el lado
base del montaje de la lente)
Masa
Aprox. 985 g (2,17 lb) (excluyendo el montaje del trípode externo)
Resistencia al polvo y a las salpicaduras
Temperatura de funcionamiento recomendada
j o o o o10 C a 40 C (14 F a 104 F)
Humedad relativa admisible
10 %RH a 80 %RH
Informazioni per la sua sicurezza
Smaltimento di vecchie apparecchiature
Solo per Unione Europea e Nazioni con sistemi di
raccolta e smaltimento
Questo simbolo sui prodotti, sull’imballaggio e/o sulle
documentazioni o manuali accompagnanti i prodotti
indica che i prodotti elettrici, elettronici non devono
essere smaltiti come rifiuti urbani p2-ma deve essere
effettuata una raccolta separata.
Per un trattamento adeguato, recupero e riciclaggio di
vecchi prodotti vi invitiamo a consegnarli agli appositi
punti di raccolta secondo la legislazione vigente nel
vostro paese.
Con uno smaltimento corretto, contribuirete a salvare
importanti risorse e ad evitare i potenziali effetti negativi sulla salute
umana e sull’ambiente.
Per ulteriori informazioni su raccolta e riciclaggio, vi invitiamo a
contattare il vostro comune.
Lo smaltimento non corretto di questi rifiuti potrebbe comportare
sanzioni in accordo con la legislazione nazionale.
Prevenzione guasti
B
Accessori in dotazione
C
Nomi e funzioni dei componenti
[LOCK]: Blocca la ghiera dello zoom.
[UNLOCK]: Sblocca la ghiera dello zoom.
ITALIANO
D
Installazione dell’obiettivo
E
Utilizzo dei paraluci
F
Utilizzo del Teleconverter (opzionale)
G
Utilizzo dell'attacco del treppiede
Precauzioni per l’uso
Ricerca guasti
Quando si accende o si spegne la fotocamera digitale o si scuote
l’obiettivo, si sente un tintinnio.
Quando si scattano foto si sente un suono proveniente dall’obiettivo.
Specifiche
Supporto
Micro Four Thirds Mount
Distanza focale
f=100 mm a 400 mm (equivalente per fotocamera con pellicola da
35 mm: 200 mm a 800 mm)
Costruzione dell’obiettivo
20 elementi in 13 gruppi (1 lente ED asferiche, 1 lente UED, 2 lenti
ED)
Tipo di apertura
Diaframma con 9 lamelle/Diaframma ad apertura circolare
Apertura massima
F4.0 (Gran angular) a F6.3 (Teleobjetivo)
Valore minimo dell’apertura
F22
Profondità di campo
12x (Gran angular) a 3,1o (Teleobjetivo)
Distanza di messa a fuoco
[FULL]: 1,3 m a / [5 m-]: 5,0 m a (dalla linea di riferimento
della distanza di messa a fuoco)
Ingrandimento massimo dell’immagine
0,25k (equivalente per fotocamera con pellicola da 35 mm: 0,5k)
Stabilizzatore ottico di immagine
Diametro filtro
72 mm
Diametro massimo
83,0 mm
Lunghezza complessiva
Circa 171,5 mm (dall’estremità dell’obiettivo al lato di base del
supporto dell’obiettivo)
Massa
Circa 985 g (escluso l'attacco del treppiede esterno)
Resistenza alla polvere ed agli schizzi
Temperatura operativa raccomandata
j o o10 C a 40 C
Umidità relativa accettabile
10 %RH a 80 %RH
安全
安全
安全
安全安全
操作
操作
操作
操作操作照表
照表
照表
照表照表
B
提供的配
提供的配
提供的配
提供的配提供的配
C
元件
元件
元件
元件元件
[LOCK]:
變焦環
[UNLOCK]:
解鎖變焦環
D
E
使
使
使
使使
F
使距鏡
使距鏡
使距鏡
使距鏡使距鏡
G
使
使
使
使使
使
使
使
使使
中文
中文
中文
中文中文
( )
數位相機啟或關閉或晃動
數位相機啟或關閉或晃動
數位相機啟或關閉或晃動
數位相機啟或關閉或晃動數位相機啟或關閉或晃動
會聽到喀噠聲等
會聽到喀噠聲等
會聽到喀噠聲等
會聽到喀噠聲等會聽到喀噠聲等
拍攝過程
拍攝過程
拍攝過程
拍攝過程拍攝過程
規格
規格
規格
規格規格
接口
接口
接口
接口接口
Micro Four Thirds 接口
焦距
焦距
焦距
焦距焦距
f=100 mm 400 mm 相當菲林相機35 mm 200 mm
800 mm
結構
結構
結構
結構結構
20 13 鏡片1 ED 1 UED 鏡片2ED 鏡片
光圈
光圈
光圈
光圈光圈
9 /光圈葉片 圓形光圈
光圈
光圈
光圈
光圈光圈
F4.0 F6.3
光圈
光圈
光圈
光圈小光圈值
F22
視角
視角
視角
視角視角
12x 3.1x
In focus
[FULL] : 1.3 m / [5 m- ] : 5.0 m從對焦距準線開
影像
影像
影像
影像影像
0.25k 相當菲林相機35 mm 0.5k
光學影像定器
光學影像定器
光學影像定器
光學影像定器光學影像定器
濾鏡
濾鏡
濾鏡
濾鏡濾鏡
72 mm
83.0 mm
總長
總長
總長
總長
171.5 mm 接口面)
重量
重量
重量
重量重量
985 g不包括外腳架台座
防濺
防濺
防濺
防濺防濺
j o o10 C 40 C
的相
的相
的相
的相的相
10 %RH 80 %RH
Информация для вашей безопасности
Правила эксплуатации
B
Принадлежности, входящие в
комплект
C
Названия и функции составных частей
[LOCK]: Кольцо трансфокатора блокируется.
[UNLOCK]: Кольцо трансфокатора разблокируется.
Panasonic Entertainment
& Communication Co., Ltd.
РУССКИЙ ЯЗЫК
D
Прикрепление объектива
E
Использование бленд объектива
F
Использование телеконвертера
(поставляется отдельно)
G
Использование крепления для
штатива
Предосторожности при использовании
фотокамеры
Устранение неисправностей
При включении или выключении цифровой фотокамеры
либо сотрясении объектива раздается дребезжащий звук.
При объектива съемке из раздается звук.
Технические характеристики
Крепление
Крепление Micro Four Thirds
Фокусное расстояние
f=100 мм до 400 мм (Эквивалент 35 мм пленочной камеры: от
200 мм )до 800 мм
Конструкция объектива
20 элементов в 13 группах (1 асферическая линза из стекла ED,
1 линза из стекла UED, 2 линзы из стекла ED)
Тип диафрагмы
9 /лепестков диафрагмы кольцевая диафрагма
Максимальный показатель диафрагмы
F4.0 (Широкоугольный режим) до F6.3 (Телережим)
Минимальное значение диафрагмы
F22
Угол обзора
12x (Широкоугольный режим) до 3,1x (Телережим)
Фокусное расстояние от
[FULL]: от 1,3 м до / [5 m-]: от 5,0 м до ( от линии отсчета
расстояния до объекта съемки)
Максимальное увеличение изображения
0,25k (Эквивалент 35 мм пленочной камеры: 0,5k)
Оптический стабилизатор изображения
Да
Диаметр фильтра
72 мм
Максимальный диаметр
83,0 мм
Полная длина
Прибл. 171,5 мм (от края объектива до основания крепления
объектива)
Масса
Прибл. 985 г (без внешнего крепления )для штатива
Пылезащищённость и брызгозащищенность
Да
Рекомендуемая рабочая температура
O Cтj10 oC до 40 o
Допустимая относительная влажность
Oт 10 %RH до 80 %RH
Название продукции
Сменный объектив для
цифровой фотокамеры
Страна производства Китай
Название производителя
Панасоник Энтертейнмент
энд Коммюникейшн Ко., Лтд.
Юридический адрес
1-10-12 Ягумо- - хигаши мати, Моригути
Сити, Осака 570-0021, Япония
Дата производства: Вы можете уточнить и год месяц по
серийному номеру на табличке.
Пример маркировкиСерийный номер XX1AXXXXXXX
(X-любая цифра или буква)
Год: Третья цифра в серийном )номере (1 , ... 02021 2022, 2 2030
Месяц: Четвертая yб ква в серийном номере (A—Январь,
B—Февраль, ...L—Декабрь)
Примечание: Сентябрь может указываться как “S” вместо “I”.
Дополнительная информация
Пожалуйста внимательно прочитайте
инструкцию по эксплуатации.


Produkt Specifikationer

Mærke: Panasonic
Kategori: Linse
Model: H-RSA100400

Har du brug for hjælp?

Hvis du har brug for hjælp til Panasonic H-RSA100400 stil et spørgsmål nedenfor, og andre brugere vil svare dig